2

PAN BURNER ORIFICE CONVERSION

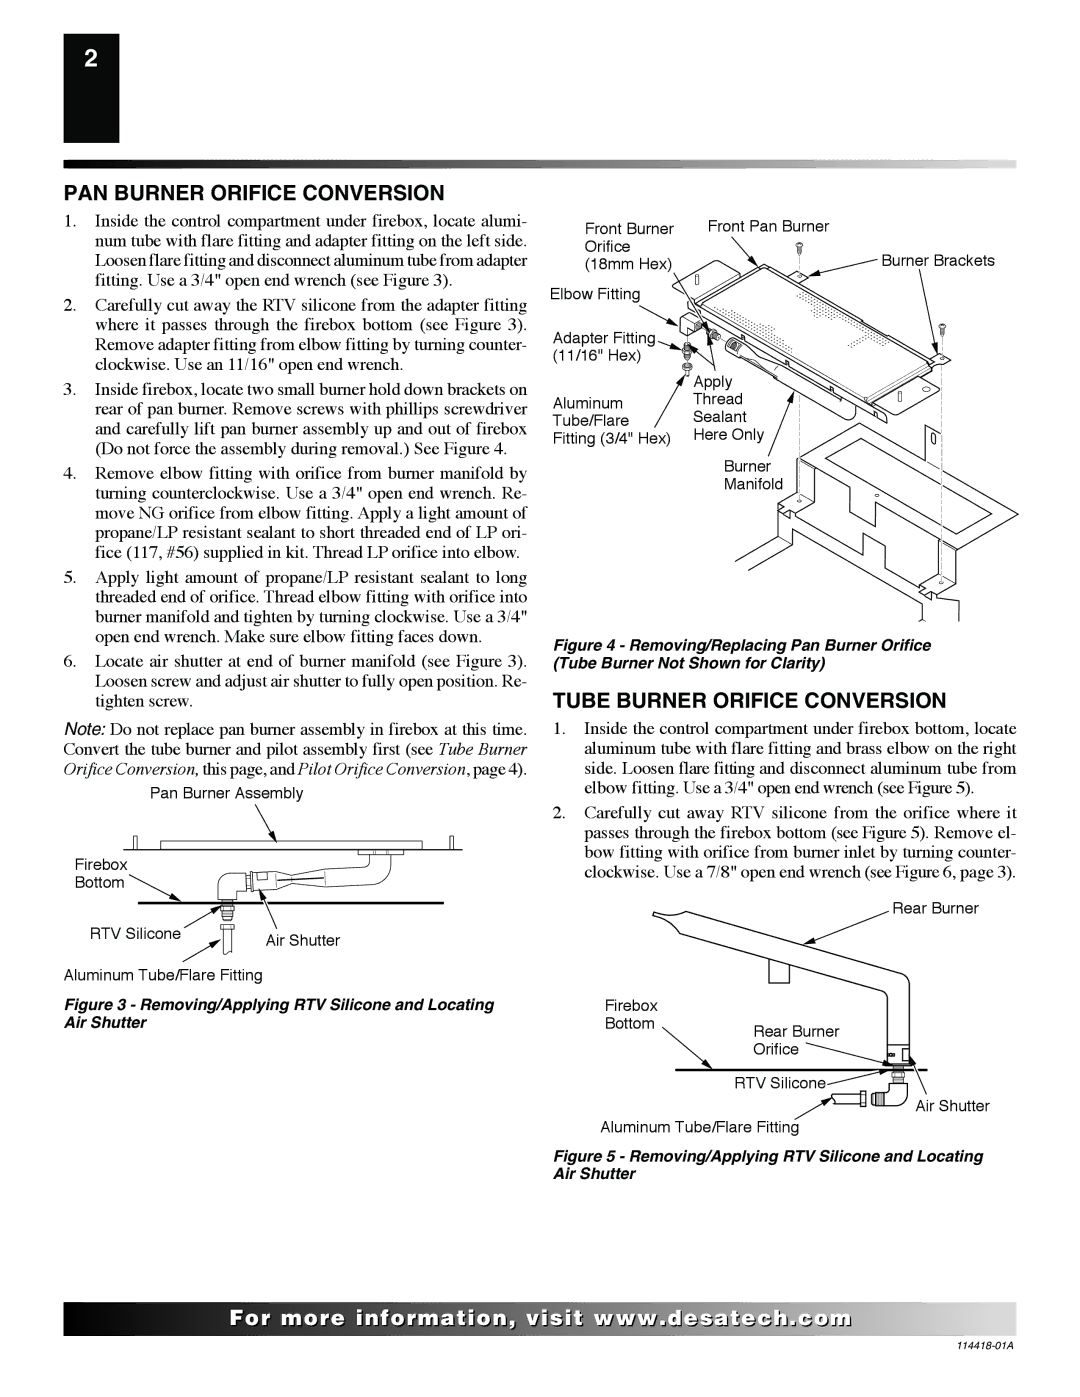
1.Inside the control compartment under firebox, locate alumi- num tube with flare fitting and adapter fitting on the left side. Loosen flare fitting and disconnect aluminum tube from adapter fitting. Use a 3/4" open end wrench (see Figure 3).

2.Carefully cut away the RTV silicone from the adapter fitting where it passes through the firebox bottom (see Figure 3). Remove adapter fitting from elbow fitting by turning counter- clockwise. Use an 11/16" open end wrench.

3.Inside firebox, locate two small burner hold down brackets on rear of pan burner. Remove screws with phillips screwdriver and carefully lift pan burner assembly up and out of firebox (Do not force the assembly during removal.) See Figure 4.

4.Remove elbow fitting with orifice from burner manifold by turning counterclockwise. Use a 3/4" open end wrench. Re- move NG orifice from elbow fitting. Apply a light amount of propane/LP resistant sealant to short threaded end of LP ori- fice (117, #56) supplied in kit. Thread LP orifice into elbow.

5.Apply light amount of propane/LP resistant sealant to long threaded end of orifice. Thread elbow fitting with orifice into burner manifold and tighten by turning clockwise. Use a 3/4" open end wrench. Make sure elbow fitting faces down.

6.Locate air shutter at end of burner manifold (see Figure 3). Loosen screw and adjust air shutter to fully open position. Re- tighten screw.

Note: Do not replace pan burner assembly in firebox at this time. Convert the tube burner and pilot assembly first (see Tube Burner Orifice Conversion, this page, and Pilot Orifice Conversion, page 4).

Pan Burner Assembly

Firebox

Bottom

Front Burner

Front Pan Burner

Orifice

Burner Brackets

(18mm Hex)

Elbow Fitting


Adapter Fitting


(11/16" Hex)


Apply

Aluminum

Thread

Tube/Flare

Sealant

Fitting (3/4" Hex)

Here Only


Burner


Manifold

Figure 4 - Removing/Replacing Pan Burner Orifice (Tube Burner Not Shown for Clarity)

TUBE BURNER ORIFICE CONVERSION

1.Inside the control compartment under firebox bottom, locate aluminum tube with flare fitting and brass elbow on the right side. Loosen flare fitting and disconnect aluminum tube from elbow fitting. Use a 3/4" open end wrench (see Figure 5).

2.Carefully cut away RTV silicone from the orifice where it passes through the firebox bottom (see Figure 5). Remove el- bow fitting with orifice from burner inlet by turning counter- clockwise. Use a 7/8" open end wrench (see Figure 6, page 3).

RTV Silicone

Air Shutter


Aluminum Tube/Flare Fitting

Figure 3 - Removing/Applying RTV Silicone and Locating Air Shutter

Firebox Bottom

Rear Burner

Rear Burner

Orifice

RTV Silicone

Air Shutter

Aluminum Tube/Flare Fitting

Figure 5 - Removing/Applying RTV Silicone and Locating

Air Shutter

For..com

114418-01A

Page 2
Image 2
Desa PCDM-36VB installation instructions PAN Burner Orifice Conversion, Tube Burner Orifice Conversion

PCDM-36VB specifications

The Desa PCDM-36VB is an innovative and expertly designed heat pump that stands at the forefront of modern heating and cooling technology. This unit is a game-changer for both residential and commercial applications, offering efficiency, reliability, and versatility. The PCDM-36VB is particularly notable for its ability to operate in a wide range of temperatures, making it suitable for various climatic conditions.

One of the standout features of the Desa PCDM-36VB is its impressive energy efficiency rating. Equipped with advanced inverter technology, it optimizes energy consumption by adjusting its compressor speed based on the heating or cooling demand. This results in lower energy bills and reduced environmental impact, aligning perfectly with today’s emphasis on sustainability.

The unit is designed with a dual function, allowing it to provide both heating in colder months and cooling during the summer. This versatility is supported by its robust heating capacity, making it a reliable choice for year-round comfort. The PCDM-36VB has a heating capacity that can effectively warm spaces even when temperatures plummet outside, ensuring a consistent indoor climate.

Another notable characteristic of this heat pump is its advanced filtration system. The built-in air purification technology not only ensures that the air circulated within a space is clean and fresh but also aids in reducing allergens and airborne particles. This feature is particularly beneficial for those who suffer from allergies or respiratory issues.

The Desa PCDM-36VB is user-friendly, featuring a smart control system that allows users to adjust settings via a mobile app or remote control. This feature enhances convenience, enabling users to set schedules, switch modes, and monitor energy usage from anywhere, ensuring optimal comfort at all times.

Moreover, the unit operates quietly, making it an ideal choice for residential installations where noise levels can be a concern. The compact design also allows for easy installation in various locations, while its durable construction ensures longevity and low maintenance costs.

In summary, the Desa PCDM-36VB is a highly efficient, versatile, and technologically advanced heat pump. With its dual functionality, superior energy efficiency, advanced filtration, and user-friendly features, it represent a cutting-edge solution for comfortable living and working environments.