INSTALLATION
Check Gas Type Clearances to Combustibles
7
INSTALLATION
Continued
![]() WARNING: Never install the heater
WARNING: Never install the heater
• in a bedroom or bathroom | |
• | in a recreational vehicle |
• | where curtains, furniture, clothing, or other flam- |
Ceiling
48"
Front View
| mable objects are less than 42 inches from the |
| front, top, or sides of the heater |
• | in high traffic areas |
• | in windy or drafty areas |
![]() CAUTION: This heater creates warm air currents. These currents move heat to wall surfaces next to heater. Installing heater next to vinyl or cloth wall coverings or operating heater where impurities (such as, but not limited to, tobacco smoke, aromatic candles, cleaning fluids, oil or kerosene lamps, etc.) in the air exist, may discolor walls or cause odors.
CAUTION: This heater creates warm air currents. These currents move heat to wall surfaces next to heater. Installing heater next to vinyl or cloth wall coverings or operating heater where impurities (such as, but not limited to, tobacco smoke, aromatic candles, cleaning fluids, oil or kerosene lamps, etc.) in the air exist, may discolor walls or cause odors.
IMPORTANT:
CHECK GAS TYPE
Use the correct gas type (natural or propane/LP) for your unit. If your stove heater gas type is different from your house gas type, do not install heater. Call dealer where you bought heater for proper type heater.
CLEARANCES TO COMBUSTIBLES (Vent-Free Operation Only)
![]() WARNING: Maintain the minimum clearances. If you can, provide greater clearances from floor, ceil- ing, and adjoining side and back walls.
WARNING: Maintain the minimum clearances. If you can, provide greater clearances from floor, ceil- ing, and adjoining side and back walls.
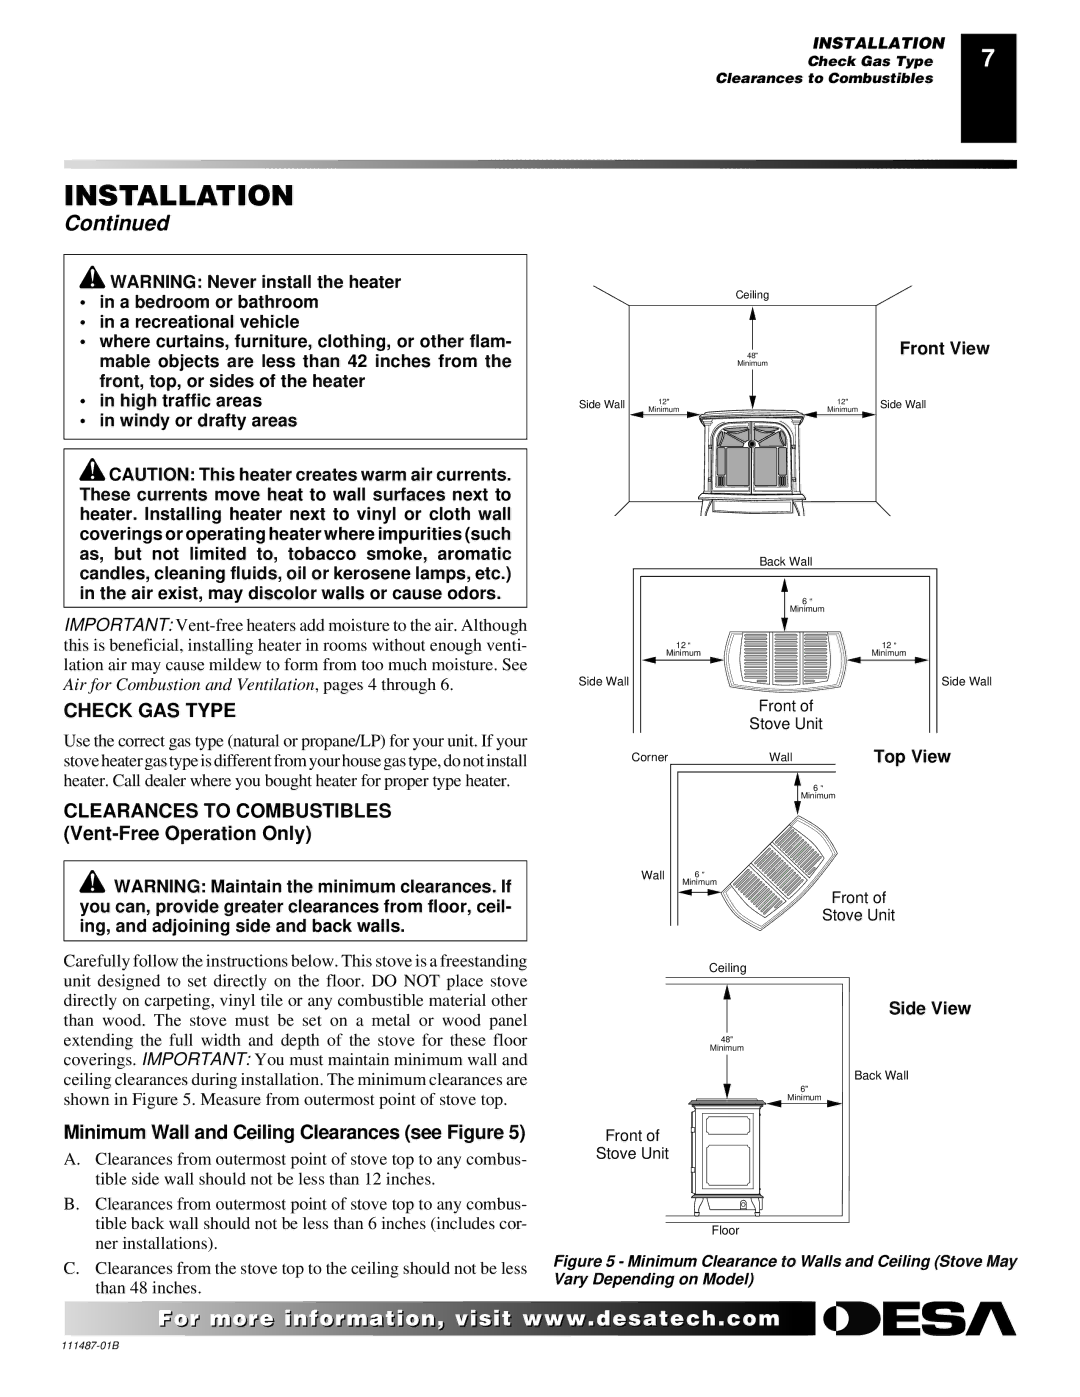
Carefully follow the instructions below. This stove is a freestanding unit designed to set directly on the floor. DO NOT place stove directly on carpeting, vinyl tile or any combustible material other than wood. The stove must be set on a metal or wood panel extending the full width and depth of the stove for these floor coverings. IMPORTANT: You must maintain minimum wall and ceiling clearances during installation. The minimum clearances are shown in Figure 5. Measure from outermost point of stove top.
Minimum Wall and Ceiling Clearances (see Figure 5)
A.Clearances from outermost point of stove top to any combus- tible side wall should not be less than 12 inches.
B.Clearances from outermost point of stove top to any combus- tible back wall should not be less than 6 inches (includes cor- ner installations).
C.Clearances from the stove top to the ceiling should not be less than 48 inches.
Minimum
Side Wall | 12" |
| 12" | Side Wall | |
Minimum |
|
| Minimum | ||
|
|
| |||
| Back Wall |
|
| 6 " |
|
| Minimum |
|
12 " |
| 12 " |
Minimum |
| Minimum |
Side Wall |
| Side Wall |
| Front of |
|
| Stove Unit |
|
Corner | Wall | Top View |
| 6 " |
|
| Minimum |
|
Wall | 6 " |
| Minimum |
Front of
Stove Unit
Ceiling
Side View
48"
Minimum
Back Wall
6"
Minimum
Front of
Stove Unit
Floor
Figure 5 - Minimum Clearance to Walls and Ceiling (Stove May Vary Depending on Model)
For more![]()
![]()
![]() visit www.
visit www.![]()
![]()
![]() .com
.com![]()
![]()
![]()
![]()
![]()
