OPERATING HEATER

Continued

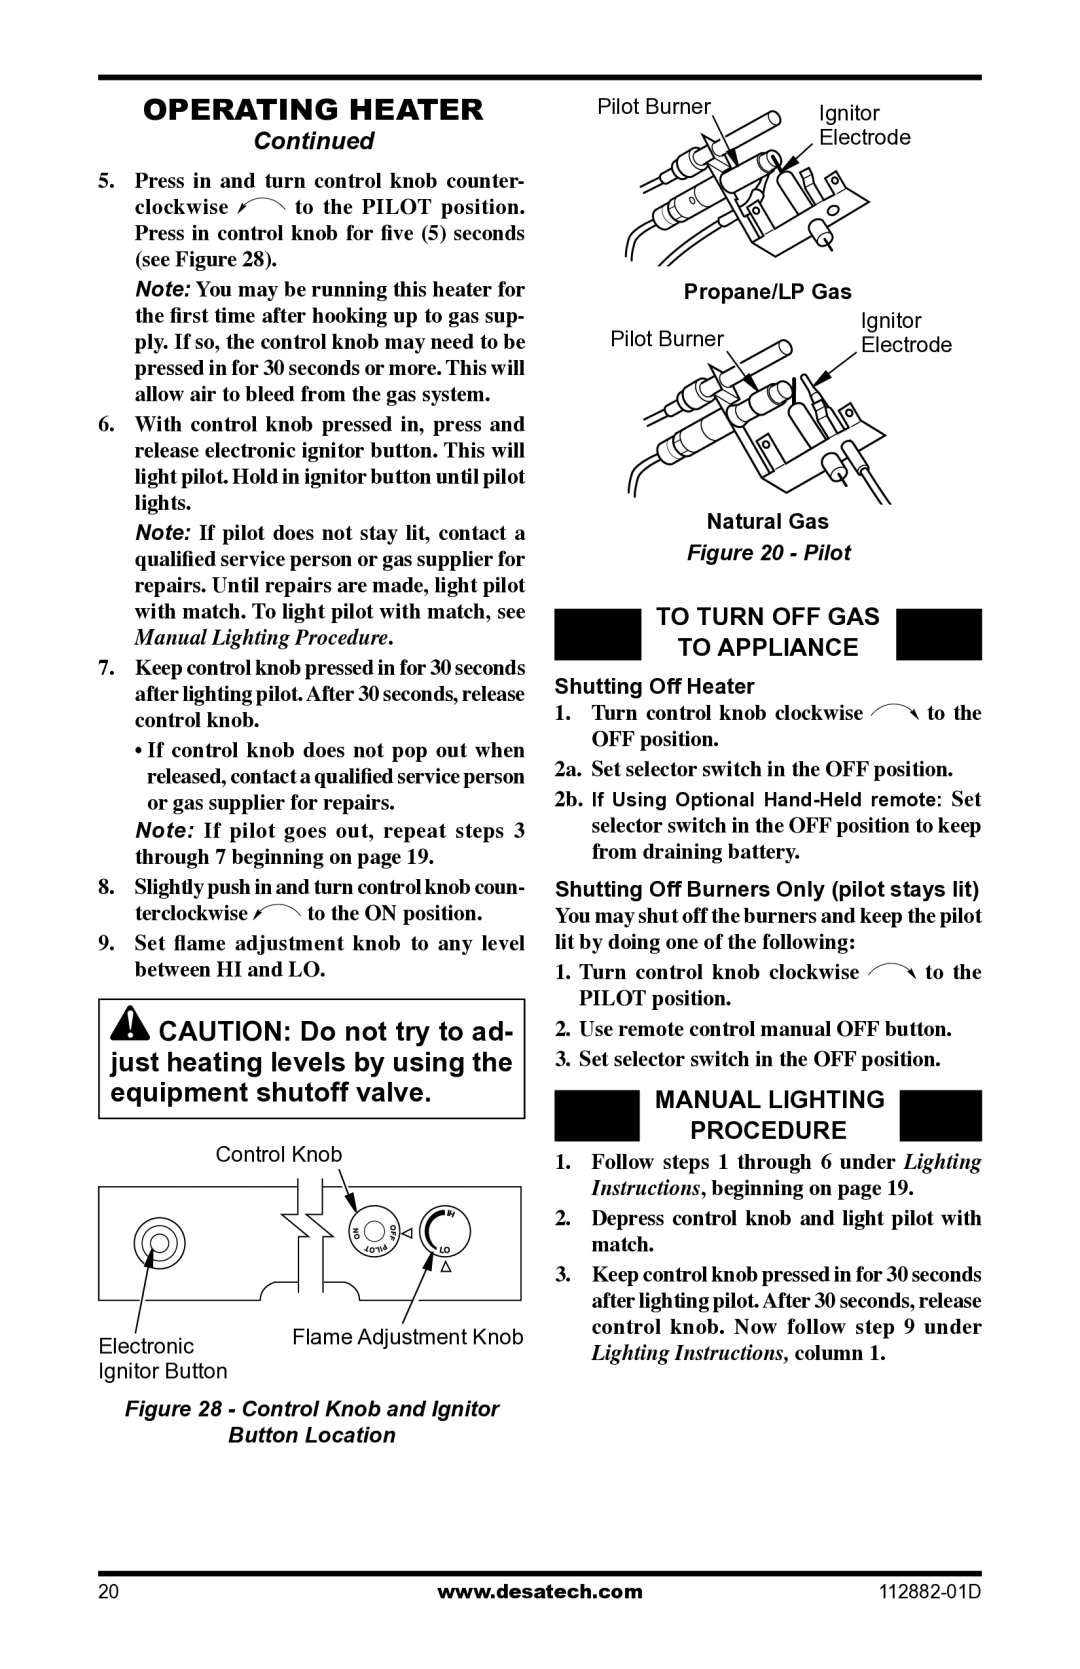
5.Press in and turn control knob counter-

clockwise to the PILOT position. Press in control knob for five (5) seconds (see Figure 28).

Note: You may be running this heater for the first time after hooking up to gas sup- ply. If so, the control knob may need to be pressed in for 30 seconds or more. This will allow air to bleed from the gas system.

6.With control knob pressed in, press and release electronic ignitor button. This will light pilot. Hold in ignitor button until pilot lights.

Note: If pilot does not stay lit, contact a qualified service person or gas supplier for repairs. Until repairs are made, light pilot with match. To light pilot with match, see Manual Lighting Procedure.

7.Keep control knob pressed in for 30 seconds after lighting pilot. After 30 seconds, release control knob.

If control knob does not pop out when released, contact a qualified service person or gas supplier for repairs.

Note: If pilot goes out, repeat steps 3 through 7 beginning on page 19.

8.Slightly push in and turn control knob coun-

terclockwise to the ON position.

9.Set flame adjustment knob to any level between HI and LO.

CAUTION: Do not try to ad- just heating levels by using the equipment shutoff valve.

Control Knob

Electronic

Flame Adjustment Knob


Ignitor Button


Figure 28 - Control Knob and Ignitor


Button Location

Pilot Burner

Ignitor


Electrode

Propane/LP Gas


Pilot Burner

Ignitor

Electrode


Natural Gas

Figure 20 - Pilot

TO TURN OFF GAS

TO APPLIANCE

Shutting Off Heater

1.Turn control knob clockwise to the OFF position.

2a.

Set selector switch in the OFF position.

2b.

If Using Optional Hand-Held remote: Set


selector switch in the OFF position to keep


from draining battery.

Shutting Off Burners Only (pilot stays lit)

You may shut off the burners and keep the pilot

lit by doing one of the following:

1.Turn control knob clockwise to the PILOT position.

2.Use remote control manual OFF button.

3.Set selector switch in the OFF position.

MANUAL LIGHTING

PROCEDURE

1.Follow steps 1 through 6 under Lighting Instructions, beginning on page 19.

2.Depress control knob and light pilot with match.

3.Keep control knob pressed in for 30 seconds after lighting pilot. After 30 seconds, release control knob. Now follow step 9 under Lighting Instructions, column 1.

20

www.desatech.com

112882-01D

Page 20
Image 20
Desa VGL18NRA, VGL18PRA, VGL24NRA, VGL24PRA, VGL30NRA, VGL30PRA To Turn OFF GAS To Appliance, Manual Lighting Procedure

VGL18NRA, VGL30PRA, VGL18NRA, VGL18PRA, VGL24NRA, VGL24PRA, VGL30NRA, VGL30PRA specifications

Desa VGL series offers a range of innovative and efficient lighting solutions, primarily catering to various lighting needs in residential and commercial spaces. The models VGL18NRA, VGL18PRA, VGL24NRA, VGL24PRA, VGL30NRA, and VGL30PRA have been designed to provide high-performance lighting while maintaining energy efficiency.

Each model in the Desa VGL lineup features a robust design, making them suitable for diverse environments. The VGL18NRA and VGL18PRA models are known for their compact size, making them ideal for smaller spaces while still delivering powerful illumination. These models utilize advanced LED technology, ensuring a longer lifespan and lower energy consumption compared to traditional lighting solutions.

In contrast, the VGL24NRA and VGL24PRA models offer a step up in brightness and area coverage, making them perfect for medium-sized settings. With enhanced lumen output and superior optical design, these lights can effectively illuminate larger areas, ensuring safety and visibility.

The VGL30NRA and VGL30PRA models harness cutting-edge features, providing maximum brightness and adaptability for larger commercial spaces. These models come equipped with smart technologies, including dimming options and motion sensors, allowing for customized lighting solutions based on specific needs. This makes them an excellent choice for dynamic environments where lighting requirements may change throughout the day.

All models in the Desa VGL series are designed with durability in mind, often featuring weather-resistant enclosures suitable for outdoor installations. Additionally, these lights are easy to install and maintain, making them a practical choice for both professional installations and DIY projects.

In summary, the Desa VGL series, encompassing models VGL18NRA, VGL18PRA, VGL24NRA, VGL24PRA, VGL30NRA, and VGL30PRA, stands out for its versatility, energy efficiency, and advanced technology. These lights not only serve diverse lighting needs across various environments but also promise longevity and reduced energy costs, making them an ideal choice for forward-thinking consumers and businesses alike.