INSTALLATION

Built-In Fireplace Installation (Cont.) Optional Mantel Installation

11

INSTALLATION

Continued

WARNING: Do not allow any combustible materi- als to overlap the firebox front facing.

IMPORTANT: Noncombustible materials such as brick, tile, etc. may overlap the front facing, but should never cover any necessary openings like louvered slots.

NOTICE: If your installation does not meet the mini- mum clearances shown, you must do one of the following:

raise the mantel to an acceptable height

remove the mantel

WARNING: Do not allow noncombustible materials to cover any necessary openings like louvered slots.

WARNING: Never modify or cover the louvered slots on the front of the firebox.

WARNING: Use only noncombustible mortar or adhesives when overlapping the front facing with noncombustible facing material.

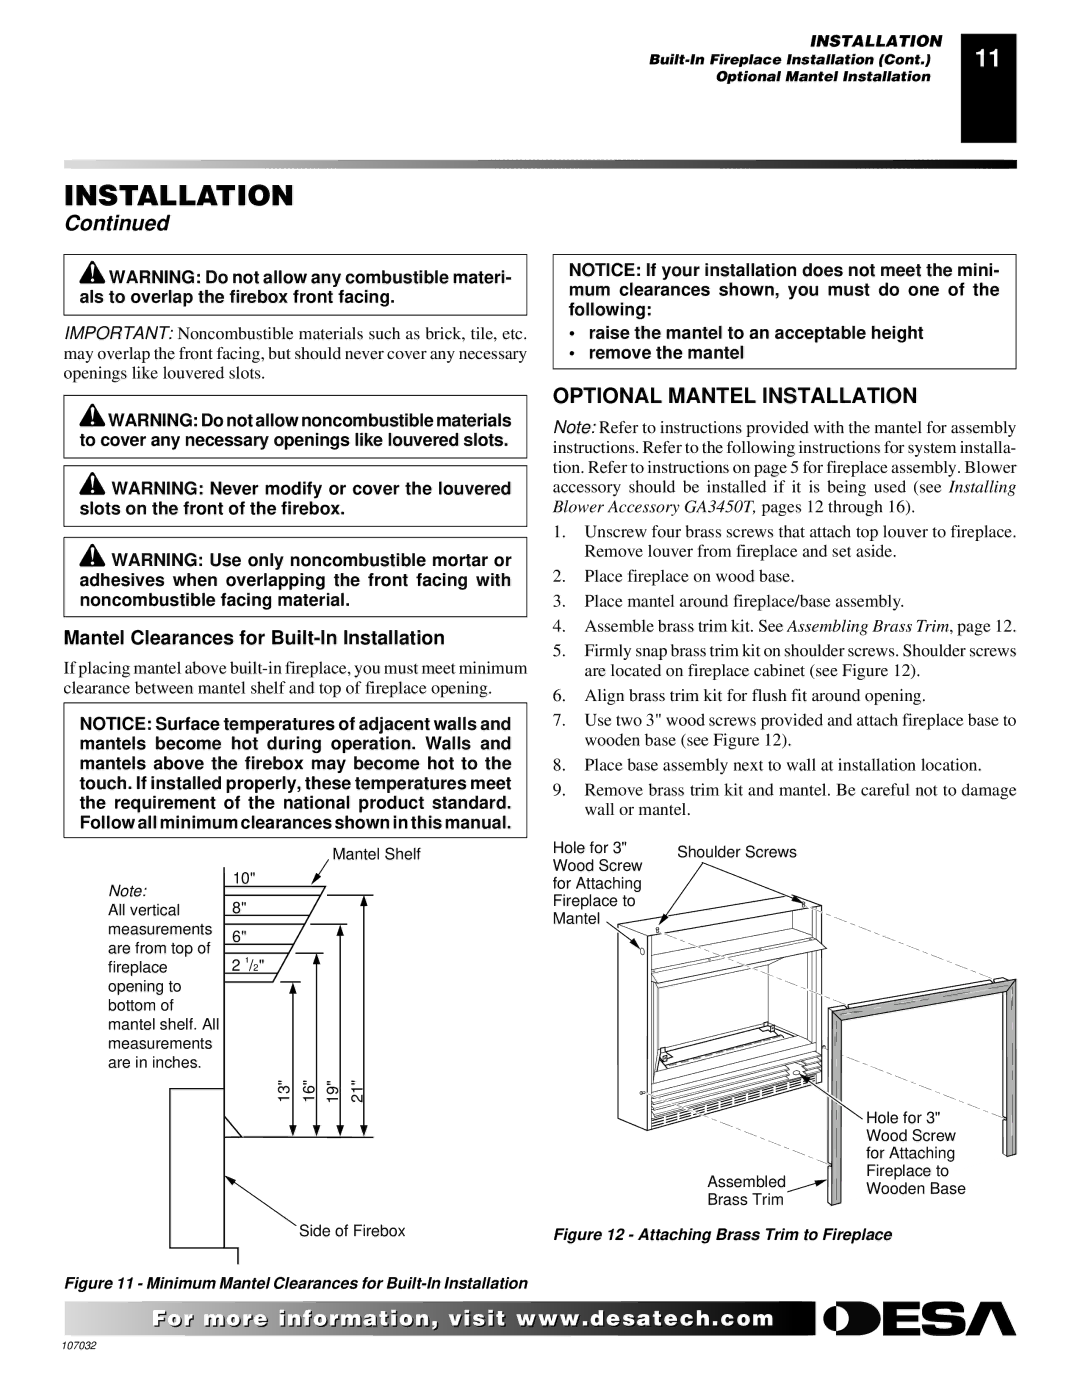
Mantel Clearances for Built-In Installation

If placing mantel above built-in fireplace, you must meet minimum clearance between mantel shelf and top of fireplace opening.

NOTICE: Surface temperatures of adjacent walls and mantels become hot during operation. Walls and mantels above the firebox may become hot to the touch. If installed properly, these temperatures meet the requirement of the national product standard. Follow all minimum clearances shown in this manual.

OPTIONAL MANTEL INSTALLATION

Note: Refer to instructions provided with the mantel for assembly instructions. Refer to the following instructions for system installa- tion. Refer to instructions on page 5 for fireplace assembly. Blower accessory should be installed if it is being used (see Installing Blower Accessory GA3450T, pages 12 through 16).

1.Unscrew four brass screws that attach top louver to fireplace. Remove louver from fireplace and set aside.

2.Place fireplace on wood base.

3.Place mantel around fireplace/base assembly.

4.Assemble brass trim kit. See Assembling Brass Trim, page 12.

5.Firmly snap brass trim kit on shoulder screws. Shoulder screws are located on fireplace cabinet (see Figure 12).

6.Align brass trim kit for flush fit around opening.

7.Use two 3" wood screws provided and attach fireplace base to wooden base (see Figure 12).

8.Place base assembly next to wall at installation location.

9.Remove brass trim kit and mantel. Be careful not to damage wall or mantel.

Note:

10"

8"

All vertical

measurements

6"

are from top of

2 1/2"

fireplace

opening to bottom of mantel shelf. All measurements are in inches.

13"

16"

Mantel Shelf

19"


21"


Hole for 3"

Shoulder Screws

Wood Screw


for Attaching


Fireplace to


Mantel


Hole for 3" Wood Screw for Attaching

Fireplace to

Assembled Wooden Base

Brass Trim

Side of Firebox

Figure 11 - Minimum Mantel Clearances for Built-In Installation

Figure 12 - Attaching Brass Trim to Fireplace

For morevisit www..com

107032

Page 11
Image 11
Desa VMH10TPB installation manual Optional Mantel Installation, Mantel Clearances for Built-In Installation

VMH10TPB specifications

Desa VMH10TPB is a cutting-edge heating solution designed for both residential and commercial applications. This innovative unit is known for its efficiency, advanced technology, and user-friendly features, making it a top choice for consumers looking for reliable heating options.

One of the standout features of the Desa VMH10TPB is its impressive heating capacity. With a maximum output of 10,000 BTUs, this unit is capable of heating spaces effectively, ensuring comfort during the colder months. It is particularly well-suited for areas up to 1,000 square feet, making it ideal for large living rooms, garages, or even small workshops.

The VMH10TPB incorporates advanced infrared heating technology, which provides a more efficient and effective heating experience compared to conventional heaters. Infrared heating warms objects and people directly, rather than just the air, resulting in immediate comfort without the need to wait for the room temperature to rise. This technology also means lower energy costs, as the unit operates at a higher efficiency rate.

Another key characteristic of the Desa VMH10TPB is its ease of use. The unit features a straightforward control panel that allows users to set their preferred temperature with precision. Additionally, it comes with a remote control, providing the convenience of adjusting settings from a distance. This feature is particularly beneficial for those who want to maintain control without having to get up repeatedly.

In terms of safety, the VMH10TPB is equipped with multiple safety features, including an automatic shut-off function and overheating protection. This ensures peace of mind for users, especially in households with children or pets. The durable construction of the unit also adds to its longevity, making it a wise investment for any property owner.

The sleek design of the Desa VMH10TPB allows it to blend seamlessly into various decor styles, whether modern or traditional. Its compact size makes it easy to install and relocate, providing flexibility in heating arrangements.

In conclusion, the Desa VMH10TPB is a powerful and efficient heating solution that combines advanced heating technology with user-friendly features and robust safety measures. With its high output capacity, infrared heating efficiency, and thoughtful design, it is a standout choice for anyone in need of reliable and effective heating.