OWNER’S MANUAL

INSTALLING TO WALL

Continued

Installing Two Mounting Screws

Note: Wall anchors and mounting screws are in hardware package. The hardware pack- age is provided with heater.

Attaching to wall stud method

For attaching mounting screw to wall stud

1.Drill hole at marked location using 9/64" drill bit.

2.Insert mounting screw into wall stud.

3.Tighten screw until 1/16" space (thick- ness of penny) is between screwhead and wall.

Attaching to wall anchor method

Follow instructions below to attach mount- ing screws to hollow walls (wall areas be- tween studs) or solid walls (concrete or masonry).

1.Drill holes at marked locations using 5/16" drill bit. For solid walls (concrete or masonry), drill at least 1 1/4" deep.

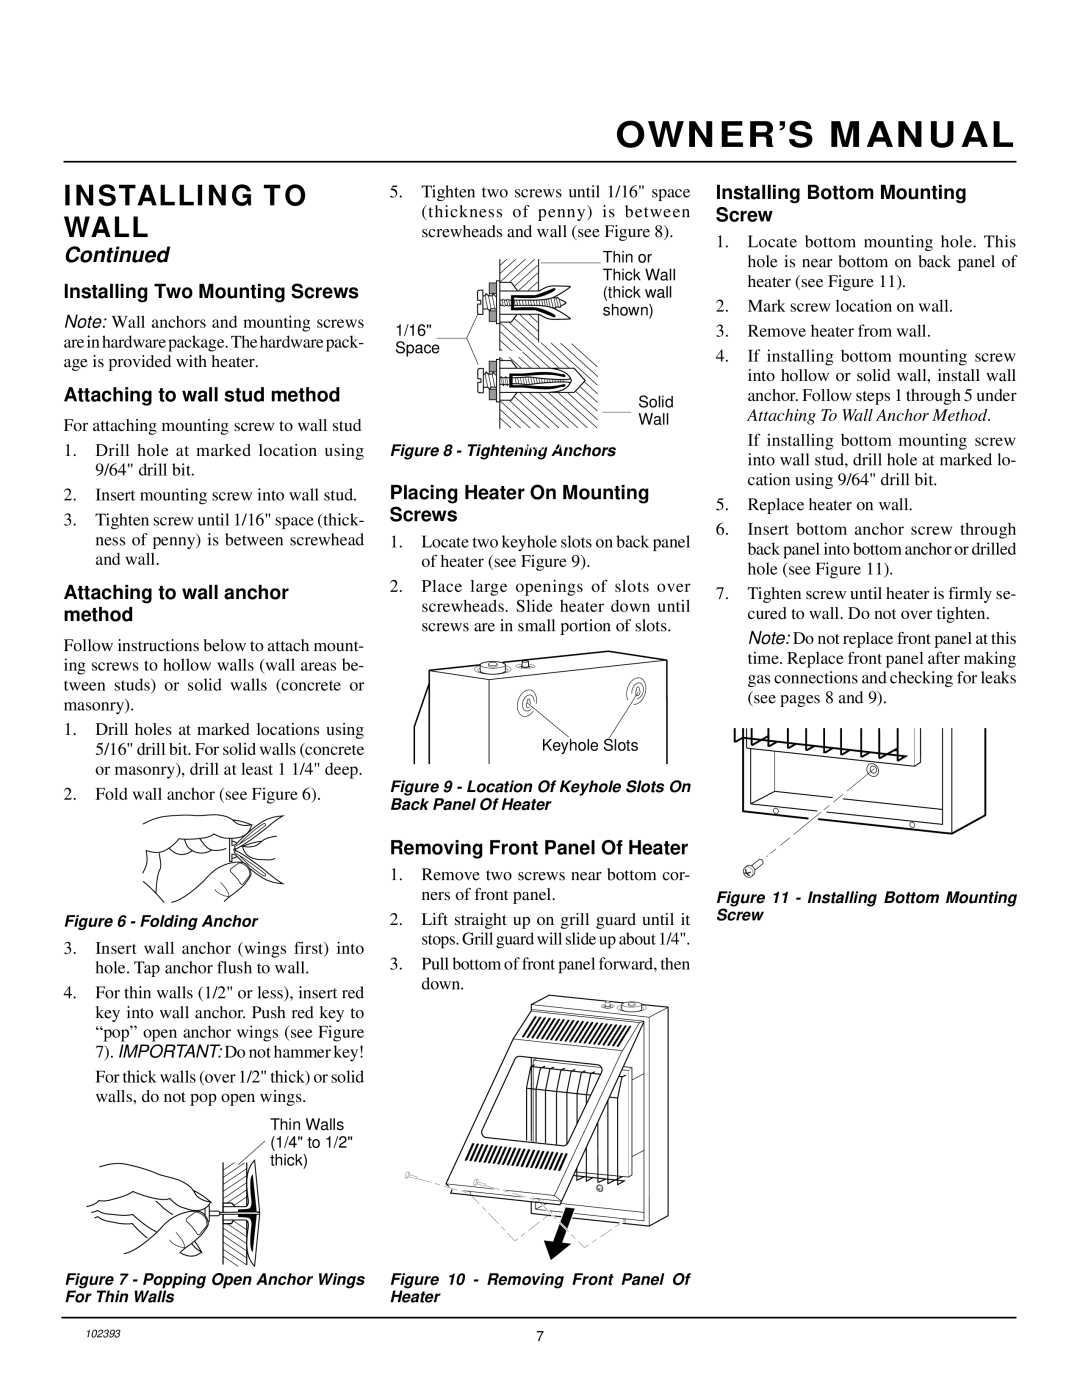
2.Fold wall anchor (see Figure 6).

Figure 6 - Folding Anchor

3.Insert wall anchor (wings first) into hole. Tap anchor flush to wall.

4.For thin walls (1/2" or less), insert red key into wall anchor. Push red key to “pop” open anchor wings (see Figure 7). IMPORTANT: Do not hammer key!

For thick walls (over 1/2" thick) or solid walls, do not pop open wings.

Thin Walls (1/4" to 1/2" thick)

5.Tighten two screws until 1/16" space (thickness of penny) is between screwheads and wall (see Figure 8).

Thin or Thick Wall

(thick wall

shown)

1/16" Space

Solid

Wall

ANCHOR

Figure 8 - Tightening Anchors

Placing Heater On Mounting Screws

1.Locate two keyhole slots on back panel of heater (see Figure 9).

2.Place large openings of slots over screwheads. Slide heater down until screws are in small portion of slots.

Keyhole Slots

Figure 9 - Location Of Keyhole Slots On Back Panel Of Heater

Removing Front Panel Of Heater

1.Remove two screws near bottom cor- ners of front panel.

2.Lift straight up on grill guard until it stops. Grill guard will slide up about 1/4".

3.Pull bottom of front panel forward, then down.

Installing Bottom Mounting Screw

1.Locate bottom mounting hole. This hole is near bottom on back panel of heater (see Figure 11).

2.Mark screw location on wall.

3.Remove heater from wall.

4.If installing bottom mounting screw into hollow or solid wall, install wall anchor. Follow steps 1 through 5 under Attaching To Wall Anchor Method.

If installing bottom mounting screw into wall stud, drill hole at marked lo- cation using 9/64" drill bit.

5.Replace heater on wall.

6.Insert bottom anchor screw through back panel into bottom anchor or drilled hole (see Figure 11).

7.Tighten screw until heater is firmly se- cured to wall. Do not over tighten.

Note: Do not replace front panel at this time. Replace front panel after making gas connections and checking for leaks (see pages 8 and 9).

Figure 11 - Installing Bottom Mounting Screw

Figure 7 - Popping Open Anchor Wings

Figure 10 - Removing Front Panel Of

For Thin Walls

Heater

102393

7

Page 7
Image 7
Desa VP1000BT Attaching to wall anchor method, Placing Heater On Mounting Screws, Removing Front Panel Of Heater

VP1000BT specifications

Desa VP1000BT is an innovative heating appliance that merges advanced technology with user-friendly features. Designed for efficient and effective heating, this model stands out in the competitive market of space heaters.

One of the key features of the Desa VP1000BT is its Bluetooth connectivity, allowing users to control the heater through a smartphone app. This capability provides unparalleled convenience, enabling users to adjust settings, set timers, and monitor temperature levels without needing to be in the same room. The seamless integration with smart home systems enhances its usability, making it a popular choice for tech-savvy consumers.

The heater utilizes infrared heating technology, which is known for its ability to provide instantaneous warmth. Unlike traditional heaters that warm the air, infrared models heat objects and people directly, resulting in a more comfortable and consistent temperature without the dry air commonly associated with conventional heating methods. This not only improves comfort but also increases energy efficiency, as the heater operates more effectively in warming the intended space.

The Desa VP1000BT is designed with safety in mind. It is equipped with several safety features, including overheat protection and a tip-over switch. These mechanisms ensure that the heater automatically shuts off if it becomes too hot or if it is accidentally knocked over, providing peace of mind for users, especially in homes with children or pets.

Additionally, the sleek and modern design of the Desa VP1000BT allows it to blend seamlessly with various interior décor styles. Its compact size makes it easy to move from room to room, while its lightweight construction adds to its portability.

Another notable characteristic is its energy efficiency. The heater is designed to consume less power while still delivering excellent heating performance. This feature is especially appealing in times of rising energy costs, as it helps users save on their monthly energy bills.

In summary, the Desa VP1000BT is a forward-thinking heating solution that combines cutting-edge technology with user-oriented features. Its Bluetooth connectivity, infrared heating, safety mechanisms, and energy efficiency make it an outstanding choice for modern households seeking reliable and effective heating options. Whether for a cozy night in or a chilly morning, the Desa VP1000BT is designed to meet diverse heating needs while prioritizing comfort and safety.