Desa Tech CHDV34NA, CHDV34PA REMOVING/REPLACING Glass Door, Installing Remote Receiver

Models: CHDV34PA CHDV34NA, CHDV34PA

1 36
Download 36 pages 26.81 Kb
Page 21
Image 21

OWNER’S MANUAL

FIREPLACE INSTALLATION

Continued

INSTALLING OPTIONAL WIRELESS HAND-HELD REMOTE CONTROL - CGHRC SERIES/CGHRCT SERIES

NOTICE: Use only alkaline bat- teries (not included).

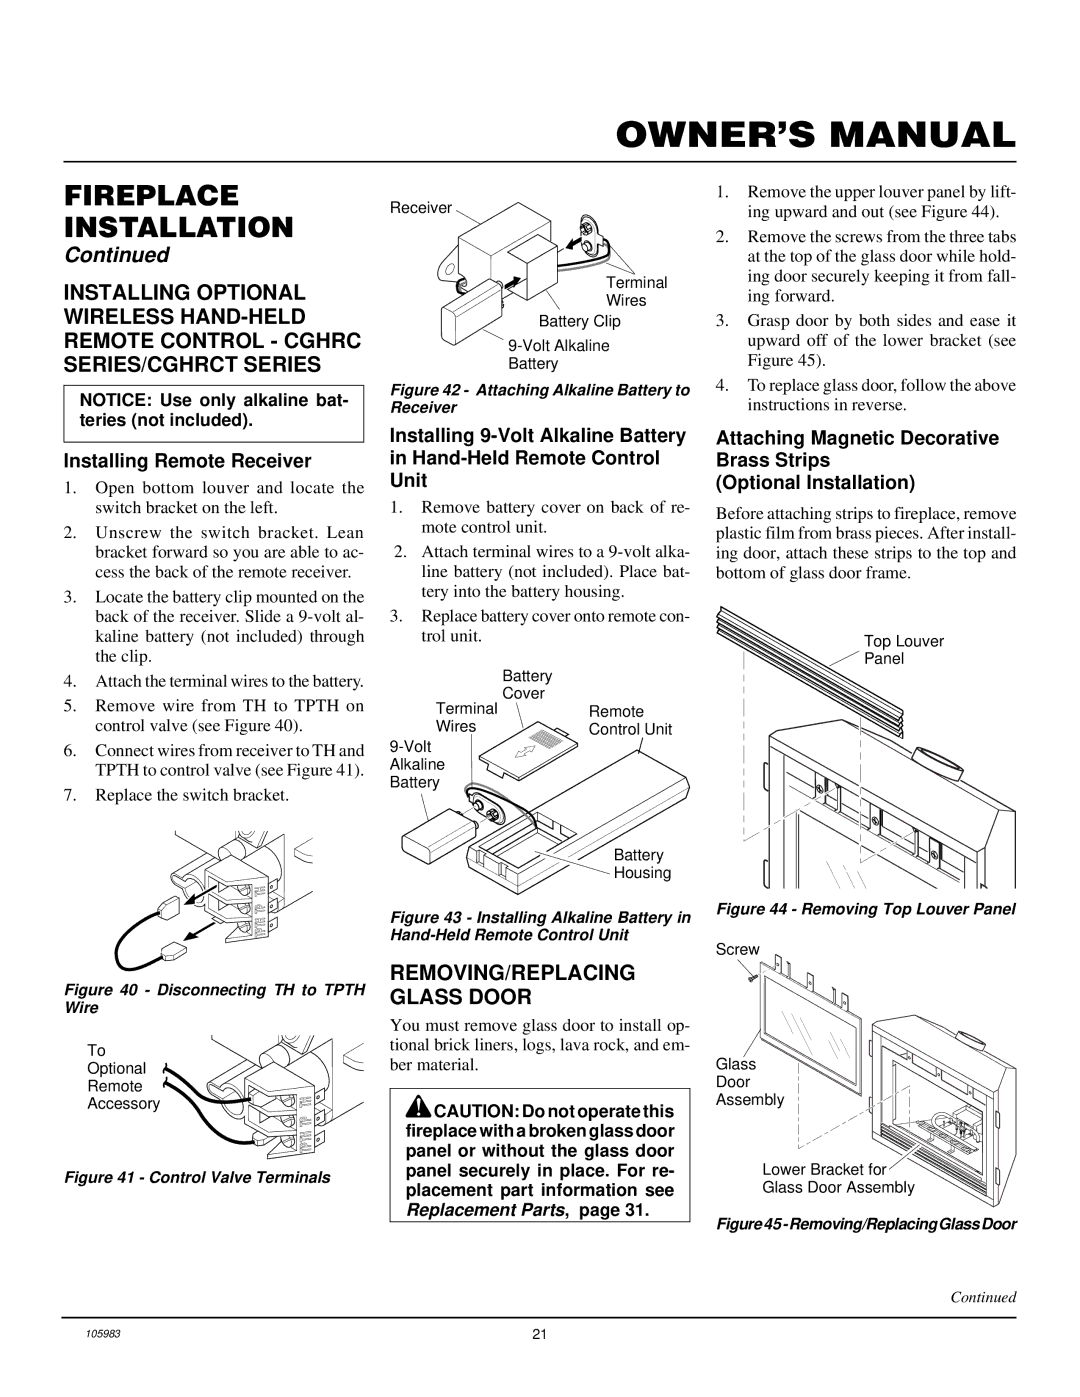
Installing Remote Receiver

1.Open bottom louver and locate the switch bracket on the left.

2.Unscrew the switch bracket. Lean bracket forward so you are able to ac- cess the back of the remote receiver.

3.Locate the battery clip mounted on the back of the receiver. Slide a 9-volt al- kaline battery (not included) through the clip.

4.Attach the terminal wires to the battery.

5.Remove wire from TH to TPTH on control valve (see Figure 40).

6.Connect wires from receiver to TH and TPTH to control valve (see Figure 41).

7.Replace the switch bracket.

Figure 40 - Disconnecting TH to TPTH Wire

To

Optional

Remote

Accessory

Figure 41 - Control Valve Terminals

Receiver

Terminal

Wires

Battery Clip

9-Volt Alkaline

Battery

Figure 42 - Attaching Alkaline Battery to Receiver

Installing 9-Volt Alkaline Battery

in Hand-Held Remote Control

Unit

1.Remove battery cover on back of re- mote control unit.

2.Attach terminal wires to a 9-volt alka- line battery (not included). Place bat- tery into the battery housing.

3.Replace battery cover onto remote con- trol unit.

Battery

Cover

Terminal

Remote

Wires

Control Unit

9-Volt Alkaline Battery

Battery

Housing

Figure 43 - Installing Alkaline Battery in Hand-Held Remote Control Unit

REMOVING/REPLACING GLASS DOOR

You must remove glass door to install op- tional brick liners, logs, lava rock, and em- ber material.

CAUTION: Do not operate this fireplace with a broken glass door panel or without the glass door panel securely in place. For re- placement part information see Replacement Parts, page 31.

1.Remove the upper louver panel by lift- ing upward and out (see Figure 44).

2.Remove the screws from the three tabs at the top of the glass door while hold- ing door securely keeping it from fall- ing forward.

3.Grasp door by both sides and ease it upward off of the lower bracket (see Figure 45).

4.To replace glass door, follow the above instructions in reverse.

Attaching Magnetic Decorative

Brass Strips

(Optional Installation)

Before attaching strips to fireplace, remove plastic film from brass pieces. After install- ing door, attach these strips to the top and bottom of glass door frame.

Top Louver

Panel

Figure 44 - Removing Top Louver Panel

Screw

Glass

Door

Assembly

Lower Bracket for

Glass Door Assembly

Figure 45 -Removing/ReplacingGlassDoor

Continued

105983

21

Page 21
Image 21
Desa Tech CHDV34NA, CHDV34PA installation manual REMOVING/REPLACING Glass Door, Installing Remote Receiver

CHDV34PA, CHDV34NA, CHDV34PA specifications

The Desa Tech CHDV34NA, CHDV34PA, and CHDV34P are advanced heating solutions that combine efficiency, reliability, and modern technology to meet the needs of today's consumers. Each model is designed to provide optimal heating while ensuring safety and ease of use, making them ideal for both residential and commercial applications.

One of the standout features of the CHDV34 series is its impressive heating capacity. With a thermal efficiency that exceeds industry standards, these units can heat up spaces quickly while minimizing energy consumption. This makes them an attractive option for those looking to reduce their energy bills without sacrificing comfort. The versatile design allows for installation in various settings, whether in living rooms, offices, or commercial spaces.

The CHDV34NA model is particularly noteworthy for its natural gas operation, making it an eco-friendly choice. Natural gas provides a clean-burning fuel option that lowers carbon emissions compared to traditional heating methods. This model comes equipped with advanced safety features, including a built-in oxygen depletion sensor, ensuring that the unit operates safely by shutting off if oxygen levels become too low.

In contrast, the CHDV34PA model runs on propane, making it a flexible alternative for those who may not have access to natural gas lines. This model shares many of the same high-efficiency features as its natural gas counterpart, offering an easy transition for users looking to switch fuel sources.

Both models utilize an innovative electronic ignition system, which enhances reliability by eliminating the need for a standing pilot light. This technology not only saves energy but also simplifies the ignition process, allowing users to enjoy a swift heating experience.

Moreover, the CHDV34PA model is compatible with a range of optional accessories, including remote controls and programmable thermostats, allowing for personalized heating management. This level of customization ensures comfort and convenience, as users can easily adjust their settings according to their specific needs.

Overall, the Desa Tech CHDV34NA, CHDV34PA, and CHDV34P models are designed with modern consumers in mind. Their blend of efficiency, eco-friendliness, and advanced features make them stand out in the market, providing reliable heating solutions that cater to a variety of lifestyles and preferences. Whether opting for natural gas or propane, users can trust these models to deliver on performance while maintaining cost-effectiveness and safety.