Desa Tech CHDV34NA, CHDV34PA installation manual Vent Pipe Connections

Models: CHDV34PA CHDV34NA, CHDV34PA

1 36
Download 36 pages 26.81 Kb
Page 9
Image 9

OWNER’S MANUAL

VENTING INSTALLATION

Continued

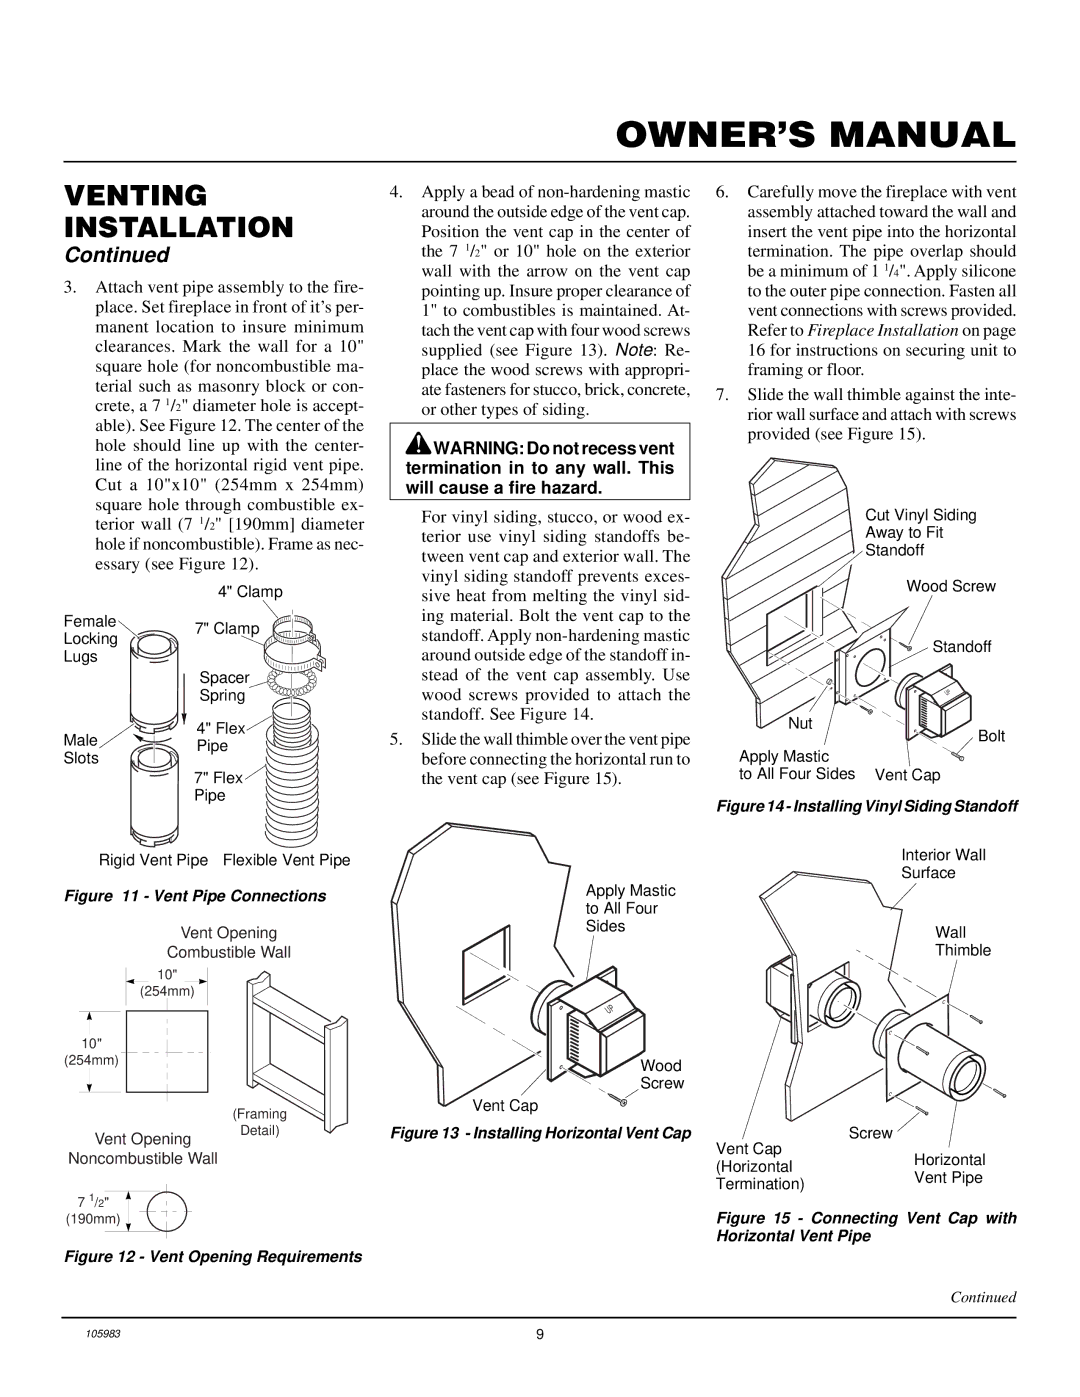
3.Attach vent pipe assembly to the fire- place. Set fireplace in front of it’s per- manent location to insure minimum clearances. Mark the wall for a 10" square hole (for noncombustible ma- terial such as masonry block or con- crete, a 7 1/2" diameter hole is accept- able). See Figure 12. The center of the hole should line up with the center- line of the horizontal rigid vent pipe. Cut a 10"x10" (254mm x 254mm) square hole through combustible ex- terior wall (7 1/2" [190mm] diameter hole if noncombustible). Frame as nec- essary (see Figure 12).


4" Clamp

Female

7" Clamp

Locking


Lugs


Spacer


Spring

Male

4" Flex

Pipe

Slots


7" Flex


Pipe

Rigid Vent Pipe Flexible Vent Pipe

Figure 11 - Vent Pipe Connections

Vent Opening

Combustible Wall

10"

(254mm)

10"

(254mm)

(Framing

4.Apply a bead of non-hardening mastic around the outside edge of the vent cap. Position the vent cap in the center of the 7 1/2" or 10" hole on the exterior wall with the arrow on the vent cap pointing up. Insure proper clearance of 1" to combustibles is maintained. At- tach the vent cap with four wood screws supplied (see Figure 13). Note: Re- place the wood screws with appropri- ate fasteners for stucco, brick, concrete, or other types of siding.

WARNING: Do not recess vent termination in to any wall. This will cause a fire hazard.

For vinyl siding, stucco, or wood ex- terior use vinyl siding standoffs be- tween vent cap and exterior wall. The vinyl siding standoff prevents exces- sive heat from melting the vinyl sid- ing material. Bolt the vent cap to the standoff. Apply non-hardening mastic around outside edge of the standoff in- stead of the vent cap assembly. Use wood screws provided to attach the standoff. See Figure 14.

5.Slide the wall thimble over the vent pipe before connecting the horizontal run to the vent cap (see Figure 15).

Apply Mastic to All Four Sides

UP

Wood

Screw

Vent Cap

6.Carefully move the fireplace with vent assembly attached toward the wall and insert the vent pipe into the horizontal termination. The pipe overlap should be a minimum of 1 1/4". Apply silicone to the outer pipe connection. Fasten all vent connections with screws provided. Refer to Fireplace Installation on page 16 for instructions on securing unit to framing or floor.

7.Slide the wall thimble against the inte- rior wall surface and attach with screws provided (see Figure 15).

Cut Vinyl Siding

Away to Fit

Standoff

Wood Screw

Standoff

UP

Nut

Bolt

Apply Mastic

to All Four Sides Vent Cap

Figure 14 - Installing Vinyl Siding Standoff

Interior Wall

Surface

Wall

Thimble

Vent Opening

Detail)

Figure 13 - Installing Horizontal Vent Cap

Screw

Vent Cap

Noncombustible Wall

7 1/2" (190mm)

Figure 12 - Vent Opening Requirements

(Horizontal

Horizontal

Vent Pipe

Termination)


Figure 15 - Connecting Vent Cap with Horizontal Vent Pipe

Continued

105983

9

Page 9
Image 9
Desa Tech CHDV34NA, CHDV34PA installation manual Vent Pipe Connections

CHDV34PA, CHDV34NA, CHDV34PA specifications

The Desa Tech CHDV34NA, CHDV34PA, and CHDV34P are advanced heating solutions that combine efficiency, reliability, and modern technology to meet the needs of today's consumers. Each model is designed to provide optimal heating while ensuring safety and ease of use, making them ideal for both residential and commercial applications.

One of the standout features of the CHDV34 series is its impressive heating capacity. With a thermal efficiency that exceeds industry standards, these units can heat up spaces quickly while minimizing energy consumption. This makes them an attractive option for those looking to reduce their energy bills without sacrificing comfort. The versatile design allows for installation in various settings, whether in living rooms, offices, or commercial spaces.

The CHDV34NA model is particularly noteworthy for its natural gas operation, making it an eco-friendly choice. Natural gas provides a clean-burning fuel option that lowers carbon emissions compared to traditional heating methods. This model comes equipped with advanced safety features, including a built-in oxygen depletion sensor, ensuring that the unit operates safely by shutting off if oxygen levels become too low.

In contrast, the CHDV34PA model runs on propane, making it a flexible alternative for those who may not have access to natural gas lines. This model shares many of the same high-efficiency features as its natural gas counterpart, offering an easy transition for users looking to switch fuel sources.

Both models utilize an innovative electronic ignition system, which enhances reliability by eliminating the need for a standing pilot light. This technology not only saves energy but also simplifies the ignition process, allowing users to enjoy a swift heating experience.

Moreover, the CHDV34PA model is compatible with a range of optional accessories, including remote controls and programmable thermostats, allowing for personalized heating management. This level of customization ensures comfort and convenience, as users can easily adjust their settings according to their specific needs.

Overall, the Desa Tech CHDV34NA, CHDV34PA, and CHDV34P models are designed with modern consumers in mind. Their blend of efficiency, eco-friendliness, and advanced features make them stand out in the market, providing reliable heating solutions that cater to a variety of lifestyles and preferences. Whether opting for natural gas or propane, users can trust these models to deliver on performance while maintaining cost-effectiveness and safety.