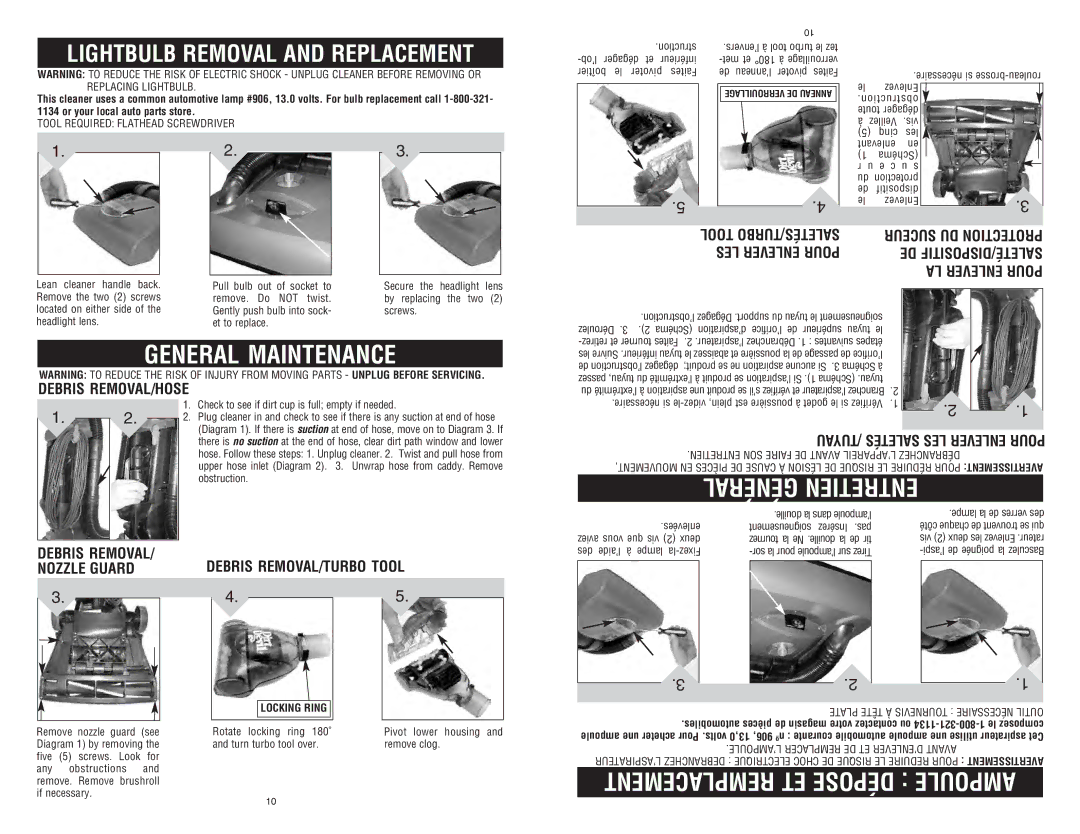
LIGHTBULB REMOVAL AND REPLACEMENT
WARNING: TO REDUCE THE RISK OF ELECTRIC SHOCK - UNPLUG CLEANER BEFORE REMOVING OR REPLACING LIGHTBULB.
This cleaner uses a common automotive lamp #906, 13.0 volts. For bulb replacement call
TOOL REQUIRED: FLATHEAD SCREWDRIVER
1.2.3.
|
|
|
| 10 |
| |
|
| .struction |
| .l’envers à tool turbo le tez | ||
boîtier | le | pivoter Faites | de l’anneau pivoter Faites | |||
|
|
|
|
|
|
|
|
|
|
|
|
|
|
|
|
|
|
| VERROUILLAGE DE NNEAUA |
|
|
|
|
|
|
|
|
.5 | .4 |
| TOOL SALETÉS/TURBO |
| LES ENLEVER POUR |
le | .nécessaire si | |
Enlevez |
| |
.obstruction | ||
toute dégager | ||
à | Veillez .vis | |
(5)cinq les enlevant en
1)(Schéma
r u e c u s |
| |
du protection |
| |
de | dispositif |
|
le | Enlevez | .3 |
|
| |
| SUCEUR DU PROTECTION | |
| DE SALETÉ/DISPOSITIF | |
|
| LA ENLEVER POUR |
Lean cleaner handle back. | Pull bulb out of socket to | Secure the headlight lens |
Remove the two (2) screws | remove. Do NOT twist. | by replacing the two (2) |
located on either side of the | Gently push bulb into sock- | screws. |
headlight lens. | et to replace. |
|
GENERAL MAINTENANCE
WARNING: TO REDUCE THE RISK OF INJURY FROM MOVING PARTS - UNPLUG BEFORE SERVICING.
DEBRIS REMOVAL/HOSE
| .l’obstruction Dégagez .support du tuyau le soigneusement |
| |
Déroulez .3 | .2) (Schéma | d’aspiration l’orifice de supérieur tuyau le |
|
.l’aspirateur Débranchez .1 : suivantes étapes |
| ||
les Suivre .inférieur tuyau le abaissez et poussière la de passage de l’orifice |
| ||
de l’obstruction dégagez produit; se ne aspiration aucune Si .3 Schéma à |
| ||
passez tuyau, du l’extrémité à produit se l’aspiration Si .1) (Schéma .tuyau |
| ||
du l’extrémité à aspiration une produit se s’il vérifiez et l’aspirateur Branchez | .2 | ||
1. | 2. |
1.Check to see if dirt cup is full; empty if needed.
2.Plug cleaner in and check to see if there is any suction at end of hose (Diagram 1). If there is suction at end of hose, move on to Diagram 3. If there is no suction at the end of hose, clear dirt path window and lower hose. Follow these steps: 1. Unplug cleaner. 2. Twist and pull hose from upper hose inlet (Diagram 2). 3. Unwrap hose from caddy. Remove obstruction.
.nécessaire si | .2 | .1 |
|
|
| ||
/TUYAU SALETÉS LES ENLEVER POUR | |||
.ENTRETIEN SON FAIRE DE AVANT L’APPAREIL DÉBRANCHEZ | ||
MOUVEMENT, EN PIÈCES DE CAUSE À LÉSION DE RISQUE LE RÉDUIRE POUR AVERTISSEMENT: | ||
| GÉNÉRAL ENTRETIEN |
|
| .douille la dans l’ampoule | .lampe la de verres des |
.enlevées | soigneusement Insérez .pas | côté chaque de trouvent se qui |
aviez vous que vis (2) deux | tournez la Ne .douille la de tir | vis (2) deux les Enlevez .rateur |
DEBRIS REMOVAL/ | DEBRIS REMOVAL/TURBO TOOL |
NOZZLE GUARD |
des l’aide | à | lampe |
|
3.
Remove nozzle guard (see Diagram 1) by removing the five (5) screws. Look for any obstructions and remove. Remove brushroll if necessary.
4. |
LOCKING RING |
Rotate locking ring 180˚ and turn turbo tool over.
5.
Pivot lower housing and remove clog.
.3 | .2 | .1 |
| PLATE TÊTE À TOURNEVIS : | NÉCESSAIRE OUTIL |
.automobiles pièces de magasin votre contactez ou | ||
ampoule une acheter Pour .volts 13,0 906, nº : courante automobile ampoule une utilise aspirateur Cet | ||
| .L’AMPOULE REMPLACER DE ET D’ENLEVER AVANT | |
L’ASPIRATEUR DEBRANCHEZ : ELECTRIQUE CHOC DE RISQUE LE REDUIRE POUR : AVERTISSEMENT | ||
REMPLACEMENT ET DÉPOSE : AMPOULE | ||
10
