Getting Started
Installing the Batteries
This unit operates on 3 AA batteries. If the sound becomes weak or distorted or the Low Battery icon appears on the display, it’s time to replace the batteries.
ATTENTION: Batteries should only be installed by an adult.
Use a Phillips screwdriver to open the battery compartment door located on the back of the unit.
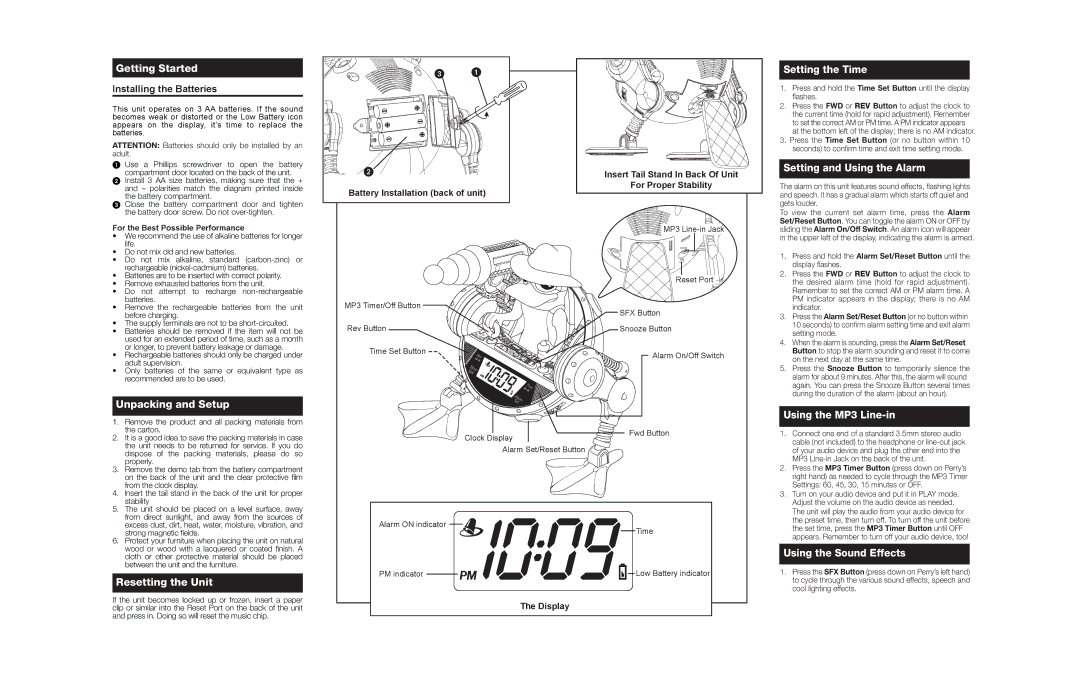
Insert Tail Stand In Back Of Unit
Setting the Time
1.Press and hold the Time Set Button until the display flashes.
2.Press the FWD or REV Button to adjust the clock to the current time (hold for rapid adjustment). Remember to set the correct AM or PM time. A PM indicator appears at the bottom left of the display; there is no AM indicator.
3.Press the Time Set Button (or no button within 10 seconds) to confirm time and exit time setting mode.
Setting and Using the Alarm
Install 3 AA size batteries, making sure that the + and – polarities match the diagram printed inside the battery compartment.
Close the battery compartment door and tighten the battery door screw. Do not
Battery Installation (back of unit)
For Proper Stability
The alarm on this unit features sound effects, flashing lights and speech. It has a gradual alarm which starts off quiet and gets louder.
To view the current set alarm time, press the Alarm Set/Reset Button. You can toggle the alarm ON or OFF by
For the Best Possible Performance
•We recommend the use of alkaline batteries for longer life.
•Do not mix old and new batteries.
•Do not mix alkaline, standard
•Batteries are to be inserted with correct polarity.
•Remove exhausted batteries from the unit.
•Do not attempt to recharge
•Remove the rechargeable batteries from the unit before charging.
•The supply terminals are not to be
•Batteries should be removed if the item will not be used for an extended period of time, such as a month or longer, to prevent battery leakage or damage.
•Rechargeable batteries should only be charged under adult supervision.
•Only batteries of the same or equivalent type as recommended are to be used.
Unpacking and Setup
1.Remove the product and all packing materials from the carton.
2.It is a good idea to save the packing materials in case the unit needs to be returned for service. If you do dispose of the packing materials, please do so properly.
3.Remove the demo tab from the battery compartment on the back of the unit and the clear protective film from the clock display.
4.Insert the tail stand in the back of the unit for proper stability
5.The unit should be placed on a level surface, away from direct sunlight, and away from the sources of excess dust, dirt, heat, water, moisture, vibration, and strong magnetic fields.
6.Protect your furniture when placing the unit on natural wood or wood with a lacquered or coated finish. A cloth or other protective material should be placed between the unit and the furniture.
Resetting the Unit
MP3 Timer/Off Button
Rev Button
Time Set Button
Clock Display
Alarm Set/Reset Button
Alarm ON indicator ![]()
![]()
PM indicator ![]()
![]()
MP3
Reset Port
SFX Button
Snooze Button
Alarm On/Off Switch
Fwd Button
Time
![]()
![]() Low Battery indicator
Low Battery indicator
sliding the Alarm On/Off Switch. An alarm icon will appear in the upper left of the display, indicating the alarm is armed.
1.Press and hold the Alarm Set/Reset Button until the display flashes.
2.Press the FWD or REV Button to adjust the clock to the desired alarm time (hold for rapid adjustment). Remember to set the correct AM or PM alarm time. A PM indicator appears in the display; there is no AM indicator.
3.Press the Alarm Set/Reset Button (or no button within 10 seconds) to confirm alarm setting time and exit alarm setting mode.
4.When the alarm is sounding, press the Alarm Set/Reset Button to stop the alarm sounding and reset it to come on the next day at the same time.
5.Press the Snooze Button to temporarily silence the alarm for about 9 minutes. After this, the alarm will sound again. You can press the Snooze Button several times during the duration of the alarm (about an hour).
Using the MP3 Line-in
1.Connect one end of a standard 3.5mm stereo audio cable (not included) to the headphone or
2.Press the MP3 Timer Button (press down on Perry’s right hand) as needed to cycle through the MP3 Timer Settings: 60, 45, 30, 15 minutes or OFF.
3.Turn on your audio device and put it in PLAY mode. Adjust the volume on the audio device as needed. The unit will play the audio from your audio device for the preset time, then turn off. To turn off the unit before the set time, press the MP3 Timer Button until OFF appears. Remember to turn off your audio device, too!
Using the Sound Effects
1.Press the SFX Button (press down on Perry’s left hand) to cycle through the various sound effects, speech and cool lighting effects.
If the unit becomes locked up or frozen, insert a paper clip or similar into the Reset Port on the back of the unit and press in. Doing so will reset the music chip.
The Display