630025.331 Installation Instructions

D.Wiring Requirements

1.120 VAC Supply Line

Route a copper 12 AWG, with ground, 120 VAC supply line from the time delay fuse or circuit breaker box to the roof opening.

a.This supply line must be located in the front portion of the 14-1/4" x 14-1/4" (±1/8") opening.

b.The power MUST be on a separate 20 Amp time delay fuse or HACR circuit breaker.

c.Make sure that at least 15" of supply wire extends into the roof opening. This ensures and easy connection at the junction box.

d.Wiring must comply with all National, State and Local Wiring Codes.

e.Use a steel sleeve and a grommet or equivalent methods to protect the wire where it passes into the opening.

E.Placing Air Conditioner On The Roof

This unit weighs approximately 100 pounds. To prevent back injury, use a mechanical hoist to place Air Conditioner on roof.

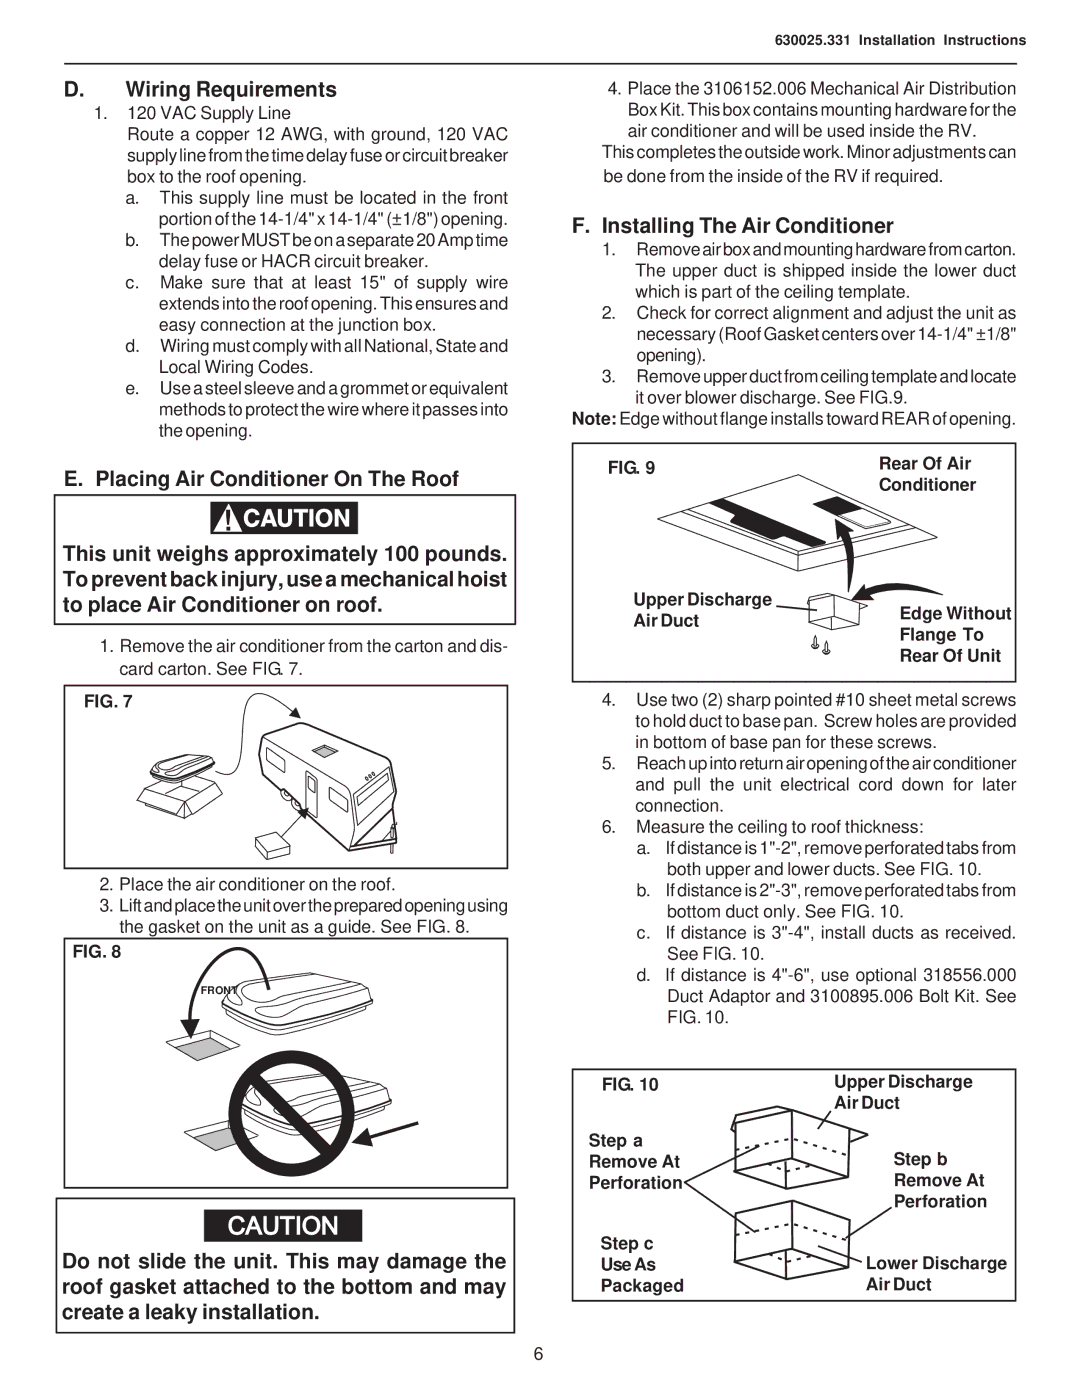
1.Remove the air conditioner from the carton and dis- card carton. See FIG. 7.

FIG. 7

2.Place the air conditioner on the roof.

3.Lift and place the unit over the prepared opening using the gasket on the unit as a guide. See FIG. 8.

FIG. 8

FRONT

CAUTION

Do not slide the unit. This may damage the roof gasket attached to the bottom and may create a leaky installation.

4.Place the 3106152.006 Mechanical Air Distribution Box Kit. This box contains mounting hardware for the air conditioner and will be used inside the RV.

This completes the outside work. Minor adjustments can be done from the inside of the RV if required.

F.Installing The Air Conditioner

1.Remove air box and mounting hardware from carton. The upper duct is shipped inside the lower duct which is part of the ceiling template.

2.Check for correct alignment and adjust the unit as necessary (Roof Gasket centers over 14-1/4" ±1/8" opening).

3.Remove upper duct from ceiling template and locate it over blower discharge. See FIG.9.

Note: Edge without flange installs toward REAR of opening.

FIG. 9

Rear Of Air


Conditioner

Upper Discharge

Air DuctEdge Without

Flange To

Rear Of Unit

4.Use two (2) sharp pointed #10 sheet metal screws to hold duct to base pan. Screw holes are provided in bottom of base pan for these screws.

5.Reach up into return air opening of the air conditioner and pull the unit electrical cord down for later connection.

6.Measure the ceiling to roof thickness:

a.If distance is 1"-2", remove perforated tabs from both upper and lower ducts. See FIG. 10.

b.If distance is 2"-3", remove perforated tabs from bottom duct only. See FIG. 10.

c.If distance is 3"-4", install ducts as received. See FIG. 10.

d.If distance is 4"-6", use optional 318556.000 Duct Adaptor and 3100895.006 Bolt Kit. See FIG. 10.

FIG. 10

Upper Discharge


Air Duct

Step a

Step b

Remove At

Perforation

Remove At


Perforation

Step c

Lower Discharge

Use As

Packaged

Air Duct

6

Page 6
Image 6
Dometic 630025.331 operating instructions Wiring Requirements, Installing The Air Conditioner

630025.331 specifications

The Dometic 630025.331 is a premium portable refrigerator designed for outdoor enthusiasts and travelers seeking reliable cooling solutions on the go. This model exemplifies Dometic's commitment to quality, innovation, and user-friendly design, making it a top choice for camping, road trips, and other outdoor adventures.

One of the standout features of the Dometic 630025.331 is its impressive cooling performance. It utilizes advanced compressor technology to provide rapid cooling down to -8°F (-22°C), ensuring that food and beverages remain fresh and chilled regardless of external temperatures. This makes it an ideal companion for extended trips where access to electricity may be limited.

The design of the Dometic 630025.331 highlights its portability and convenience. It features a robust construction with durable materials that can withstand the rigors of outdoor use. Its ergonomic handles make it easy to transport, while the built-in wheels allow for effortless movement across various terrains. Additionally, the LED display provides real-time temperature readings and adjustable settings, allowing users to customize their cooling experience.

Energy efficiency is another critical aspect of the Dometic 630025.331. It operates on both AC and DC power sources, making it versatile for use in vehicles, campsites, and even at home. The energy-saving mode ensures minimal power consumption, making it an eco-friendly choice. The unit is also equipped with a battery protection system, which prevents the refrigerator from draining the battery of your vehicle or power source.

The internal storage capacity of the Dometic 630025.331 is generous, offering ample space for food and beverages. The interior is designed for optimal organization, featuring removable storage baskets that facilitate easy access to items. This thoughtful design maximizes usability, making it simple to pack and unpack essentials during your travels.

In addition to its impressive features, the Dometic 630025.331 incorporates modern technologies such as Bluetooth connectivity. This allows users to monitor the temperature and adjust settings via a smartphone app, providing the ultimate convenience for tech-savvy outdoor enthusiasts.

Overall, the Dometic 630025.331 is a robust and versatile portable refrigerator that combines cutting-edge technology with practical design. Its powerful cooling capabilities, portability, and user-friendly features make it an exceptional choice for anyone looking to enhance their outdoor experience. Whether you're camping in the wilderness or embarking on a road trip, the Dometic 630025.331 ensures that your food and drinks remain perfectly chilled.