NEVER LEAVE THE HEATER UNATTENDED WHILE BURNING!
D.) FAN BLADES
CLEAN EVERY SEASON OR AS NEEDED. -Remove upper shell(See 10 page.)
-Use 1/8" allen wrench to loosen set screw which holds Fan Blade to motor shaft.
- Slip Fan Blade off motor shaft.
-Clean Fan Blade using a soft colth moistened with kerosene or solvent.
-Dry Fan Blade throughly.
-Reinstall Fan Blade on motor shaft. Place Fan Blade hub flush with end of motor shaft.
-Place Set Screw on flat of shaft. Tighten Set Screw firmly(40~50 inch-pounds/4.5~5.6 N-m).
E.) NOZZLE
REMOVE DIRT IN NOZZLE AS NEEDED(See Page 14)
-Remove Upper Shell(See page 10). -Remove Fan Blade(See Fan Blades).
-Remove Fuel and Air Line from Burner Head. -Remove Ignitor Wire from Spark Plug.
-Remove three Screws using medium phillips screwdriver and remove Burner Head from combustion chamber.
-Remove Spark Plug from Burner Head using medium phillips screwdriver.
-Carefully remove Nozzle from Burner Head using 5/8" socket wrench.
-Blow compressed air through face of Nozzle.(this will remove any dirt in Nozzle)
-Reinstall Nozzle into Burner Head and tighten firmly. (80~110 inch-pounds)
-Reinstall Spark Plug in Burner Head. -Attach Ignitor wire to Spark Plug. -Attach Fuel and Air Line to Burner Head. -Reinstall Fan Blade and Upper Shell.
Figure 14. Fan and Setscrew Location.
Figure 15. Removing Nozzle
NEVER LEAVE THE HEATER UNATTENDED WHILE BURNING!
F.) SPARK PLUG
CLEAN AND REGAP EVERY 600 HOURS OF OPERATION OR REPLACE AS NEEDED.
-Remove upper shell(See 10 page).
-Remove Fan Blade(See 11 Page).
-Remove Ignitor Wire from Spark Plug.
-Remove Spark Plug from Burner Head using medium phillips screwdriver.
-Clean and regap Spark plug electrodes to 0.140″(3.5mm) gap.
-Reinstall Spark Plug in Burner Head.
-Attach Ignitor wire to Spark Plug.
-Reinstall Fan and Upper Shell.
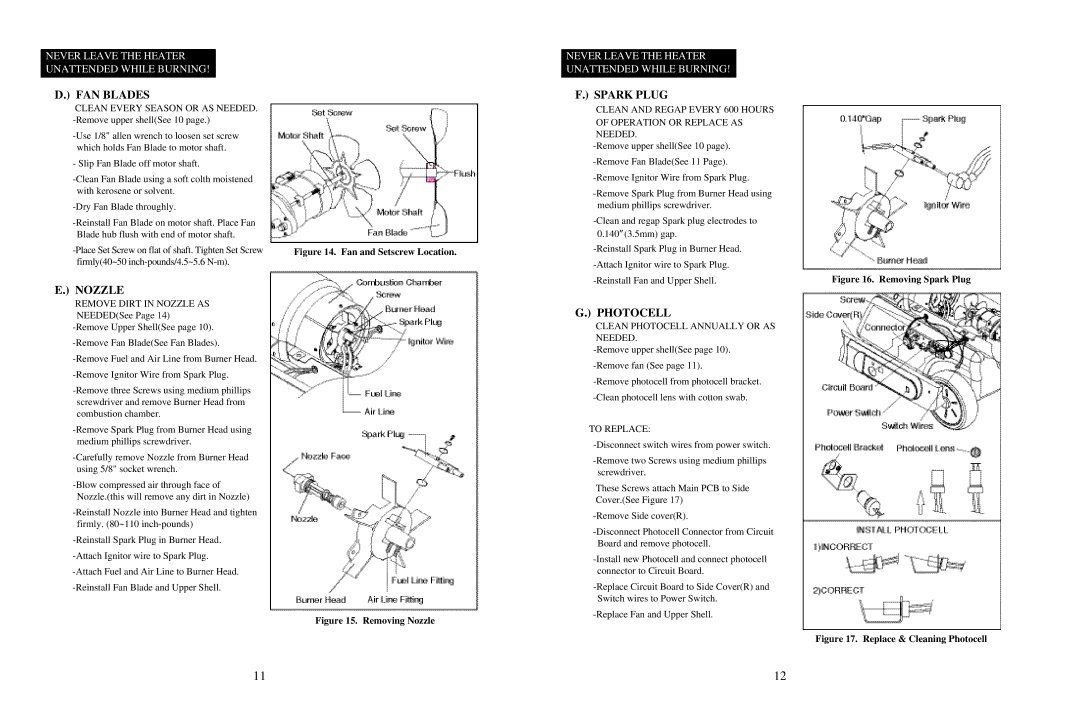
G.) PHOTOCELL
CLEAN PHOTOCELL ANNUALLY OR AS NEEDED.
-Remove upper shell(See page 10).
-Remove fan (See page 11).
-Remove photocell from photocell bracket.
-Clean photocell lens with cotton swab.
TO REPLACE:
-Disconnect switch wires from power switch.
-Remove two Screws using medium phillips screwdriver.
These Screws attach Main PCB to Side
Cover.(See Figure 17)
-Remove Side cover(R).
-Disconnect Photocell Connector from Circuit Board and remove photocell.
-Install new Photocell and connect photocell connector to Circuit Board.
-Replace Circuit Board to Side Cover(R) and Switch wires to Power Switch.
-Replace Fan and Upper Shell.
Figure 16. Removing Spark Plug
Figure 17. Replace & Cleaning Photocell