Uso de su televisor con pantalla LCD

Ajuste de la configuración del sonido

Para ajustar la configuración de audio:

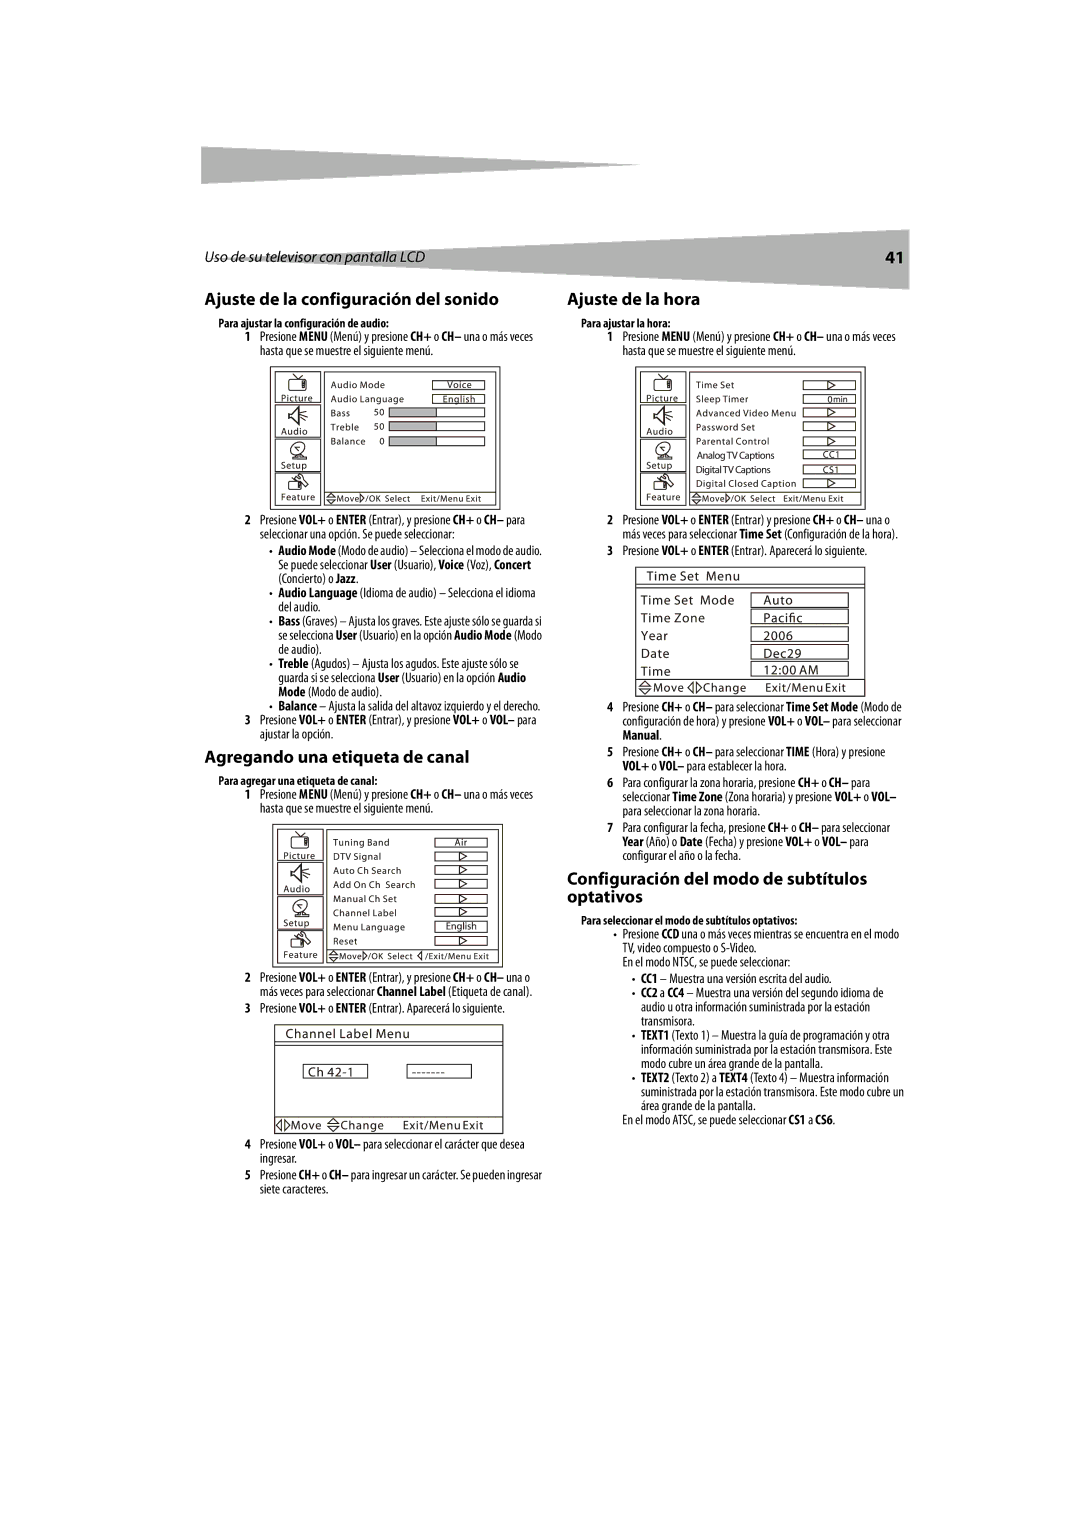
1Presione MENU (Menú) y presione CH+ o CH– una o más veces hasta que se muestre el siguiente menú.

2Presione VOL+ o ENTER (Entrar), y presione CH+ o CH– para seleccionar una opción. Se puede seleccionar:

Audio Mode (Modo de audio) – Selecciona el modo de audio. Se puede seleccionar User (Usuario), Voice (Voz), Concert (Concierto) o Jazz.

Audio Language (Idioma de audio) – Selecciona el idioma del audio.

Bass (Graves) – Ajusta los graves. Este ajuste sólo se guarda si se selecciona User (Usuario) en la opción Audio Mode (Modo de audio).

Treble (Agudos) – Ajusta los agudos. Este ajuste sólo se guarda si se selecciona User (Usuario) en la opción Audio Mode (Modo de audio).

Balance – Ajusta la salida del altavoz izquierdo y el derecho. 3 Presione VOL+ o ENTER (Entrar), y presione VOL+ o VOL– para

ajustar la opción.

Agregando una etiqueta de canal

Para agregar una etiqueta de canal:

1Presione MENU (Menú) y presione CH+ o CH– una o más veces hasta que se muestre el siguiente menú.

2Presione VOL+ o ENTER (Entrar), y presione CH+ o CH– una o más veces para seleccionar Channel Label (Etiqueta de canal).

3Presione VOL+ o ENTER (Entrar). Aparecerá lo siguiente.

4Presione VOL+ o VOL– para seleccionar el carácter que desea ingresar.

5Presione CH+ o CH– para ingresar un carácter. Se pueden ingresar siete caracteres.

41

Ajuste de la hora

Para ajustar la hora:

1Presione MENU (Menú) y presione CH+ o CH– una o más veces hasta que se muestre el siguiente menú.

2Presione VOL+ o ENTER (Entrar) y presione CH+ o CH– una o más veces para seleccionar Time Set (Configuración de la hora).

3Presione VOL+ o ENTER (Entrar). Aparecerá lo siguiente.

4Presione CH+ o CH– para seleccionar Time Set Mode (Modo de configuración de hora) y presione VOL+ o VOL– para seleccionar Manual.

5Presione CH+ o CH– para seleccionar TIME (Hora) y presione VOL+ o VOL– para establecer la hora.

6Para configurar la zona horaria, presione CH+ o CH– para seleccionar Time Zone (Zona horaria) y presione VOL+ o VOL– para seleccionar la zona horaria.

7Para configurar la fecha, presione CH+ o CH– para seleccionar Year (Año) o Date (Fecha) y presione VOL+ o VOL– para configurar el año o la fecha.

Configuración del modo de subtítulos optativos

Para seleccionar el modo de subtítulos optativos:

Presione CCD una o más veces mientras se encuentra en el modo TV, video compuesto o S-Video.

En el modo NTSC, se puede seleccionar:

CC1 – Muestra una versión escrita del audio.

CC2 a CC4 – Muestra una versión del segundo idioma de audio u otra información suministrada por la estación transmisora.

TEXT1 (Texto 1) – Muestra la guía de programación y otra información suministrada por la estación transmisora. Este modo cubre un área grande de la pantalla.

TEXT2 (Texto 2) a TEXT4 (Texto 4) – Muestra información

suministrada por la estación transmisora. Este modo cubre un área grande de la pantalla.

En el modo ATSC, se puede seleccionar CS1 a CS6.

Page 41
Image 41
Dynex DX-LCDTV19 manual Ajuste de la configuración del sonido, Agregando una etiqueta de canal, Ajuste de la hora

DX-LCDTV19 specifications

The Dynex DX-LCDTV19 is a compact, versatile television that caters to consumers seeking a reliable display for smaller spaces, such as bedrooms, kitchens, or dorm rooms. With its sleek design, this 19-inch LCD television combines quality performance with essential features that make it an attractive choice for many users.

At the forefront of the Dynex DX-LCDTV19's appeal is its 720p HD resolution, which provides a crisp and clear picture quality. The 1366 x 768 resolution enhances the viewing experience by delivering sharp details and vibrant colors, whether you're watching your favorite TV shows, movies, or sports events. The LCD technology used in this model ensures that it has excellent color reproduction and wide viewing angles, making it suitable for a variety of viewing environments.

Connectivity is another standout feature of the Dynex DX-LCDTV19. It is equipped with multiple input options, including HDMI, VGA, and composite inputs, allowing users to connect various external devices such as gaming consoles, Blu-ray players, and laptops with ease. The presence of an integrated digital tuner enables users to access over-the-air broadcasts without the need for an additional set-top box, making it convenient for those who prefer free television programming.

The sound quality of the DX-LCDTV19 is enhanced by its built-in speakers, delivering decent audio that complements the visual experience. The television also includes headphone output for private listening, which can be particularly useful in shared living situations or during late-night viewing sessions.

Energy efficiency is a key consideration for many consumers, and the Dynex DX-LCDTV19 does not disappoint. It is designed with energy-saving features that help reduce power consumption, making it an environmentally friendly option for those conscious of their energy use.

The user-friendly interface and remote control make navigating through channels and settings straightforward. The menu is intuitive, allowing users of all ages to easily adjust picture settings, access inputs, and customize preferences without hassle.

In summary, the Dynex DX-LCDTV19 stands out as an affordable, compact television that incorporates essential features, good picture quality, and versatile connectivity options. It's an ideal choice for users with limited space or those seeking a reliable secondary TV without breaking the bank. Whether used for casual viewing or as part of a home entertainment setup, the Dynex DX-LCDTV19 proves to be a practical and efficient option in the world of LCD televisions.