Edimax Technology EK-UAK4 manual 
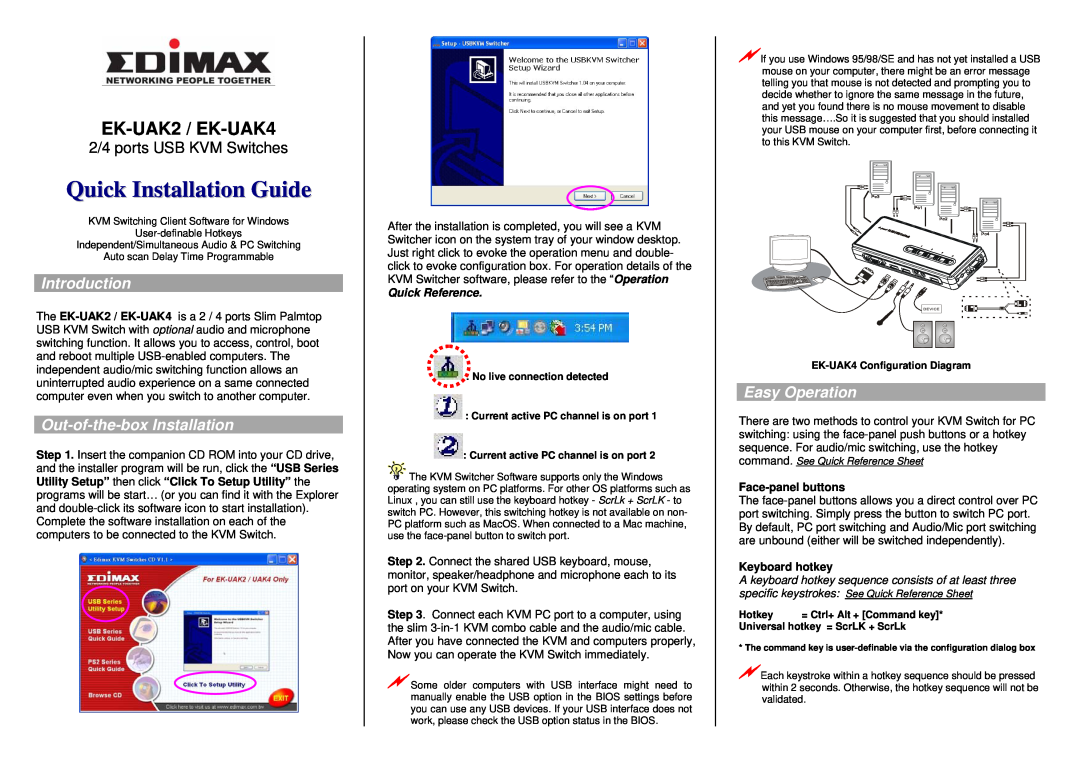
Quick Installation Guide, Introduction, Easy Operation

Models: EK-UAK4

1 2
Download 2 pages 8.54 Kb
Page 1
Image 1
EK-UAK2 / EK-UAK4

EK-UAK2 / EK-UAK4

2/4 ports USB KVM Switches

Quick Installation Guide

KVM Switching Client Software for Windows

User-definable Hotkeys

Independent/Simultaneous Audio & PC Switching

Auto scan Delay Time Programmable

Introduction

The EK-UAK2 /EK-UAK4is a 2 / 4 ports Slim Palmtop USB KVM Switch with optional audio and microphone switching function. It allows you to access, control, boot and reboot multiple USB-enabled computers. The independent audio/mic switching function allows an uninterrupted audio experience on a same connected computer even when you switch to another computer.

Out-of-the-box Installation

Step 1. Insert the companion CD ROM into your CD drive, and the installer program will be run, click the “USB Series Utility Setup” then click “Click To Setup Utility” the programs will be start… (or you can find it with the Explorer and double-click its software icon to start installation). Complete the software installation on each of the computers to be connected to the KVM Switch.

After the installation is completed, you will see a KVM Switcher icon on the system tray of your window desktop. Just right click to evoke the operation menu and double- click to evoke configuration box. For operation details of the KVM Switcher software, please refer to the “Operation

Quick Reference.

2/4 ports USB KVM Switches : No live connection detected

Quick Installation Guide : Current active PC channel is on port 1

Introduction: Current active PC channel is on port 2

Out-of-the-box InstallationQuick Reference.Easy Operation The KVM Switcher Software supports only the Windows operating system on PC platforms. For other OS platforms such as Linux , you can still use the keyboard hotkey - ScrLk + ScrLK - to switch PC. However, this switching hotkey is not available on non- PC platform such as MacOS. When connected to a Mac machine, use the face-panel button to switch port.

Step 2. Connect the shared USB keyboard, mouse, monitor, speaker/headphone and microphone each to its port on your KVM Switch.

Step 3. Connect each KVM PC port to a computer, using the slim 3-in-1 KVM combo cable and the audio/mic cable. After you have connected the KVM and computers properly, Now you can operate the KVM Switch immediately.

Manual background Some older computers with USB interface might need to manually enable the USB option in the BIOS settings before you can use any USB devices. If your USB interface does not work, please check the USB option status in the BIOS.

Manual backgroundIf you use Windows 95/98/SE and has not yet installed a USB mouse on your computer, there might be an error message telling you that mouse is not detected and prompting you to decide whether to ignore the same message in the future, and yet you found there is no mouse movement to disable this message….So it is suggested that you should installed

your USB mouse on your computer first, before connecting it to this KVM Switch.

EK-UAK4 Configuration Diagram

Easy Operation

There are two methods to control your KVM Switch for PC switching: using the face-panel push buttons or a hotkey sequence. For audio/mic switching, use the hotkey command. See Quick Reference Sheet

Face-panel buttons

The face-panel buttons allows you a direct control over PC port switching. Simply press the button to switch PC port. By default, PC port switching and Audio/Mic port switching are unbound (either will be switched independently).

Keyboard hotkey

A keyboard hotkey sequence consists of at least three specific keystrokes: See Quick Reference Sheet

Hotkey = Ctrl+ Alt + [Command key]*

Universal hotkey = ScrLK + ScrLk

* The command key is user-definable via the configuration dialog box

Manual backgroundEach keystroke within a hotkey sequence should be pressed within 2 seconds. Otherwise, the hotkey sequence will not be validated.

Page 1
Image 1
Edimax Technology EK-UAK4 manual Quick Installation Guide, Introduction, Out-of-the-box Installation, Easy Operation