Electrical Adjustments

7Luminance adjustment adjustment [PC]

1.Receive the 100%whole-white computer signal with Computer 1 [Analog RGB] mode.

2.Enter the service mode.

3.Measure luminance on the screen with the luminance meter. It is A for the reading of luminance meter.

4.Change the signal source to the 50%whole-white computer signal with Computer 1 [Analog RGB] mode.

5.Select group no. “4”, Item no. “6” and change the Data value to make the reading of luminance meter to be A x 23%.

8A/D Ref. Voltage adjustment [Video]

1.Receive the 16-step gray scale composite video sig- nal with Video mode.

2.Enter the service mode.

3.Connect a digital voltmeter to test point “TPVRB” (+) and chassis ground (-).

4.Select group no. “5”, Item no. “17” and adjust the volt- age to be 1.0 ±0.05Vdc by changing the Data value.

5.Connect a digital voltmeter to test point “TPGVRT (+) and chassis ground (-).

6.Select Item no. “18” and adjust the voltage to be 2.5 ±0.05Vdc by changing the Data value.

10Pedestal adjustment [Video]

1.Receive the 100%whole-Black composite video sig- nal with Video mode.

2.Enter the service mode.

3.Connect an oscilloscope to test point “TP531” (+) and chassis ground (-).

4.Select group no. “5”, Item no. “11” and adjust the black level to be maximum amplitude by changing the Data value.

5.Connect an oscilloscope to test point “TP501” (+) and chassis ground (-).

6.Select Item no. “12” and adjust the black level to be maximum amplitude by changing the Data value.

7.Connect an oscilloscope to test point “TP561” (+) and chassis ground (-).

8.Select Item no. “13” and adjust the black level to be maximum amplitude by changing the Data value.

Black Level

Pedestal Level

Note: This adjustment should be done after A/D Input adjustment [Video].

9A/D Input adjustment [Video]

1.Receive the 16-step gray scale composite video sig- nal with Video mode.

2.Enter the service mode.

3.Connect an oscilloscope to test point “TP13G” (+) and chassis ground (-).

4.Select group no. “3”, Item no. “1” and adjust the ampli- tude “a” to be 1.35 ±0.1V by changing the Data value.

*This changes all the RGB amplitude at the same time. Item no. “2” can be adjusted for G only.

5.Connect an oscilloscope to test point “TP13B” (+) and chassis ground (-).

6.Select Item no. “3” and adjust the amplitude “a” to be 1.35 ±0.1V by changing the Data value.

7.Connect an oscilloscope to test point “TP13R” (+) and chassis ground (-).

8.Select Item no. “4” and adjust the amplitude “a” to be 1.35 ±0.1V by changing the Data value.

(a)

11Video Gain adjustment [Video]

1.Receive the 16-step gray scale video composite sig- nal with Video mode.

2.Enter the service mode.

3.Connect an oscilloscope to test point “TP531” (+) and chassis ground (-).

4.Select group no. “4”, Item no. “3” and adjust the white level to be minimum amplitude by changing the Data value.

5.Connect an oscilloscope to test point “TP501” (+) and chassis ground (-).

6.Select Item no. “4” and adjust the white level to be minimum amplitude by changing the Data value.

7.Connect an oscilloscope to test point “TP561” (+) and chassis ground (-).

8.Select Item no. “5” and adjust the white level to be minimum amplitude by changing the Data value.

White Level

(a)

-27-

Page 29
Image 29
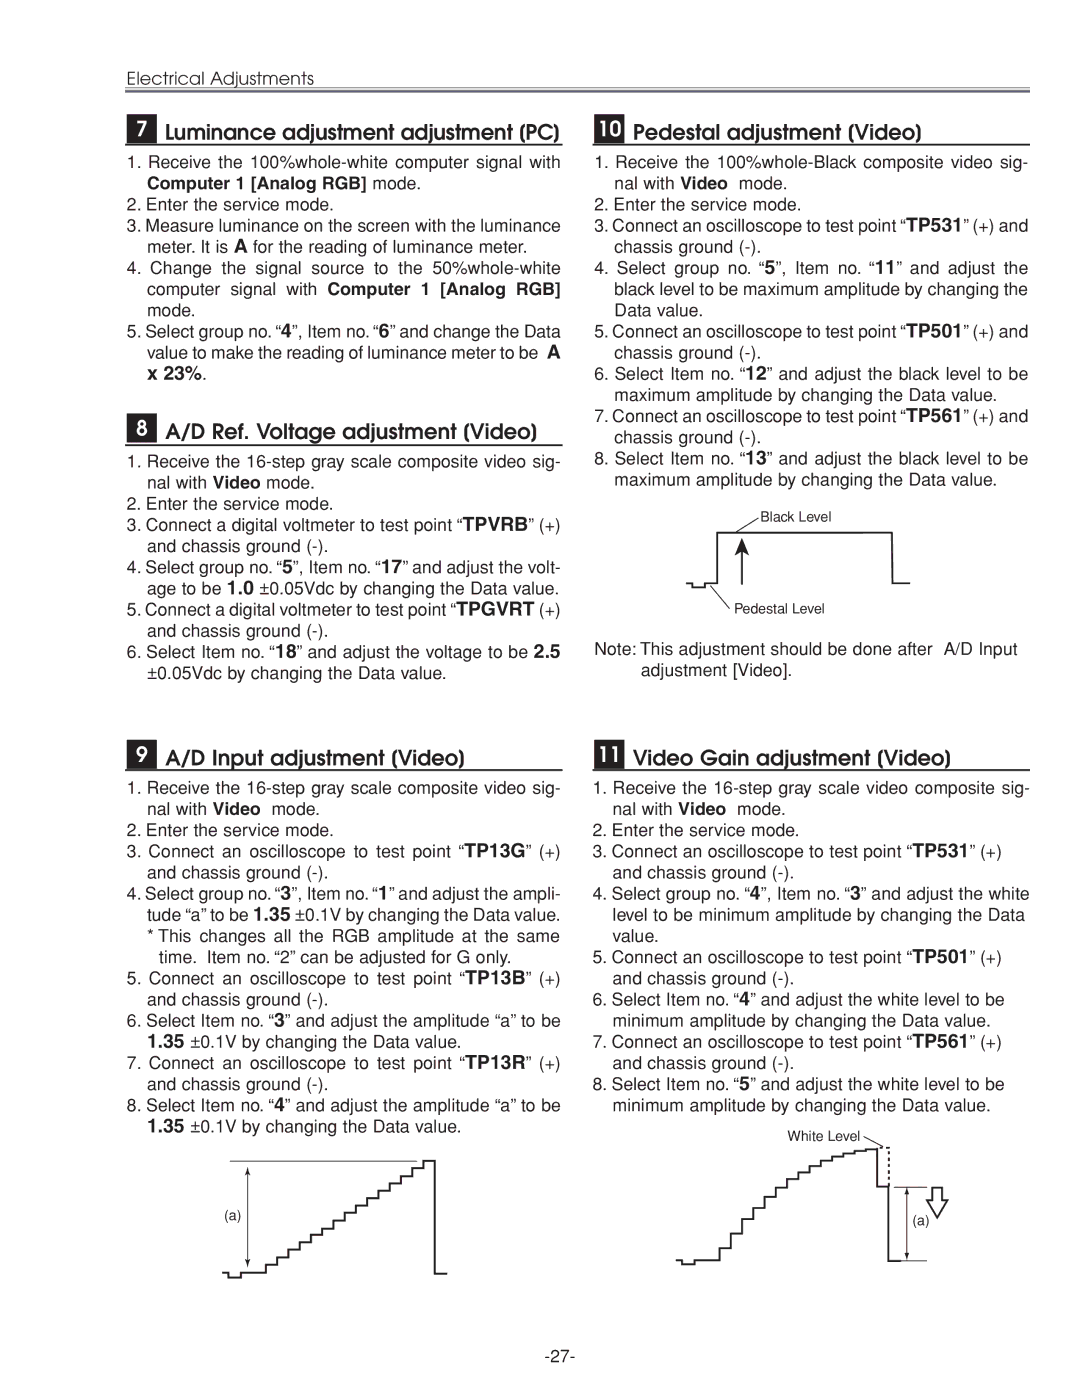
Eiki LC-XG210 service manual Luminance adjustment adjustment PC, D Ref. Voltage adjustment Video, Pedestal adjustment Video

LC-XG210 specifications

The Eiki LC-XG210 is a high-performance LCD projector designed for professional presentations and educational use. This projector stands out due to its impressive brightness, exceptional image quality, and versatile connectivity options, making it an ideal choice for a variety of settings, including classrooms, conference rooms, and auditoriums.

One of the primary features of the Eiki LC-XG210 is its remarkable brightness, with a lumen output of 3,200 ANSI lumens. This high brightness level ensures that presentations remain vibrant and clear, even in well-lit environments. Coupled with a native resolution of XGA (1024 x 768 pixels), the projector delivers sharp text and detailed images, making it suitable for displaying both graphics and video footage.

The LC-XG210 utilizes advanced 3LCD technology, which ensures accurate color reproduction and enhanced color brightness. This technology provides a wide color gamut, allowing users to enjoy rich and lifelike colors without any noticeable color distortion. The projector also features a high contrast ratio, contributing to deeper blacks and more vivid images, further enhancing the overall viewing experience.

Connectivity is a crucial aspect of the Eiki LC-XG210, and it excels in this area with a range of input options. It includes multiple VGA inputs, composite and S-Video inputs, as well as a USB port for easy connection to computers and other devices. This flexibility allows users to seamlessly switch between different sources without the need for additional adapters.

Additionally, the projector is equipped with a powerful built-in speaker that delivers clear audio, eliminating the need for external sound systems in smaller venues. Its lightweight and portable design make it easy to transport, enabling users to set it up quickly in various locations.

The Eiki LC-XG210 also boasts a user-friendly interface and advanced features such as automatic keystone correction, which simplifies the setup process by automatically adjusting the image to fit the screen perfectly. This projector is designed for reliability and longevity, evident in its long lamp life of up to 5,000 hours in eco mode, reducing maintenance costs and enhancing overall value.

In summary, the Eiki LC-XG210 is a versatile and powerful projector that combines high brightness levels, advanced LCD technology, and extensive connectivity options. These features make it an excellent choice for any professional or educational environment, ensuring outstanding image quality and reliability for diverse presentation needs.