DMX PARTNER
6
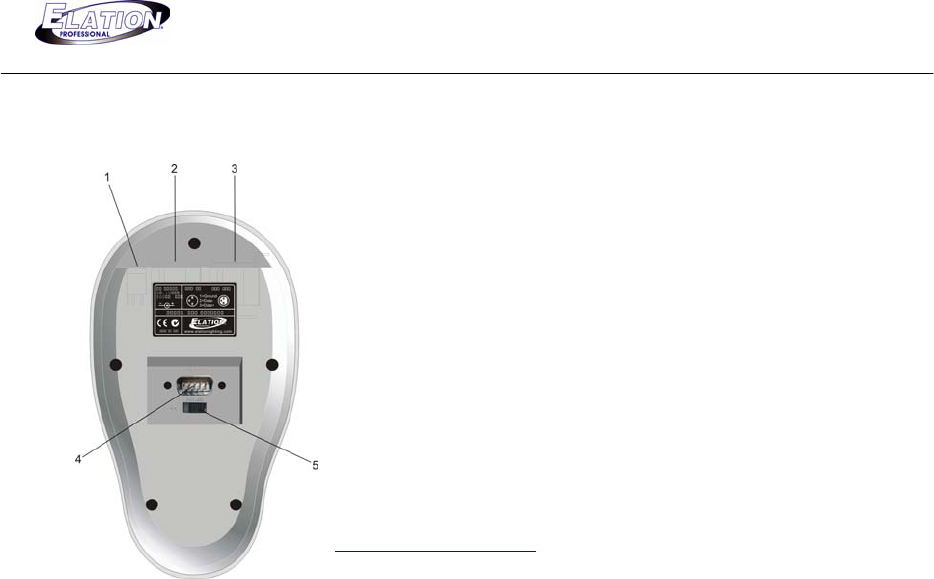
Section 5: Rear Panel Overview
1. Power Supply DC Input- plug the supplied 9 DC-1000mA
minimum power supply into this input.
2. DMX Input- connect a universal DMX controller into this input for
scene uploading.
3. DMX Output- connect to moving lights or dimmers for chase and
show playback of uploaded scenes. This output works in conjunction
with the 1-8 chase buttons, strobe button and the two (2) show
buttons.
4. DB9 Pin RS-232 input connector- connect to a another DMX
Partner, lap top or PC to transfer or load a data file. Use a standard
RS-232 serial lap link type cable to connect between DMX Partner
and other device. Must use Elation RS-232 software to transfer data
between DMX Partner and lap top or PC- software availible at
www.elationlighting.com . (See section 10 for additonal data transfer
information).
5. Power switch- switches the units power on or off.
Section 6: Assigning Joystick
1. Connect from your DMX controllers output to the DMX input of your DMX Partner.
2. Press the “Pan/Tilt“ button so that its LED turns ON.
3. On your DMX Controller, adjust all DMX values to zero.
4. Press and hold down the “Record“ button and simultaneously press chase buttons 1, 6, 8,1, 6, 8
in sequence. As a result, the Record LED will illuminate. (Note: if you do not have a DMX
controller connected to the DMX input of the DMX Partner as described in the previous step, you
will not be able to access Record mode).
5. On your DMX Controller, adjust your Pan channel to any value between 30-127. For example- If
Pan is on channel # 1, you would adjust channel 1 to any value betwen 30-127. (It is very
important that you do not adjust any other channel during this process. In doing so you may
assign unwanted channels to the joystick).
6. Press the “Pan/Tilt“ button to confirm and save your Pan setting.
7. On your DMX Controller, adjust your Tilt channel to any value between 128-255. For example- If
Tilt is on channel # 2, you would adjust channel 2 to any value betwen 128-255. (It is very
important that you do not adjust any other channel during this process. In doing so, you may
assign unwanted channels to the joystick).
8. Press the “Pan/Tilt“ button to confirm and save your Tilt setting.
9. Press “Blackout“ twice to exit.