INSTALLATION INSTRUCTIONS FOR FREESTANDING GAS RANGE

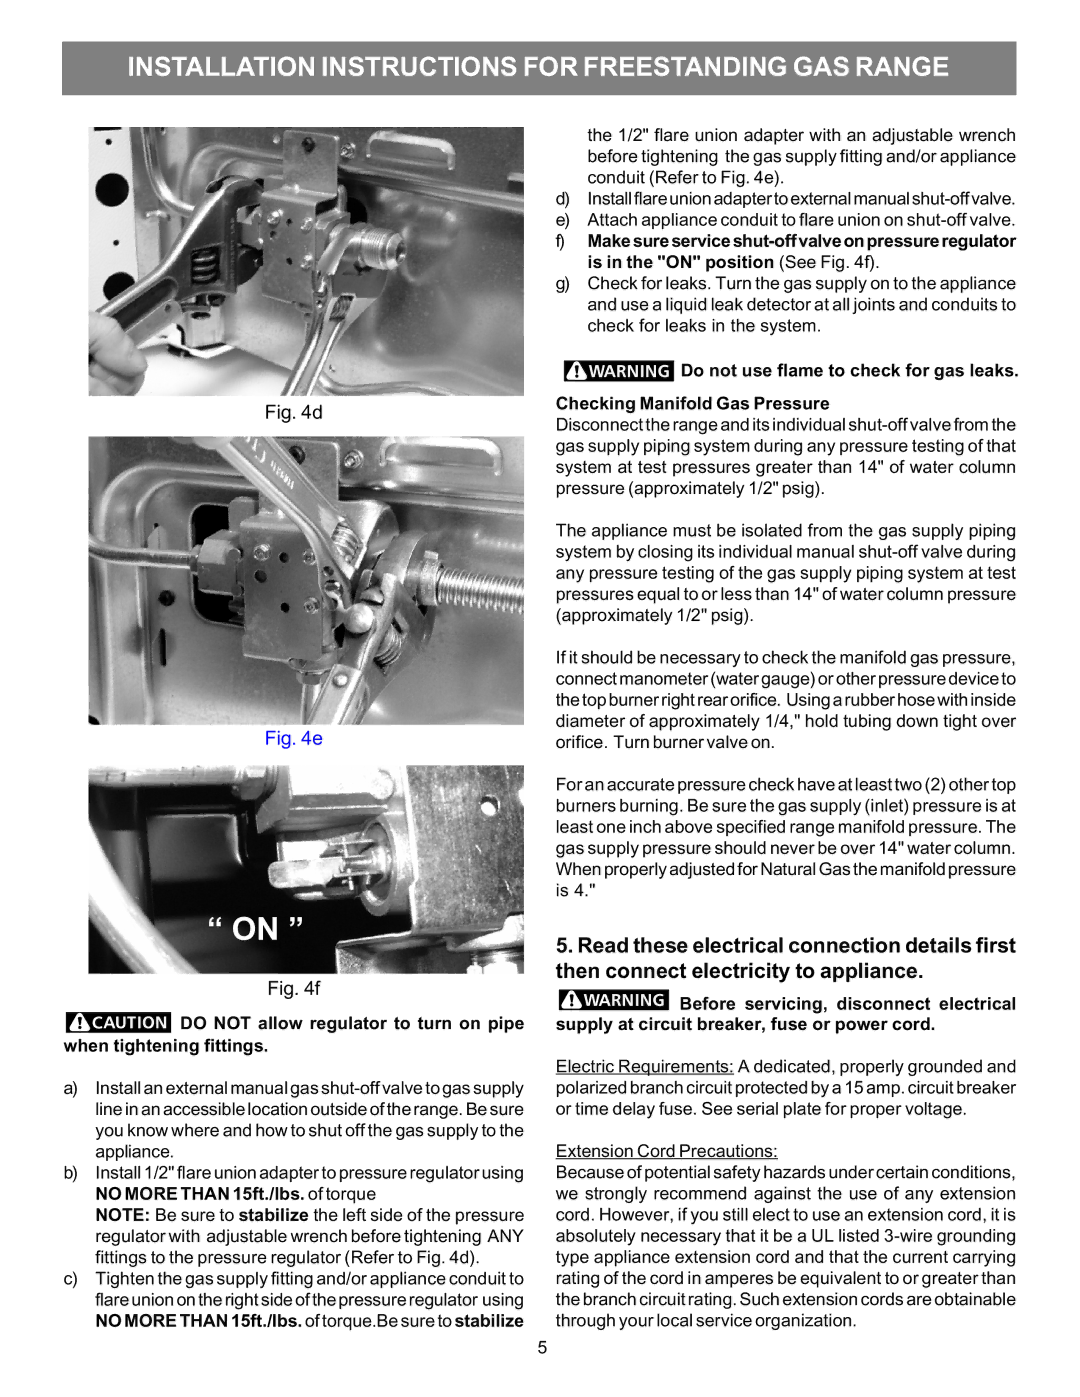
Fig. 4d

Fig. 4e

“ ON ”

Fig. 4f

DO NOT allow regulator to turn on pipe when tightening fittings.

a)Install an external manual gas shut-off valve to gas supply line in an accessible location outside of the range. Be sure you know where and how to shut off the gas supply to the appliance.

b)Install 1/2" flare union adapter to pressure regulator using NO MORE THAN 15ft./lbs. of torque

NOTE: Be sure to stabilize the left side of the pressure regulator with adjustable wrench before tightening ANY fittings to the pressure regulator (Refer to Fig. 4d).

c)Tighten the gas supply fitting and/or appliance conduit to flare union on the right side of the pressure regulator using NO MORE THAN 15ft./lbs. of torque.Be sure to stabilize

the 1/2" flare union adapter with an adjustable wrench before tightening the gas supply fitting and/or appliance conduit (Refer to Fig. 4e).

d)Install flare union adapter to external manual shut-off valve.

e)Attach appliance conduit to flare union on shut-off valve.

f)Make sure service shut-off valve on pressure regulator is in the "ON" position (See Fig. 4f).

g)Check for leaks. Turn the gas supply on to the appliance and use a liquid leak detector at all joints and conduits to check for leaks in the system.

Do not use flame to check for gas leaks. Checking Manifold Gas Pressure

Disconnect the range and its individual shut-off valve from the gas supply piping system during any pressure testing of that system at test pressures greater than 14" of water column pressure (approximately 1/2" psig).

The appliance must be isolated from the gas supply piping system by closing its individual manual shut-off valve during any pressure testing of the gas supply piping system at test pressures equal to or less than 14" of water column pressure (approximately 1/2" psig).

If it should be necessary to check the manifold gas pressure, connect manometer (water gauge) or other pressure device to the top burner right rear orifice. Using a rubber hose with inside diameter of approximately 1/4," hold tubing down tight over orifice. Turn burner valve on.

For an accurate pressure check have at least two (2) other top burners burning. Be sure the gas supply (inlet) pressure is at least one inch above specified range manifold pressure. The gas supply pressure should never be over 14" water column. When properly adjusted for Natural Gas the manifold pressure is 4."

5.Read these electrical connection details first then connect electricity to appliance.

Before servicing, disconnect electrical supply at circuit breaker, fuse or power cord.

Electric Requirements: A dedicated, properly grounded and polarized branch circuit protected by a 15 amp. circuit breaker or time delay fuse. See serial plate for proper voltage.

Extension Cord Precautions:

Because of potential safety hazards under certain conditions, we strongly recommend against the use of any extension cord. However, if you still elect to use an extension cord, it is absolutely necessary that it be a UL listed 3-wire grounding type appliance extension cord and that the current carrying rating of the cord in amperes be equivalent to or greater than the branch circuit rating. Such extension cords are obtainable through your local service organization.

5

Page 7
Image 7
Electrolux 316469105 installation instructions Extension Cord Precautions

316469105 specifications

The Electrolux 316469105 is a top-tier range replacement part known for its reliability and performance in cooking appliances. Designed to enhance the functionality of various Electrolux ranges, this component represents a critical part of many kitchen setups.

One of the main features of the Electrolux 316469105 is its high-quality construction. Made with durable materials, the part ensures longevity and resistance to wear and tear, common issues in household appliances. The attention to quality means that users can expect consistent performance over time, making cooking more enjoyable and efficient.

The Electrolux 316469105 is engineered for compatibility with a range of models, thereby offering versatility for homeowners who own different Electrolux appliances. This compatibility ensures that users can easily replace old or malfunctioning parts without the need for major modifications or adjustments to their existing setups.

In terms of technology, this range part boasts innovative designs that facilitate better heat distribution for even cooking results. The use of advanced materials allows for quicker heat-up times and optimal energy efficiency. This is particularly beneficial in today's eco-conscious society, where consumers are increasingly concerned about their energy consumption and carbon footprint.

The Electrolux 316469105 is also designed with practicality in mind. Its installation process is straightforward, with clear instructions that guide users through the replacement steps. This user-friendly design means that even those with limited DIY skills can successfully replace the part, saving both time and money by avoiding costly service calls.

Another notable characteristic is its emphasis on safety. The part is constructed to meet rigorous safety standards, reducing the risk of malfunctions during operation. This feature provides peace of mind to users, allowing them to focus on creating delicious meals without worrying about the integrity of their appliance.

Overall, the Electrolux 316469105 is a testament to quality engineering and customer-centered design. With its robust features, technological innovations, and user-friendly attributes, it stands out as an essential component for anyone looking to maintain or enhance the performance of their Electrolux range. Whether you’re a seasoned chef or just starting your culinary journey, this part can significantly improve your cooking experience.