INSTALLATION INSTRUCTIONS FOR FREESTANDING GAS RANGE

REMEMBER DO NOT ALLOW SPILLS, FOOD,

CLEANING AGENTS OR ANY OTHER MATERIAL TO ENTER THE GAS ORIFICE HOLDER OPENING. Always keep the Burner Caps and Burner Heads in place whenever the surface burners are in use.

7. Electric Ignition Surface Burners

Operation of electric igniters should be checked after range and supply line connectors have been carefully checked for leaks and range has been connected to electric power.

a.To check for proper lighting, push in and turn a surface

burner knob counterclockwise to the (lite) position. You will hear the igniter sparking (See Fig. 1).

b.The surface burner should light when gas is available to the top burner. Purge air from supply lines by leaving

knob in the (lite) position until burner ignites. Each burner should light within four (4) seconds in normal operation after air has been purged from supply lines.

c.Visually check that burner has lit. Once the burner lights,

the control knob should be turned out of the (lite) position.

d.There are separate electrodes (igniters) for each burner. Try each knob separately until all burner valves have been checked.

Test to verify if “LO or LOW” setting should be adjusted (right front position ONLY):

a.Push in and turn knob to (lite) until burner ignites.

b.Push in and quickly turn knob to LOWEST POSITION.

c.If burner goes out, reset control to OFF.

d.Remove the burner control knob.

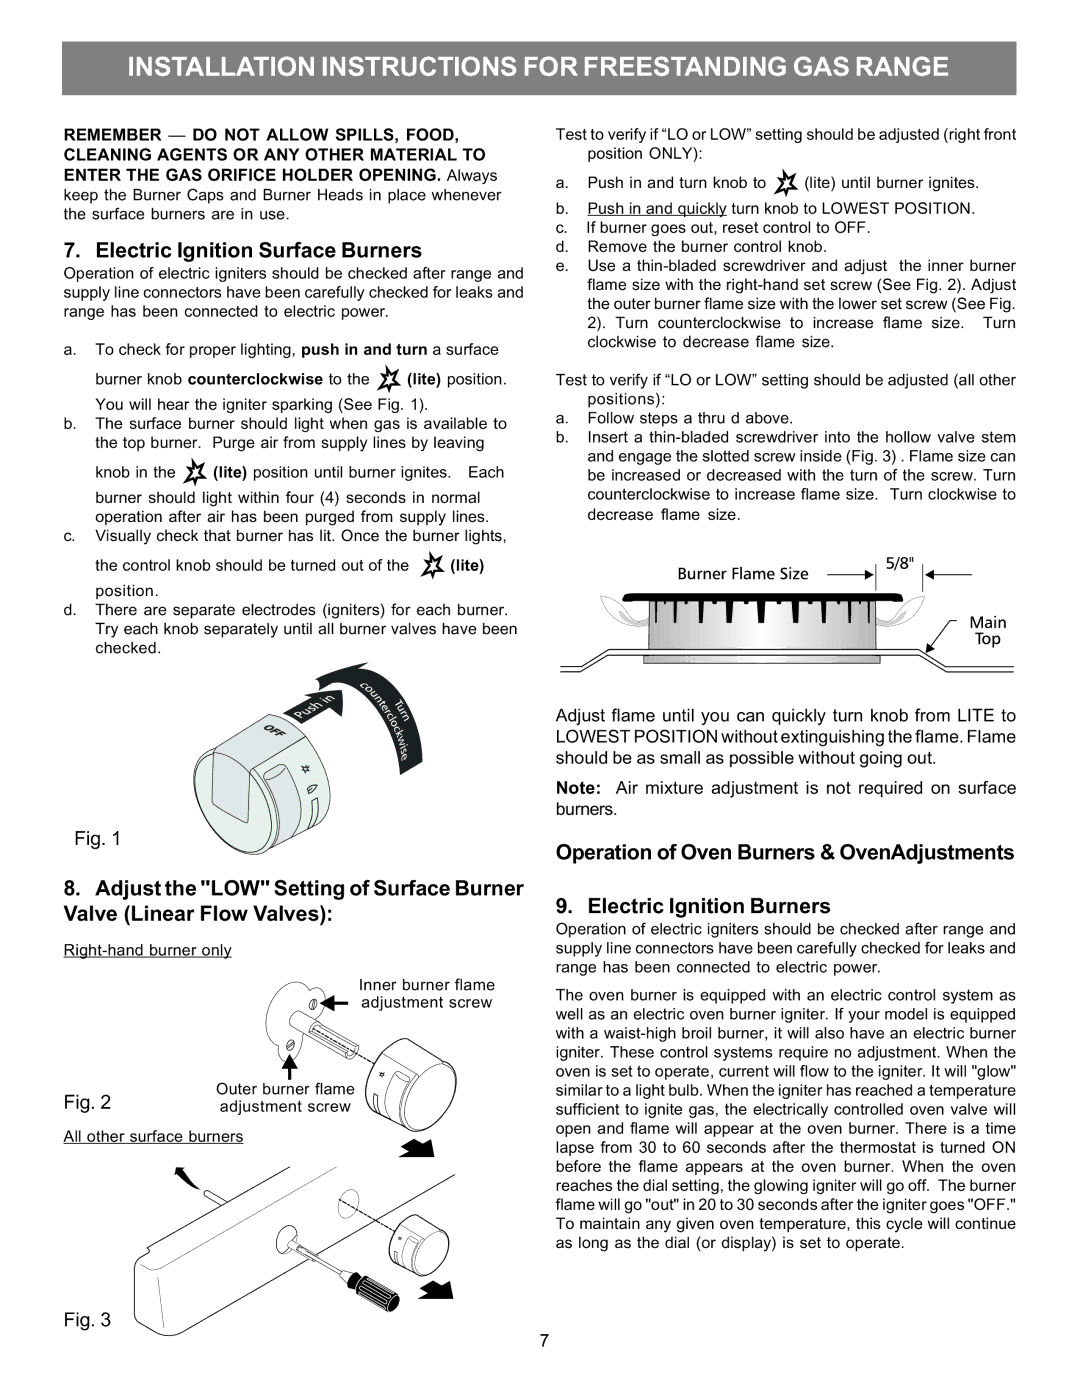
e.Use a thin-bladed screwdriver and adjust the inner burner flame size with the right-hand set screw (See Fig. 2). Adjust the outer burner flame size with the lower set screw (See Fig. 2). Turn counterclockwise to increase flame size. Turn clockwise to decrease flame size.

Test to verify if “LO or LOW” setting should be adjusted (all other positions):

a.Follow steps a thru d above.

b.Insert a thin-bladed screwdriver into the hollow valve stem and engage the slotted screw inside (Fig. 3) . Flame size can be increased or decreased with the turn of the screw. Turn counterclockwise to increase flame size. Turn clockwise to decrease flame size.

Fig. 1

8.Adjust the "LOW" Setting of Surface Burner Valve (Linear Flow Valves):

Right-hand burner only

Inner burner flame adjustment screw

Fig. 2

Outer burner flame

adjustment screw

All other surface burners

Fig. 3

Adjust flame until you can quickly turn knob from LITE to LOWEST POSITION without extinguishing the flame. Flame should be as small as possible without going out.

Note: Air mixture adjustment is not required on surface burners.

Operation of Oven Burners & OvenAdjustments

9. Electric Ignition Burners

Operation of electric igniters should be checked after range and supply line connectors have been carefully checked for leaks and range has been connected to electric power.

The oven burner is equipped with an electric control system as well as an electric oven burner igniter. If your model is equipped with a waist-high broil burner, it will also have an electric burner igniter. These control systems require no adjustment. When the oven is set to operate, current will flow to the igniter. It will "glow" similar to a light bulb. When the igniter has reached a temperature sufficient to ignite gas, the electrically controlled oven valve will open and flame will appear at the oven burner. There is a time lapse from 30 to 60 seconds after the thermostat is turned ON before the flame appears at the oven burner. When the oven reaches the dial setting, the glowing igniter will go off. The burner flame will go "out" in 20 to 30 seconds after the igniter goes "OFF." To maintain any given oven temperature, this cycle will continue as long as the dial (or display) is set to operate.

7

Page 9
Image 9
Electrolux 316469105 installation instructions Electric Ignition Surface Burners, Remember do not Allow SPILLS, Food

316469105 specifications

The Electrolux 316469105 is a top-tier range replacement part known for its reliability and performance in cooking appliances. Designed to enhance the functionality of various Electrolux ranges, this component represents a critical part of many kitchen setups.

One of the main features of the Electrolux 316469105 is its high-quality construction. Made with durable materials, the part ensures longevity and resistance to wear and tear, common issues in household appliances. The attention to quality means that users can expect consistent performance over time, making cooking more enjoyable and efficient.

The Electrolux 316469105 is engineered for compatibility with a range of models, thereby offering versatility for homeowners who own different Electrolux appliances. This compatibility ensures that users can easily replace old or malfunctioning parts without the need for major modifications or adjustments to their existing setups.

In terms of technology, this range part boasts innovative designs that facilitate better heat distribution for even cooking results. The use of advanced materials allows for quicker heat-up times and optimal energy efficiency. This is particularly beneficial in today's eco-conscious society, where consumers are increasingly concerned about their energy consumption and carbon footprint.

The Electrolux 316469105 is also designed with practicality in mind. Its installation process is straightforward, with clear instructions that guide users through the replacement steps. This user-friendly design means that even those with limited DIY skills can successfully replace the part, saving both time and money by avoiding costly service calls.

Another notable characteristic is its emphasis on safety. The part is constructed to meet rigorous safety standards, reducing the risk of malfunctions during operation. This feature provides peace of mind to users, allowing them to focus on creating delicious meals without worrying about the integrity of their appliance.

Overall, the Electrolux 316469105 is a testament to quality engineering and customer-centered design. With its robust features, technological innovations, and user-friendly attributes, it stands out as an essential component for anyone looking to maintain or enhance the performance of their Electrolux range. Whether you’re a seasoned chef or just starting your culinary journey, this part can significantly improve your cooking experience.