Fitting the Hob into the worktop

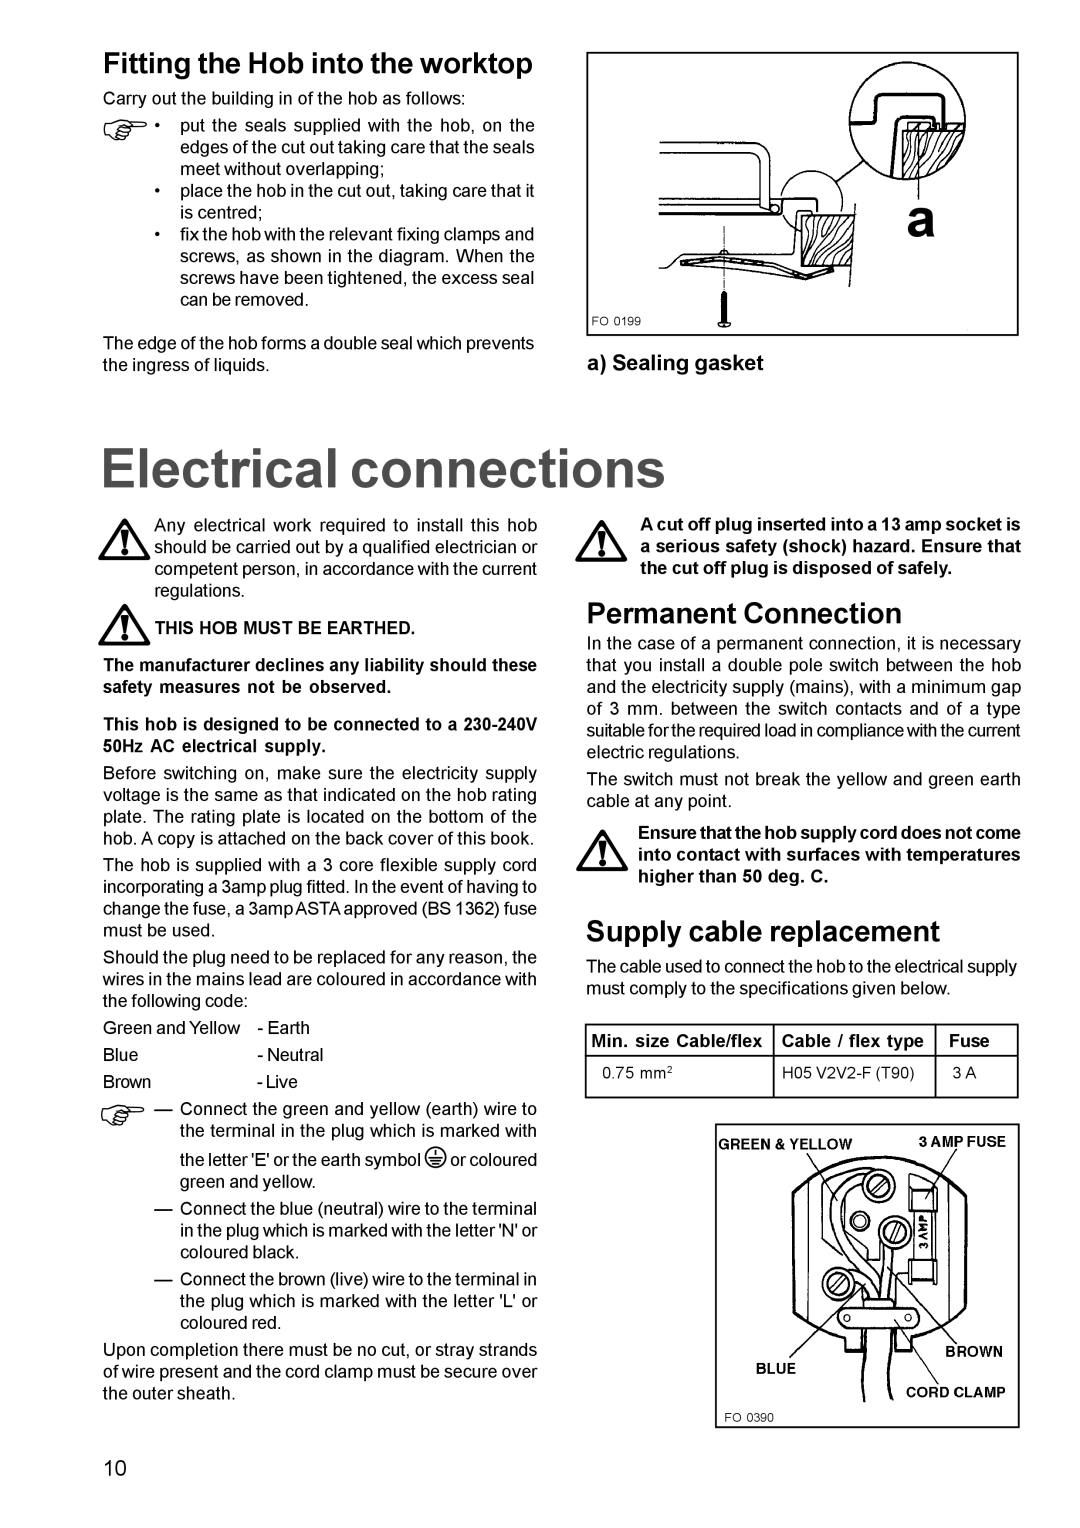
Carry out the building in of the hob as follows:

Φ• put the seals supplied with the hob, on the edges of the cut out taking care that the seals meet without overlapping;

place the hob in the cut out, taking care that it is centred;

fix the hob with the relevant fixing clamps and screws, as shown in the diagram. When the screws have been tightened, the excess seal can be removed.

The edge of the hob forms a double seal which prevents the ingress of liquids.

a

FO 0199

a) Sealing gasket

Electrical connections

Any electrical work required to install this hob should be carried out by a qualified electrician or competent person, in accordance with the current regulations.

THIS HOB MUST BE EARTHED.

The manufacturer declines any liability should these safety measures not be observed.

This hob is designed to be connected to a 230-240V 50Hz AC electrical supply.

Before switching on, make sure the electricity supply voltage is the same as that indicated on the hob rating plate. The rating plate is located on the bottom of the hob. A copy is attached on the back cover of this book.

The hob is supplied with a 3 core flexible supply cord incorporating a 3amp plug fitted. In the event of having to change the fuse, a 3amp ASTA approved (BS 1362) fuse must be used.

Should the plug need to be replaced for any reason, the wires in the mains lead are coloured in accordance with the following code:

Green and Yellow - Earth

Blue- Neutral

Brown- Live

Φ— Connect the green and yellow (earth) wire to the terminal in the plug which is marked with

the letter 'E' or the earth symbolor coloured green and yellow.

Connect the blue (neutral) wire to the terminal in the plug which is marked with the letter 'N' or coloured black.

Connect the brown (live) wire to the terminal in the plug which is marked with the letter 'L' or coloured red.

Upon completion there must be no cut, or stray strands of wire present and the cord clamp must be secure over the outer sheath.

A cut off plug inserted into a 13 amp socket is a serious safety (shock) hazard. Ensure that the cut off plug is disposed of safely.

Permanent Connection

In the case of a permanent connection, it is necessary that you install a double pole switch between the hob and the electricity supply (mains), with a minimum gap of 3 mm. between the switch contacts and of a type suitable for the required load in compliance with the current electric regulations.

The switch must not break the yellow and green earth cable at any point.

Ensure that the hob supply cord does not come into contact with surfaces with temperatures higher than 50 deg. C.

Supply cable replacement

The cable used to connect the hob to the electrical supply must comply to the specifications given below.

Min. size Cable/flex

Cable / flex type

Fuse


0.75 mm2

H05 V2V2-F (T90)

3 A


FO 0390

10

Page 10
Image 10
Electrolux EHG 691, EHG 673 manual Electrical connections, Fitting the Hob into the worktop, Permanent Connection

EHG 673, EHG 691 specifications

Electrolux, a leading global appliance manufacturer, has made a notable impact in the world of kitchen products with its innovative cooktops, particularly the EHG 691 and EHG 673 models. Both of these units exemplify Electrolux's commitment to quality, efficiency, and modern design.

The Electrolux EHG 691 is a powerful gas cooktop that features five burners, including a high-power wok burner, allowing for versatile cooking options. The burner configuration is designed to accommodate various pot sizes, making it suitable for everything from simmering sauces to stir-frying. One of its standout features is the Flame Safety Device, which automatically cuts off the gas supply if the flame goes out, providing peace of mind for safety-conscious cooks.

On the other hand, the EHG 673 model also offers a robust gas cooking experience but is slightly more compact with four burners. This model is perfect for smaller kitchens or those who may not require as much cooking power. It includes an innovative pan support system designed to provide stability and support for pots and pans, enhancing the overall cooking experience.

Both models come with sleek stainless steel finishes that not only add a touch of elegance to any kitchen but are also easy to clean and maintain. The simple-to-use control knobs are situated at the front, ensuring easy access and safety while cooking.

Electrolux has incorporated several advanced technologies into its cooktops. The gas flow is carefully engineered for optimal combustion efficiency, leading to faster cooking times and better energy use. Additionally, the removable burner caps make cleaning hassle-free, a significant consideration for those who love cooking but dread the cleanup after.

In terms of characteristics, both models are built to last, featuring durable materials that can withstand everyday wear and tear. The EHG 691 and EHG 673 are suitable for both home cooks and professional chefs looking to enhance their culinary prowess.

In summary, the Electrolux EHG 691 and EHG 673 are exceptional gas cooktops that exemplify the brand's focus on quality, functionality, and design. With their advanced features and technologies, they cater to a wide range of cooking needs, ensuring a delightful cooking experience in every kitchen.