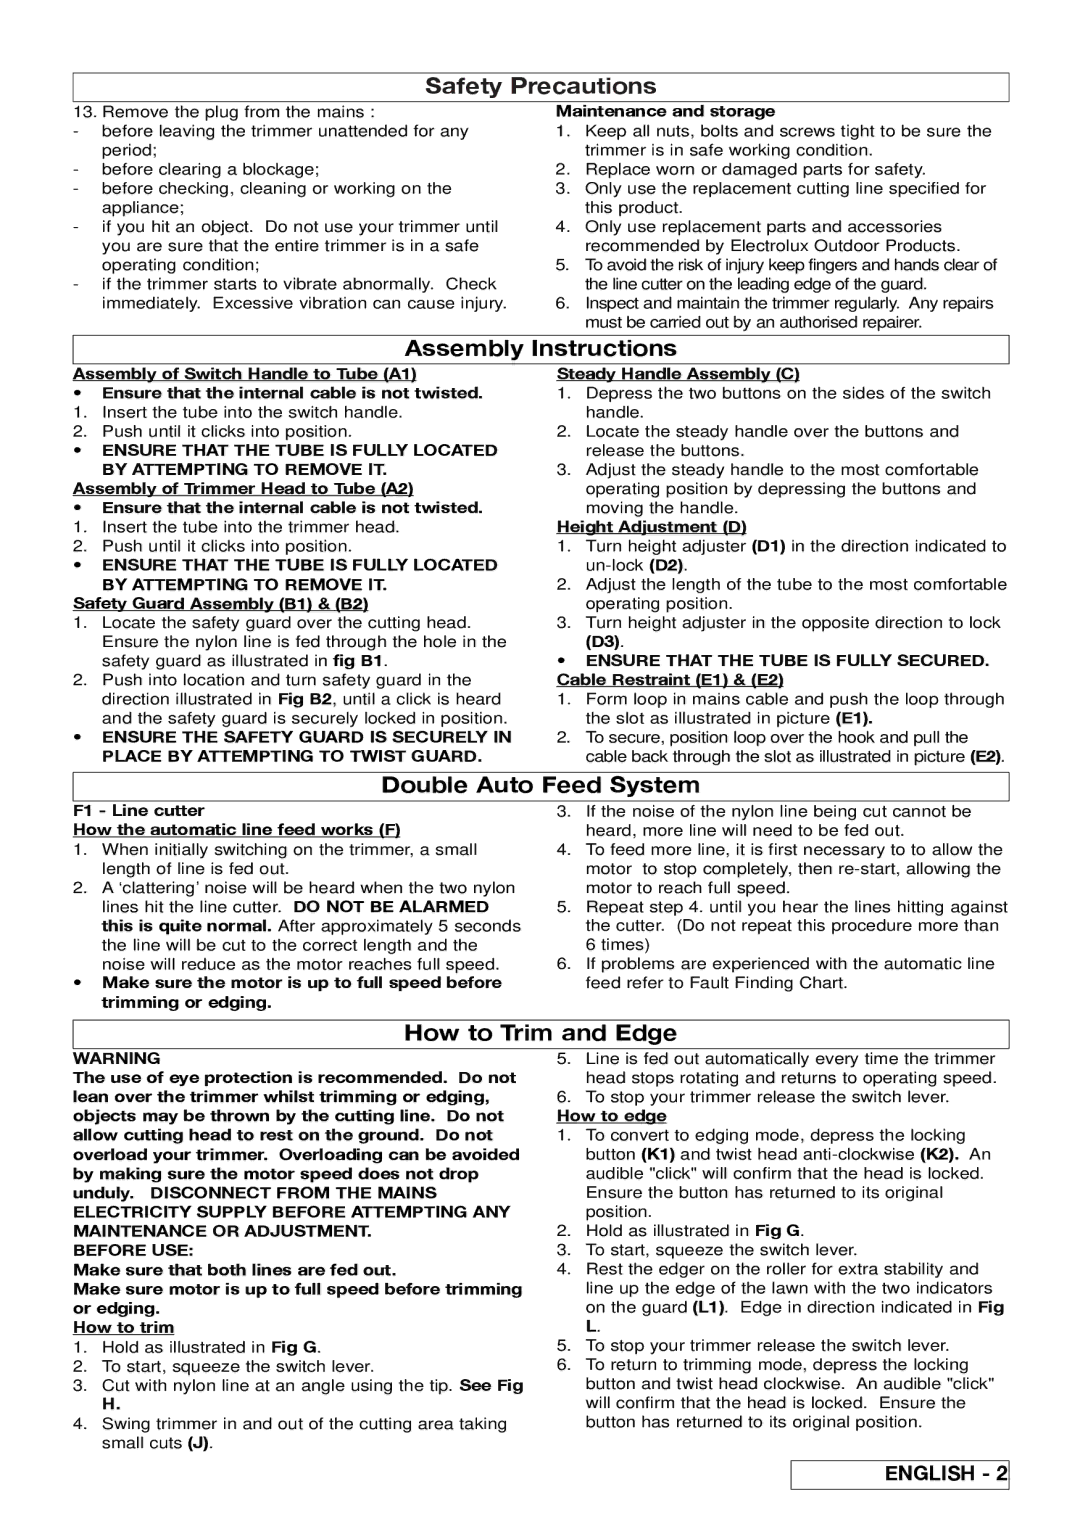
Electrolux ET500 Safety Precautions, Assembly Instructions, Double Auto Feed System, English

Models: 96487036200 96487026200 ET700 ET500

1 14
Download 14 pages 50.44 Kb
Page 8
Image 8
Safety Precautions

Safety Precautions

13. Remove the plug from the mains :

-before leaving the trimmer unattended for any period;

-before clearing a blockage;

-before checking, cleaning or working on the appliance;

-if you hit an object. Do not use your trimmer until you are sure that the entire trimmer is in a safe operating condition;

-if the trimmer starts to vibrate abnormally. Check immediately. Excessive vibration can cause injury.

Maintenance and storage

1.Keep all nuts, bolts and screws tight to be sure the trimmer is in safe working condition.

2.Replace worn or damaged parts for safety.

3.Only use the replacement cutting line specified for this product.

4.Only use replacement parts and accessories recommended by Electrolux Outdoor Products.

5.To avoid the risk of injury keep fingers and hands clear of the line cutter on the leading edge of the guard.

6.Inspect and maintain the trimmer regularly. Any repairs must be carried out by an authorised repairer.

Assembly Instructions

Assembly of Switch Handle to Tube (A1)

Ensure that the internal cable is not twisted.

1.Insert the tube into the switch handle.

2.Push until it clicks into position.

ENSURE THAT THE TUBE IS FULLY LOCATED

BY ATTEMPTING TO REMOVE IT. Assembly of Trimmer Head to Tube (A2)

Ensure that the internal cable is not twisted.

1.Insert the tube into the trimmer head.

2.Push until it clicks into position.

ENSURE THAT THE TUBE IS FULLY LOCATED

BY ATTEMPTING TO REMOVE IT.

Safety Guard Assembly (B1) & (B2)

1.Locate the safety guard over the cutting head.

Ensure the nylon line is fed through the hole in the safety guard as illustrated in fig B1.

2.Push into location and turn safety guard in the direction illustrated in Fig B2, until a click is heard

and the safety guard is securely locked in position.

ENSURE THE SAFETY GUARD IS SECURELY IN PLACE BY ATTEMPTING TO TWIST GUARD.

Steady Handle Assembly (C)

1.Depress the two buttons on the sides of the switch handle.

2.Locate the steady handle over the buttons and release the buttons.

3.Adjust the steady handle to the most comfortable operating position by depressing the buttons and

moving the handle.

Height Adjustment (D)

1.Turn height adjuster (D1) in the direction indicated to un-lock (D2).

2.Adjust the length of the tube to the most comfortable operating position.

3.Turn height adjuster in the opposite direction to lock

(D3).

ENSURE THAT THE TUBE IS FULLY SECURED. Cable Restraint (E1) & (E2)

1.Form loop in mains cable and push the loop through the slot as illustrated in picture (E1).

2.To secure, position loop over the hook and pull the cable back through the slot as illustrated in picture (E2).

Double Auto Feed System

F1 - Line cutter

How the automatic line feed works (F)

1.When initially switching on the trimmer, a small length of line is fed out.

2.A ‘clattering’ noise will be heard when the two nylon lines hit the line cutter. DO NOT BE ALARMED this is quite normal. After approximately 5 seconds the line will be cut to the correct length and the

noise will reduce as the motor reaches full speed.

Make sure the motor is up to full speed before trimming or edging.

3.If the noise of the nylon line being cut cannot be heard, more line will need to be fed out.

4.To feed more line, it is first necessary to to allow the motor to stop completely, then re-start, allowing the motor to reach full speed.

5.Repeat step 4. until you hear the lines hitting against the cutter. (Do not repeat this procedure more than 6 times)

6.If problems are experienced with the automatic line feed refer to Fault Finding Chart.

How to Trim and Edge

WARNING

The use of eye protection is recommended. Do not lean over the trimmer whilst trimming or edging, objects may be thrown by the cutting line. Do not allow cutting head to rest on the ground. Do not overload your trimmer. Overloading can be avoided by making sure the motor speed does not drop unduly. DISCONNECT FROM THE MAINS ELECTRICITY SUPPLY BEFORE ATTEMPTING ANY MAINTENANCE OR ADJUSTMENT.

BEFORE USE:

Make sure that both lines are fed out.

Make sure motor is up to full speed before trimming or edging.

How to trim

1.Hold as illustrated in Fig G.

2.To start, squeeze the switch lever.

3.Cut with nylon line at an angle using the tip. See Fig

H.

4.Swing trimmer in and out of the cutting area taking small cuts (J).

5.Line is fed out automatically every time the trimmer head stops rotating and returns to operating speed.

6.To stop your trimmer release the switch lever.

How to edge

1.To convert to edging mode, depress the locking button (K1) and twist head anti-clockwise (K2). An audible "click" will confirm that the head is locked. Ensure the button has returned to its original position.

2.Hold as illustrated in Fig G.

3.To start, squeeze the switch lever.

4.Rest the edger on the roller for extra stability and

line up the edge of the lawn with the two indicators on the guard (L1). Edge in direction indicated in Fig L.

5.To stop your trimmer release the switch lever.

6.To return to trimming mode, depress the locking button and twist head clockwise. An audible "click" will confirm that the head is locked. Ensure the button has returned to its original position.

ENGLISH - 2

Page 8
Image 8
Electrolux ET500, ET700 Safety Precautions, Assembly Instructions, Double Auto Feed System, How to Trim and Edge, English