4. CONNECTING TO GAS

This appliance is designed to be installed with an appliance flexible connection only. Supply piping should not be less than R³/8. Connection is made to the Rc½ (½" B.S.P.) female threaded entry pipe located just below the hotplate level on the rear left hand side of the appliance. NOTE: ONLY LIQUID SEALANTS TO BE USED

WHEN INLET GAS PIPE IS FITTED I.E.: DO NOT USE P.T.F.E. SEALANT TAPE.

Check for gas soundness after connecting the gas supply.

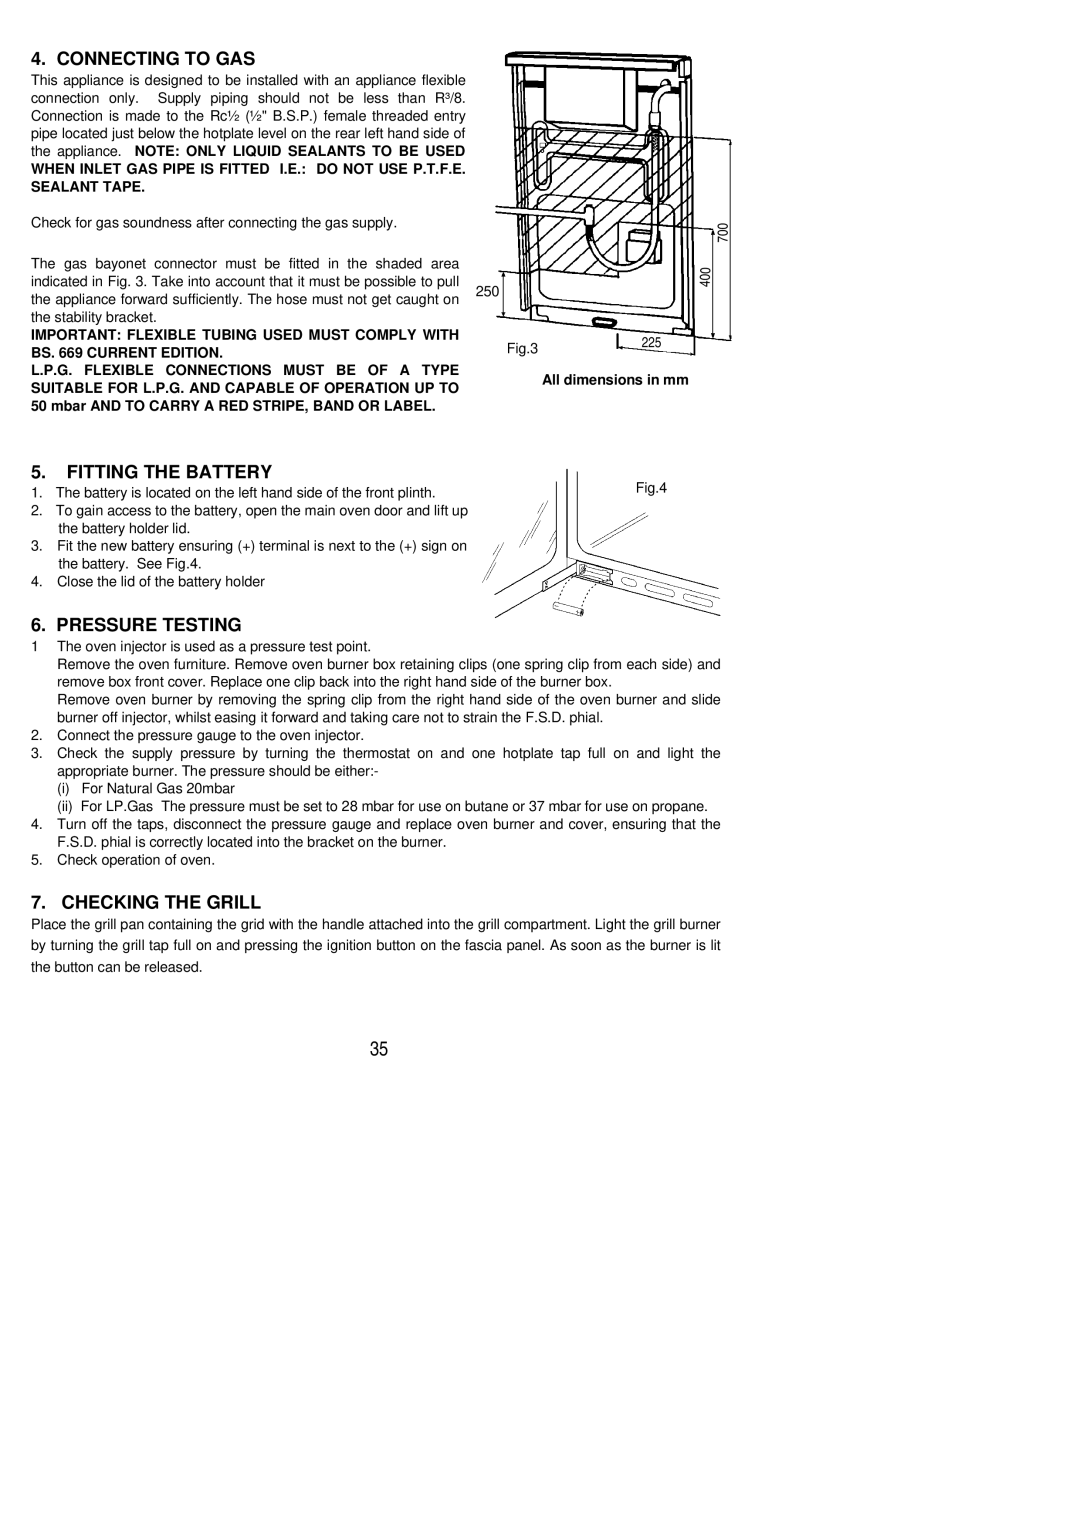
The gas bayonet connector must be fitted in the shaded area

indicated in Fig. 3. Take into account that it must be possible to pull

250

the appliance forward sufficiently. The hose must not get caught on the stability bracket.

IMPORTANT: FLEXIBLE TUBING USED MUST COMPLY WITH BS. 669 CURRENT EDITION.

L.P.G. FLEXIBLE CONNECTIONS MUST BE OF A TYPE SUITABLE FOR L.P.G. AND CAPABLE OF OPERATION UP TO 50 mbar AND TO CARRY A RED STRIPE, BAND OR LABEL.

Fig.3225

All dimensions in mm

700

5. FITTING THE BATTERY

1. The battery is located on the left hand side of the front plinth.

Fig.4


2.To gain access to the battery, open the main oven door and lift up the battery holder lid.

3.Fit the new battery ensuring (+) terminal is next to the (+) sign on the battery. See Fig.4.

4.Close the lid of the battery holder

6. PRESSURE TESTING

1The oven injector is used as a pressure test point.

Remove the oven furniture. Remove oven burner box retaining clips (one spring clip from each side) and remove box front cover. Replace one clip back into the right hand side of the burner box.

Remove oven burner by removing the spring clip from the right hand side of the oven burner and slide burner off injector, whilst easing it forward and taking care not to strain the F.S.D. phial.

2.Connect the pressure gauge to the oven injector.

3.Check the supply pressure by turning the thermostat on and one hotplate tap full on and light the appropriate burner. The pressure should be either:-

(i)For Natural Gas 20mbar

(ii)For LP.Gas The pressure must be set to 28 mbar for use on butane or 37 mbar for use on propane.

4.Turn off the taps, disconnect the pressure gauge and replace oven burner and cover, ensuring that the F.S.D. phial is correctly located into the bracket on the burner.

5.Check operation of oven.

7. CHECKING THE GRILL

Place the grill pan containing the grid with the handle attached into the grill compartment. Light the grill burner

by turning the grill tap full on and pressing the ignition button on the fascia panel. As soon as the burner is lit

the button can be released.

35

Page 35
Image 35
Electrolux R G 5 0 M installation instructions Connecting to GAS, Fitting the Battery, Pressure Testing, Checking the Grill

R G 5 0 M specifications

The Electrolux R G 5 0 M is a versatile cooking appliance designed to meet the needs of modern households. This built-in oven combines innovation, efficiency, and advanced technology, making it an essential tool for culinary enthusiasts and home chefs alike.

One of the standout features of the Electrolux R G 5 0 M is its generous capacity. With ample space, it allows you to cook large meals or multiple dishes at once, which is perfect for families or entertaining guests. The oven's interior is also designed for easy cleaning, minimizing the time spent scrubbing after a delightful meal.

Equipped with advanced cooking technologies, the Electrolux R G 5 0 M ensures consistent and precise cooking results. It features a multifunctional cooking system that includes various cooking modes such as conventional baking, grilling, and convection. This versatility enables you to choose the best method for your culinary creations, whether you are baking a cake or roasting a chicken.

Another notable characteristic is the oven’s intuitive control panel. The user-friendly interface allows you to effortlessly navigate through settings and select cooking programs. This intuitive design enhances the cooking experience, making it accessible even for novice cooks.

The Electrolux R G 5 0 M is also equipped with advanced heat distribution technology. This feature ensures that heat is evenly circulated throughout the oven, resulting in uniform cooking and browning. Say goodbye to unevenly cooked meals; instead, enjoy perfectly baked goods and succulent roasts every time.

Energy efficiency is another aspect where the Electrolux R G 5 0 M excels. Designed with modern energy-saving technologies, this oven minimizes energy consumption without compromising performance. This not only benefits the environment but also helps in reducing utility bills.

Moreover, the sleek and modern design of the Electrolux R G 5 0 M seamlessly fits into any kitchen aesthetic. Its stylish finish and contemporary look elevate the overall appearance of your kitchen, providing both functionality and elegance.

In summary, the Electrolux R G 5 0 M is an advanced-built oven that combines high capacity, versatile cooking modes, user-friendly controls, and energy efficiency. Whether you are preparing a simple weekday dinner or a lavish feast, this oven is equipped to handle all cooking tasks with ease and precision, making it a remarkable addition to any home.