NOTE: CEILING COVER,


SUPPLY WIRES AND

OUTLET

FAN WIRES OMITTED

BOX

FOR CLARITY.


HANGER


BRACKET

Figure 14

HANGER BALL/


DOWNROD ASSEMBLY

!WARNING

To avoid possible fire or shock, do not pinch wires between the hanger ball/downrod assembly and the hanger bracket.

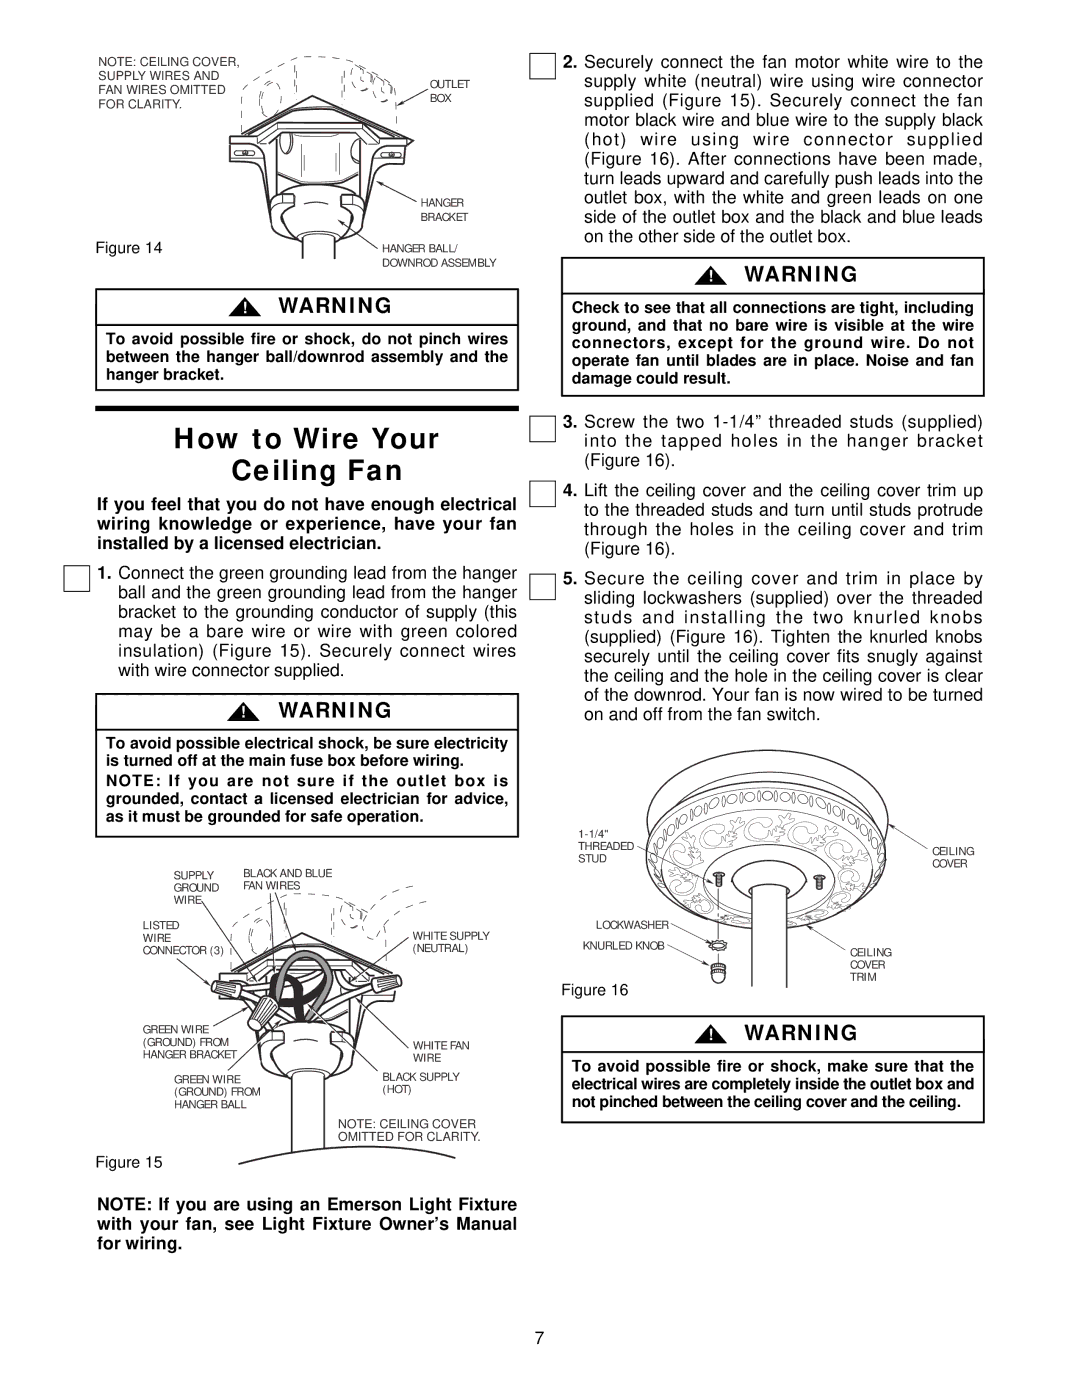
2.Securely connect the fan motor white wire to the supply white (neutral) wire using wire connector supplied (Figure 15). Securely connect the fan motor black wire and blue wire to the supply black (hot) wire using wire connector supplied (Figure 16). After connections have been made, turn leads upward and carefully push leads into the outlet box, with the white and green leads on one side of the outlet box and the black and blue leads on the other side of the outlet box.

!WARNING

Check to see that all connections are tight, including ground, and that no bare wire is visible at the wire connectors, except for the ground wire. Do not operate fan until blades are in place. Noise and fan damage could result.

How to Wire Your

Ceiling Fan

If you feel that you do not have enough electrical wiring knowledge or experience, have your fan installed by a licensed electrician.

1.Connect the green grounding lead from the hanger ball and the green grounding lead from the hanger bracket to the grounding conductor of supply (this may be a bare wire or wire with green colored insulation) (Figure 15). Securely connect wires with wire connector supplied.

!WARNING

To avoid possible electrical shock, be sure electricity is turned off at the main fuse box before wiring. NOTE: If you are not sure if the outlet box is grounded, contact a licensed electrician for advice, as it must be grounded for safe operation.

3.Screw the two 1-1/4” threaded studs (supplied) into the tapped holes in the hanger bracket (Figure 16).

4.Lift the ceiling cover and the ceiling cover trim up to the threaded studs and turn until studs protrude through the holes in the ceiling cover and trim (Figure 16).

5.Secure the ceiling cover and trim in place by sliding lockwashers (supplied) over the threaded studs and installing the two knurled knobs (supplied) (Figure 16). Tighten the knurled knobs securely until the ceiling cover fits snugly against the ceiling and the hole in the ceiling cover is clear of the downrod. Your fan is now wired to be turned on and off from the fan switch.

SUPPLY

BLACK AND BLUE

GROUND

FAN WIRES

WIRE


LISTED

WHITE SUPPLY

WIRE

CONNECTOR (3)

(NEUTRAL)

1-1/4"

THREADED STUD

LOCKWASHER

KNURLED KNOB

Figure 16

CEILING

COVER

CEILING

COVER

TRIM

GREEN WIRE


(GROUND) FROM

WHITE FAN

HANGER BRACKET

WIRE

GREEN WIRE

BLACK SUPPLY

(GROUND) FROM

(HOT)

HANGER BALL


NOTE: CEILING COVER


OMITTED FOR CLARITY.

Figure 15

NOTE: If you are using an Emerson Light Fixture with your fan, see Light Fixture Owner’s Manual for wiring.

!WARNING

To avoid possible fire or shock, make sure that the electrical wires are completely inside the outlet box and not pinched between the ceiling cover and the ceiling.

7

Page 7
Image 7
Emerson CF1ORB01 owner manual How to Wire Your Ceiling Fan

CF1ORB01 specifications

The Emerson CF1ORB01 is a sophisticated ceiling fan designed to blend style with functionality, making it an excellent addition to any modern home. Its sleek design and advanced technologies ensure both aesthetic appeal and efficient performance.

One of the standout features of the Emerson CF1ORB01 is its Energy Star certification. This certification indicates that the fan operates with high energy efficiency, contributing to lower electricity bills while also promoting environmental sustainability. The motor is designed to provide quiet operation, ensuring that the fan can be used in bedrooms or living spaces without causing disruptive noise.

The CF1ORB01 is equipped with a robust 153 mm x 15 mm motor that provides outstanding airflow, making it suitable for various room sizes. The fan generates a maximum airflow of around 5,400 cubic feet per minute (CFM), ensuring a comfortable and breezy environment for users. An optional remote control feature is also available, allowing for easy operation from anywhere in the room, enhancing user convenience.

Another significant characteristic is the fan's versatile blade design. The Emerson CF1ORB01 features five blades constructed from high-quality materials, ensuring durability and longevity. The blades are meticulously balanced to minimize wobbling and noise, providing a serene atmosphere while circulating air effectively. The specific finish of the blades contributes to the overall aesthetic, allowing the fan to complement a range of interior design themes.

Installation of the fan is made easier with its universal ceiling mount design, which means it can be installed on various ceiling types, whether standard or sloped. Additionally, the fan comes with a downrod that allows it to hang at the optimal height for efficiency in airflow and style.

The Emerson CF1ORB01 also features a reversible motor. This allows users to switch the fan's direction, which is especially useful for seasonal changes. In summer, the fan can create a wind-chill effect, helping to keep spaces cool. In winter, reversing the fan's direction helps circulate warm air that rises to the ceiling, promoting an even temperature throughout the room.

Overall, the Emerson CF1ORB01 stands out for its combination of elegance, efficiency, and advanced features, making it a preferred choice for consumers seeking a reliable ceiling fan.