8.Reinstall the hanger ball on the downrod (Figure 5) as follows. Route the motor leads through the hanger ball and slide the hanger ball over the downrod. Install the pin through the holes at the top of the downrod and slide the hanger ball up the downrod, aligning the ball so the pin is captured in the groove in the top of the hanger ball. Pull the hanger ball up tight against the pin and securely tighten the setscrew in the hanger ball. A loose setscrew could create fan wobble.

!WARNING

It is critical that the pin in the hanger ball is properly installed and the setscrew securely tightened. Failure to verify that the pin and setscrew are properly installed could result in the fan falling.

9.The fan comes with blue, black and white leads that are 80” long. Before installing fan, measure up approximately 6 to 9-inches above the ball/ downrod assembly. Cut off excess leads and strip back insulation 1/2-inch from end of leads.

Electrical Requirements

Your new ceiling fan will require a grounded electrical supply line of 120 volts AC, 60 Hz, 15 amp circuit.

The outlet box must be securely anchored and capable of withstanding a load of at least 50 pounds.

!WARNING

To reduce the risk of fire, electric shock, or personal injury, mount fan to outlet box marked acceptable for fan support, and use screws supplied with outlet box. Most outlet boxes commonly used for support of light fixtures are not acceptable for fan support and may need to be replaced. Consult a qualified electrician if in doubt.

If your fan is to replace an existing ceiling light fixture, turn electricity off at the main fuse box at this time and remove the existing light fixture.

!WARNING

Turning off wall switch is not sufficient. To avoid pos- sible electrical shock, be sure electricity is turned off at the main fuse box before wiring. All wiring must be in accordance with national and local codes and the ceiling fan must be properly grounded as a precaution against possible electrical shock.

How to Hang Your

Ceiling Fan

!WARNING

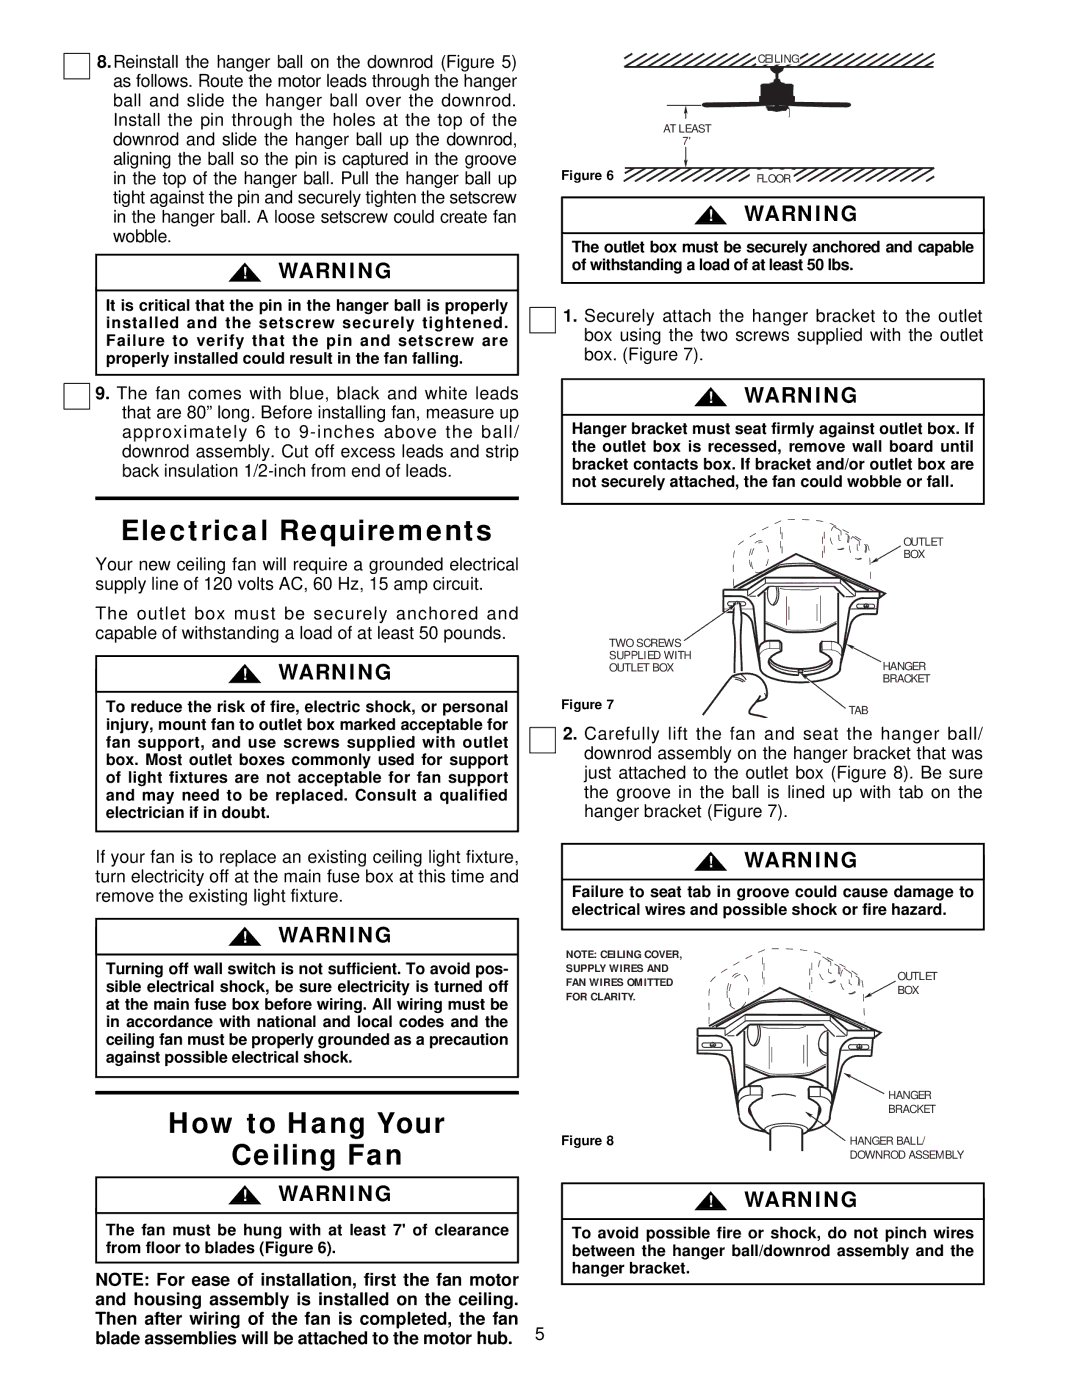
The fan must be hung with at least 7' of clearance from floor to blades (Figure 6).

NOTE: For ease of installation, first the fan motor and housing assembly is installed on the ceiling. Then after wiring of the fan is completed, the fan blade assemblies will be attached to the motor hub. 5

CEILING

AT LEAST

7'

Figure 6

FLOOR

!WARNING

The outlet box must be securely anchored and capable of withstanding a load of at least 50 lbs.

1.Securely attach the hanger bracket to the outlet box using the two screws supplied with the outlet box. (Figure 7).

!WARNING

Hanger bracket must seat firmly against outlet box. If the outlet box is recessed, remove wall board until bracket contacts box. If bracket and/or outlet box are not securely attached, the fan could wobble or fall.

OUTLET

BOX

TWO SCREWS


SUPPLIED WITH

HANGER

OUTLET BOX


BRACKET

Figure 7

TAB


2.Carefully lift the fan and seat the hanger ball/ downrod assembly on the hanger bracket that was just attached to the outlet box (Figure 8). Be sure the groove in the ball is lined up with tab on the hanger bracket (Figure 7).

!WARNING

Failure to seat tab in groove could cause damage to electrical wires and possible shock or fire hazard.

NOTE: CEILING COVER,


SUPPLY WIRES AND

OUTLET

FAN WIRES OMITTED

BOX

FOR CLARITY.


HANGER


BRACKET

Figure 8

HANGER BALL/


DOWNROD ASSEMBLY

!WARNING

To avoid possible fire or shock, do not pinch wires between the hanger ball/downrod assembly and the hanger bracket.

Page 5
Image 5
Emerson CF2000PW02, CF2000AB02, CF2000PB02, CF2000AW02, CF2000WB02 Electrical Requirements, How to Hang Your Ceiling Fan

CF2000WW02, CF2000AW02, CF2000WB02, CF2000PB02, CF2000PW02 specifications

The Emerson CF2000 series ceiling fans, which include models CF2000BC02, CF2000AB02, CF2000PW02, CF2000WB02, and CF2000AW02, are designed to enhance comfort and style in various living spaces. These fans are notable for their powerful performance, sleek designs, and energy-efficient technologies, making them an excellent choice for both residential and commercial applications.

One of the standout features of the CF2000 series is its advanced motor technology. Equipped with an ultra-efficient DC motor, these fans operate quietly while delivering maximum airflow. This motor not only reduces energy consumption but also prolongs the lifespan of the fan, making it a smart investment for any space. The fans are designed to offer multiple-speed settings, allowing users to customize airflow according to their preferences.

Aesthetic appeal is another hallmark of the CF2000 series. With a range of finishes, including brushed chrome, antique brass, white, walnut, and black, these fans can seamlessly integrate into various interior design schemes. The streamlined, modern blades are crafted for optimal performance and style, ensuring that the fan is not just a functional piece but also a striking addition to any room.

In terms of installation and usability, the Emerson CF2000 fans are designed with user-friendliness in mind. They come with a comprehensive guide that makes installation straightforward, even for those with minimal DIY experience. Many models in this series offer a reversible motor function, allowing them to provide both cooling airflow in the summer and warmth distribution during winter months, enhancing year-round comfort.

The CF2000 series also features integrated lighting options. Models may include energy-efficient LED light kits, allowing homeowners to illuminate their spaces while maintaining energy efficiency. This versatility makes the fans suitable for use in diverse settings, including living rooms, bedrooms, and open-concept spaces.

In summary, the Emerson CF2000BC02, CF2000AB02, CF2000PW02, CF2000WB02, and CF2000AW02 ceiling fans stand out for their powerful performance, stylish design, and energy-efficient technologies. With advanced motor systems, aesthetic diversity, ease of installation, and integrated lighting solutions, they are a perfect choice for anyone seeking to enhance their home's comfort and design.