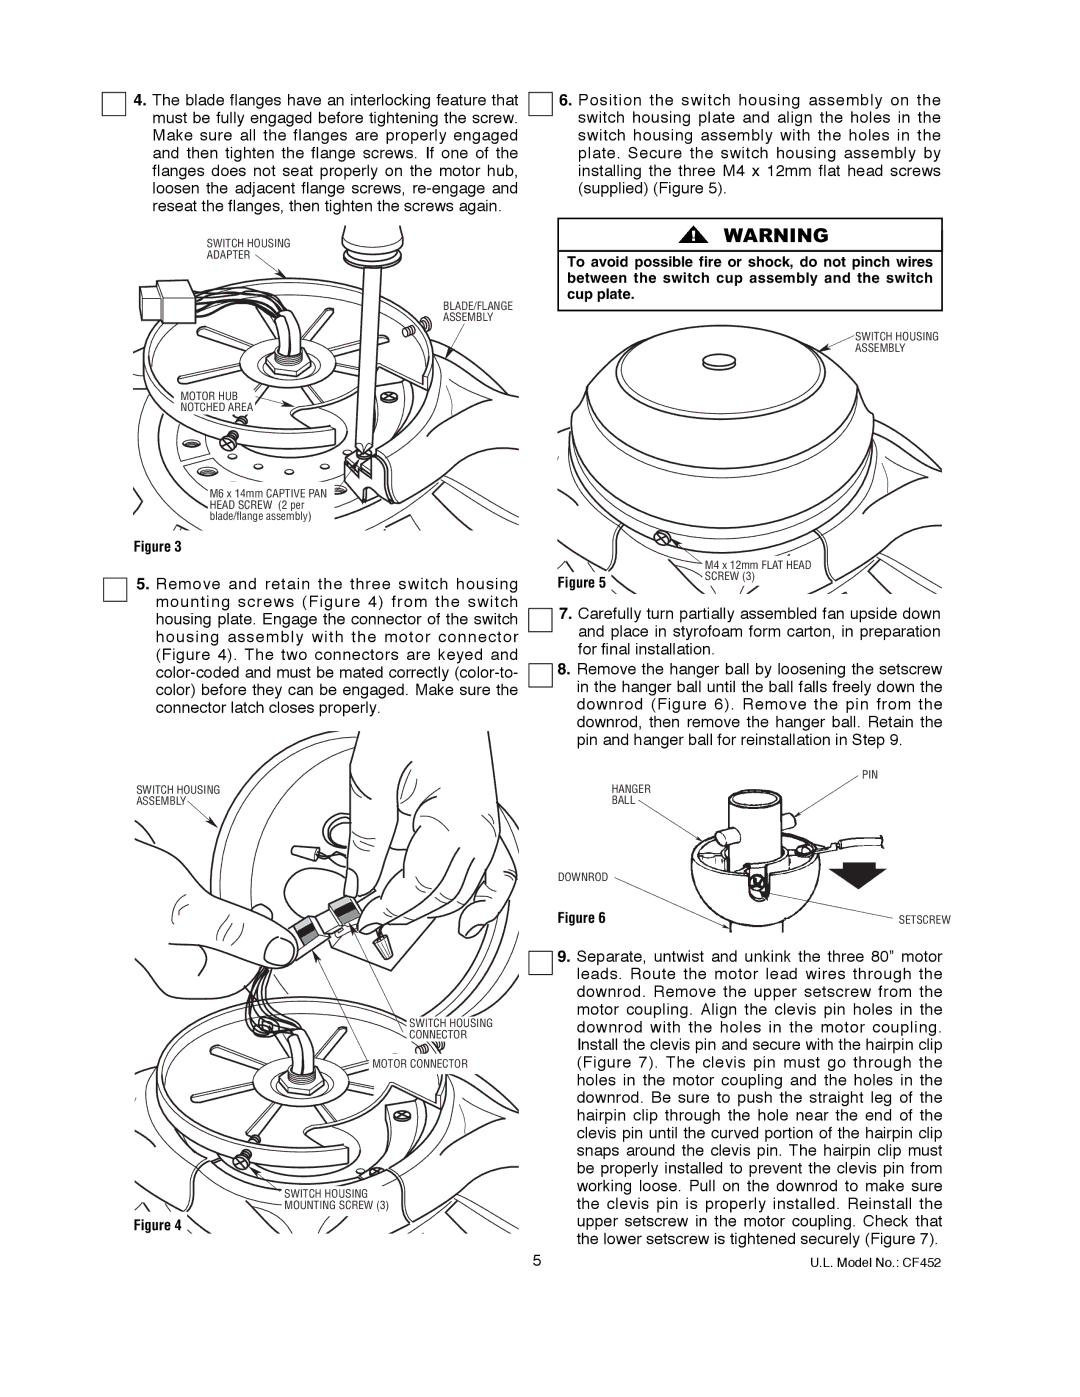
4.The blade flanges have an interlocking feature that must be fully engaged before tightening the screw. Make sure all the flanges are properly engaged and then tighten the flange screws. If one of the flanges does not seat properly on the motor hub, loosen the adjacent flange screws, re-engage and reseat the flanges, then tighten the screws again.

SWITCH HOUSING

ADAPTER

BLADE/FLANGE

ASSEMBLY

MOTOR HUB

NOTCHED AREA

M6 x 14mm CAPTIVE PAN HEAD SCREW (2 per blade/flange assembly)

Figure 3

5.Remove and retain the three switch housing mounting screws (Figure 4) from the switch housing plate. Engage the connector of the switch housing assembly with the motor connector (Figure 4). The two connectors are keyed and color-coded and must be mated correctly (color-to- color) before they can be engaged. Make sure the connector latch closes properly.

SWITCH HOUSING

ASSEMBLY

SWITCH HOUSING

CONNECTOR

MOTOR CONNECTOR

SWITCH HOUSING

MOUNTING SCREW (3)

Figure 4

6.Position the switch housing assembly on the switch housing plate and align the holes in the switch housing assembly with the holes in the plate. Secure the switch housing assembly by installing the three M4 x 12mm flat head screws (supplied) (Figure 5).

! WARNING

To avoid possible fire or shock, do not pinch wires between the switch cup assembly and the switch cup plate.

SWITCH HOUSING

ASSEMBLY


M4 x 12mm FLAT HEAD

Figure 5

SCREW (3)


7.Carefully turn partially assembled fan upside down and place in styrofoam form carton, in preparation for final installation.

8.Remove the hanger ball by loosening the setscrew in the hanger ball until the ball falls freely down the downrod (Figure 6). Remove the pin from the downrod, then remove the hanger ball. Retain the pin and hanger ball for reinstallation in Step 9.

PIN

HANGER

BALL

DOWNROD

Figure 6

SETSCREW


9.Separate, untwist and unkink the three 80” motor leads. Route the motor lead wires through the downrod. Remove the upper setscrew from the motor coupling. Align the clevis pin holes in the downrod with the holes in the motor coupling. Install the clevis pin and secure with the hairpin clip (Figure 7). The clevis pin must go through the holes in the motor coupling and the holes in the downrod. Be sure to push the straight leg of the hairpin clip through the hole near the end of the clevis pin until the curved portion of the hairpin clip snaps around the clevis pin. The hairpin clip must be properly installed to prevent the clevis pin from working loose. Pull on the downrod to make sure the clevis pin is properly installed. Reinstall the upper setscrew in the motor coupling. Check that the lower setscrew is tightened securely (Figure 7).

5

U.L. Model No.: CF452

Page 5
Image 5
Emerson CF452AW00, CF452GES00, CF452GBZ00, CF452BS00, CF452ORB00, CF452AP00 owner manual Switch Housing Assembly

CF452AW00, CF452AP00, CF452ORB00, CF452BS00, CF452GBZ00 specifications

The Emerson CF452AP00, CF452GBZ00, CF452AW00, CF452BS00, and CF452ORB00 ceiling fans are a perfect blend of style, performance, and efficiency. Designed to cater to diverse aesthetic preferences and functional needs, these fans stand out due to their high-quality features and advanced technologies.

The CF452AP00 model showcases a sleek and modern design, featuring an appealing brushed steel finish that complements contemporary interiors. This fan is equipped with a powerful motor that ensures a steady airflow while maintaining energy efficiency, making it suitable for various room sizes.

In contrast, the CF452GBZ00 comes with an elegant bronze finish, perfect for traditional or vintage-themed spaces. This model not only maintains elegance but also includes innovative whisper-quiet technology, ensuring a peaceful ceiling fan experience without the annoying hum often associated with fan operation.

The CF452AW00, with its bright white finish, is designed for those who prefer a clean and minimalist look. This versatile fan delivers excellent performance while seamlessly integrating into any décor, providing a refreshing breeze that enhances comfort in living areas, bedrooms, or home offices.

For those who seek a touch of warmth in their rooms, the CF452BS00 model offers a striking brushed satin finish. This fan is engineered for optimal airflow, and its energy-efficient motor contributes to reduced energy consumption. The sleek design and functionality make it a perfect addition to cozy environments where ambiance matters.

Lastly, the CF452ORB00 model features a rich oil-rubbed bronze finish that adds a sophisticated touch to any space. It comes with integrated LED lighting, providing both illumination and an energy-efficient option for modern homes. The fan’s reversible motor allows for year-round use, effectively circulating air in cooling or heating modes.

All models feature a user-friendly remote control, enabling easy operation from any corner of the room. Additionally, Emerson’s ceiling fans are equipped with advanced technologies that enhance their performance, including multiple speed settings and precise airflow direction control.

These ceiling fans not only elevate the aesthetics of your spaces but also promote energy savings and comfort, making them ideal choices for homeowners looking to invest in reliable and stylish ceiling fans.