MOTOR

3/16-24 x 1/2"

COUPLING


SETSCREW

HAIRPIN

CLEVIS PIN

CLIP

JAMNUT

CEILING

COVER

CLEVIS PIN

3/16-24 x 1/2" SCREW WITH JAM NUT

MOTOR COUPLING

Figure 1

HANGER BALL/ DOWNROD ASSEMBLY

CLEVIS PIN

HAIRPIN CLIP

8.Rotate the motor hub until the flange screw hole is next to the cutout in the switch housing plate. Attach one blade assembly to the motor hub using two 1/4- 20 x 1/2” Phillips oval head flange screws. Make sure the screws are NOT tightened. (Figure 3.) Repeat this procedure for the other four blade assemblies.

SWITCH HOUSING

BLADE FLANGE

PLATE


Figure 3

MOTOR HUB

1/4-20 X 1/2" PHILLIPS OVAL

HEAD FLANGE SCREWS (2)

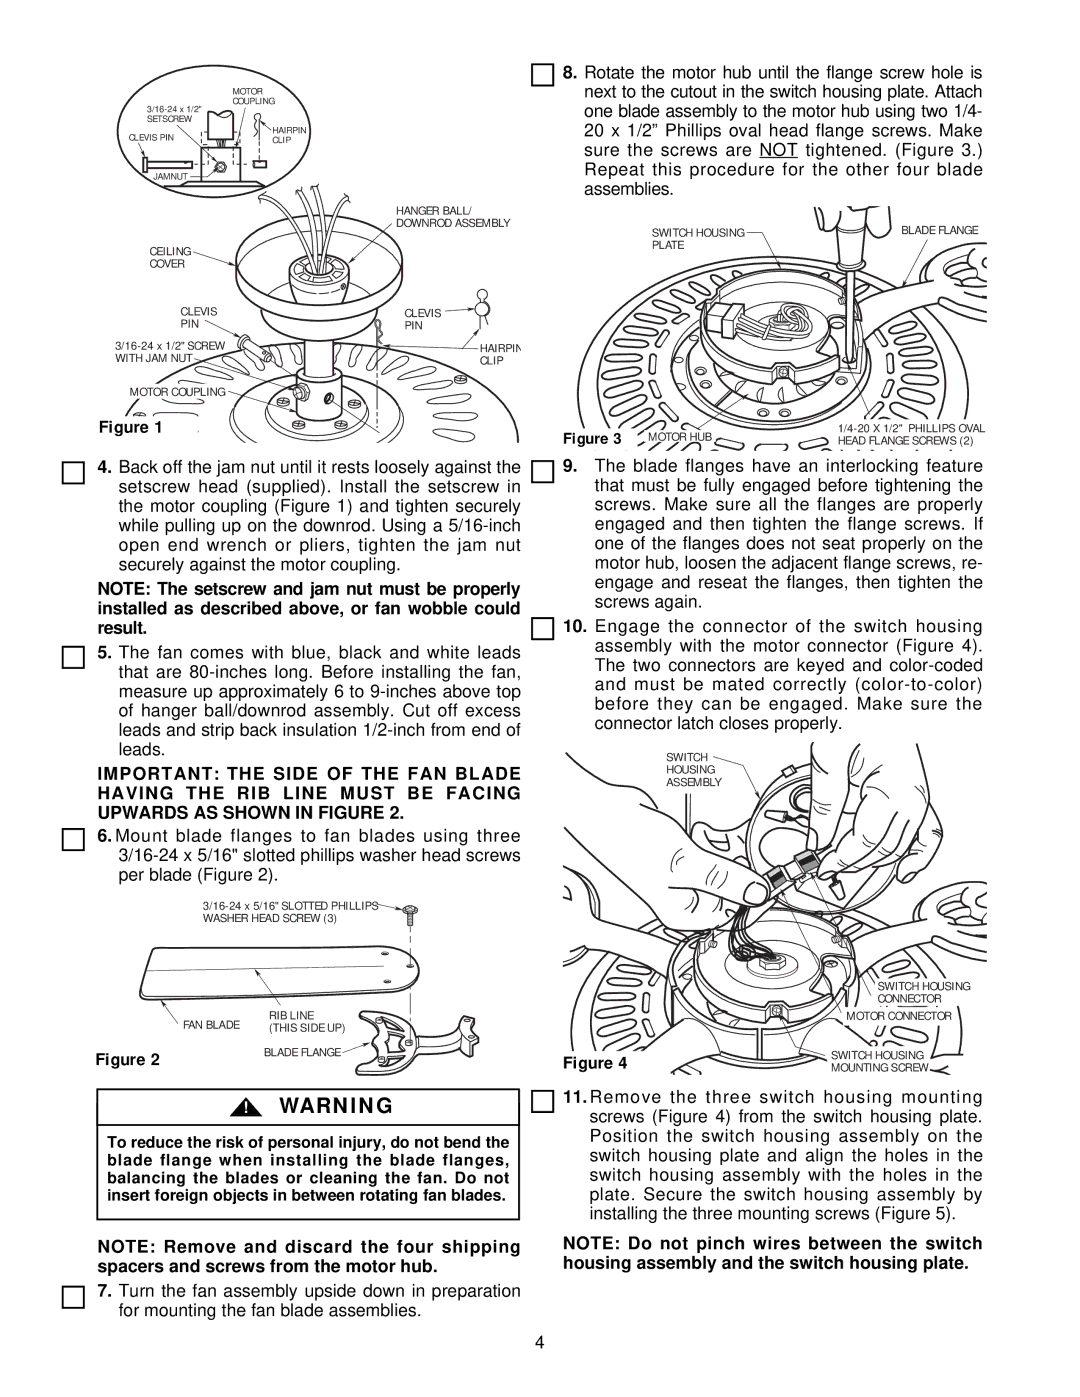
4.Back off the jam nut until it rests loosely against the setscrew head (supplied). Install the setscrew in the motor coupling (Figure 1) and tighten securely while pulling up on the downrod. Using a 5/16-inch open end wrench or pliers, tighten the jam nut securely against the motor coupling.

NOTE: The setscrew and jam nut must be properly installed as described above, or fan wobble could result.

5.The fan comes with blue, black and white leads that are 80-inches long. Before installing the fan, measure up approximately 6 to 9-inches above top of hanger ball/downrod assembly. Cut off excess leads and strip back insulation 1/2-inch from end of leads.

IMPORTANT: THE SIDE OF THE FAN BLADE HAVING THE RIB LINE MUST BE FACING UPWARDS AS SHOWN IN FIGURE 2.

6.Mount blade flanges to fan blades using three 3/16-24 x 5/16" slotted phillips washer head screws per blade (Figure 2).

3/16-24 x 5/16" SLOTTED PHILLIPS WASHER HEAD SCREW (3)

FAN BLADE

RIB LINE

(THIS SIDE UP)

Figure 2

BLADE FLANGE


!WARNING

To reduce the risk of personal injury, do not bend the blade flange when installing the blade flanges, balancing the blades or cleaning the fan. Do not insert foreign objects in between rotating fan blades.

NOTE: Remove and discard the four shipping spacers and screws from the motor hub.

7.Turn the fan assembly upside down in preparation for mounting the fan blade assemblies.

9.The blade flanges have an interlocking feature that must be fully engaged before tightening the screws. Make sure all the flanges are properly engaged and then tighten the flange screws. If one of the flanges does not seat properly on the motor hub, loosen the adjacent flange screws, re- engage and reseat the flanges, then tighten the screws again.

10.Engage the connector of the switch housing assembly with the motor connector (Figure 4). The two connectors are keyed and color-coded and must be mated correctly (color-to-color) before they can be engaged. Make sure the connector latch closes properly.

SWITCH

HOUSING

ASSEMBLY


SWITCH HOUSING


CONNECTOR


MOTOR CONNECTOR

Figure 4

SWITCH HOUSING

MOUNTING SCREW

11.Remove the three switch housing mounting screws (Figure 4) from the switch housing plate. Position the switch housing assembly on the switch housing plate and align the holes in the switch housing assembly with the holes in the plate. Secure the switch housing assembly by installing the three mounting screws (Figure 5).

NOTE: Do not pinch wires between the switch housing assembly and the switch housing plate.

4

Page 4
Image 4
Emerson CF652BQ00, CF652W00, CF652WW00, CF652OB00, CF652V00, CF652DB00, CF652AW00, CF652WB00 warranty Ceiling Cover Clevis PIN

CF652WB00, CF652AW00, CF652DB00, CF652BQ00, CF652V00 specifications

The Emerson CF652 series of ceiling fans, which includes models CF652DB00, CF652W00, CF652V00, CF652WW00, and CF652WB00, stands out in the market for its blend of modern design, energy efficiency, and advanced technology. These fans are more than just a means of air circulation; they are an enhancement to home decor, providing both functionality and style.

One of the core features of the CF652 series is its sleek, contemporary design that fits seamlessly into various interior styles. Whether you prefer the elegant dark bronze finish of the CF652DB00, the crisp white of the CF652W00, or the stylish wood tones of the CF652WB00, there is a model to suit every aesthetic preference. The blades are designed for optimal air movement and are available in various finishes, enhancing their ability to complement home interiors while promoting airflow.

In terms of performance, the Emerson CF652 fans are engineered with powerful motors that ensure quiet operation while delivering substantial airflow. The high-capacity motor operates efficiently, allowing the fan to circulate air effectively without consuming excessive energy. This energy efficiency translates to lower utility bills and a reduced carbon footprint, making it an environmentally friendly choice.

Moreover, many fans in the CF652 series feature integrated LED lighting, providing both illumination and enhanced functionality. These LED lights are designed for long life and low energy consumption, making them a cost-effective lighting solution for any room. The versatility of the lighting options allows homeowners to create the perfect atmosphere, whether for a relaxed evening or a lively gathering.

Additional technological advancements in the CF652 series include remote control operation on select models, offering added convenience for adjusting fan speeds and lighting without getting up. This integration of technology enhances user experience, adding to the practicality of these ceiling fans.

Safety features, such as a secure mounting system and a durable motor, ensure longevity and reliability, giving peace of mind to homeowners.

In summary, the Emerson CF652 series combines aesthetic appeal, advanced technology, and energy efficiency, making it an excellent choice for anyone looking to upgrade their home’s airflow and style. With various finishes and features tailored for modern living, these fans provide a perfect blend of elegance and functionality.