!WARNING

To reduce the risk of personal injury, do not bend the blade flange when installing the blade flanges, balancing the blades or cleaning the fan. Do not insert foreign objects in between rotating fan blades.

3/16-24 x 5/16" SLOTTED PHILLIPS HEAD SCREW (3)

BLADE WASHER (3)

FAN BLADE

BLADE FLANGE

MOUNTING SCREWS (4)

Figure 7

SWITCH

HOUSING

CONNECTOR

MOTOR

CONNECTOR


PULL

LATCH

CHAIN

SWITCH


SWITCH

HOUSING

ASSEMBLY

SLOT FOR PULL

CHAIN SWITCH

Figure 5

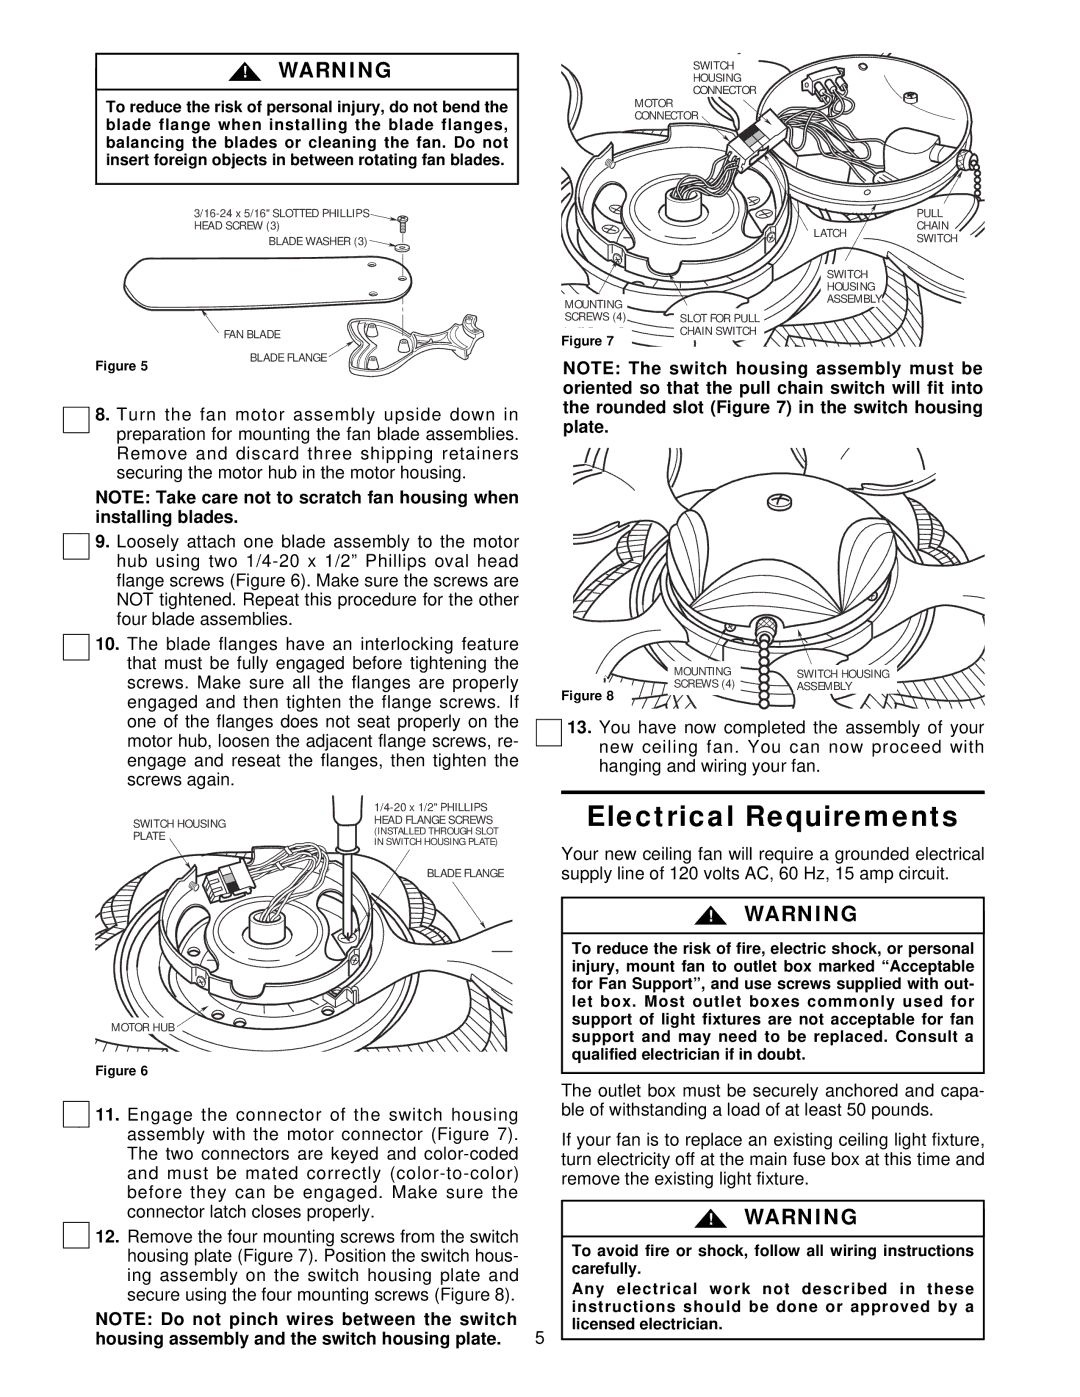
8.Turn the fan motor assembly upside down in preparation for mounting the fan blade assemblies. Remove and discard three shipping retainers securing the motor hub in the motor housing.

NOTE: Take care not to scratch fan housing when installing blades.

9.Loosely attach one blade assembly to the motor hub using two 1/4-20 x 1/2” Phillips oval head flange screws (Figure 6). Make sure the screws are NOT tightened. Repeat this procedure for the other four blade assemblies.

10.The blade flanges have an interlocking feature that must be fully engaged before tightening the screws. Make sure all the flanges are properly engaged and then tighten the flange screws. If one of the flanges does not seat properly on the motor hub, loosen the adjacent flange screws, re- engage and reseat the flanges, then tighten the screws again.


1/4-20 x 1/2" PHILLIPS

SWITCH HOUSING

HEAD FLANGE SCREWS

(INSTALLED THROUGH SLOT

PLATE

IN SWITCH HOUSING PLATE)


BLADE FLANGE

NOTE: The switch housing assembly must be oriented so that the pull chain switch will fit into the rounded slot (Figure 7) in the switch housing plate.

MOUNTING

SWITCH HOUSING

SCREWS (4)

ASSEMBLY

Figure 8


13.You have now completed the assembly of your new ceiling fan. You can now proceed with hanging and wiring your fan.

Electrical Requirements

Your new ceiling fan will require a grounded electrical supply line of 120 volts AC, 60 Hz, 15 amp circuit.

MOTOR HUB

Figure 6

11.Engage the connector of the switch housing assembly with the motor connector (Figure 7). The two connectors are keyed and color-coded and must be mated correctly (color-to-color) before they can be engaged. Make sure the connector latch closes properly.

12.Remove the four mounting screws from the switch housing plate (Figure 7). Position the switch hous- ing assembly on the switch housing plate and secure using the four mounting screws (Figure 8).

NOTE: Do not pinch wires between the switch

5

housing assembly and the switch housing plate.

!WARNING

To reduce the risk of fire, electric shock, or personal injury, mount fan to outlet box marked “Acceptable for Fan Support”, and use screws supplied with out- let box. Most outlet boxes commonly used for support of light fixtures are not acceptable for fan support and may need to be replaced. Consult a qualified electrician if in doubt.

The outlet box must be securely anchored and capa- ble of withstanding a load of at least 50 pounds.

If your fan is to replace an existing ceiling light fixture, turn electricity off at the main fuse box at this time and remove the existing light fixture.

!WARNING

To avoid fire or shock, follow all wiring instructions carefully.

Any electrical work not described in these instructions should be done or approved by a licensed electrician.

Page 5
Image 5
Emerson CF940SCK00, CF940WB00, CF940BC00, CF940AW00 Electrical Requirements, Housing assembly and the switch housing plate

CF940SCK00, CF940AB00, CF940PW00, CF940AW00, CF940BC00 specifications

The Emerson CF940 series fans, including models CF940WB00, CF940AW00, CF940SCK00, CF940AB00, and CF940PW00, are a testament to advanced engineering and thoughtful design in home appliance technology. These ceiling fans are meticulously crafted to enhance the comfort of any living space, whether it’s a cozy living room or a spacious deck.

One of the standout features of these fans is their aerodynamic blade design, which optimizes airflow while minimizing noise. Each model in the series is equipped with high-performance blades that ensure efficient air circulation, providing a refreshing breeze regardless of the room size. The Emerson CF940 series fans also boast a powerful motor, delivering a robust airflow that effectively cools down even the warmest of spaces.

The CF940 models come with a stylish and versatile design, making them suitable for a range of interior designs. The available finishes, such as Walnut, Antique White, and Satin Black, ensure that these fans can blend seamlessly with existing decor, enhancing the overall aesthetic of each room. The fans also incorporate integrated LED lighting, offering a dual function that provides both illumination and cooling comfort, thus eliminating the need for additional light fixtures.

In addition to their aesthetic appeal, the Emerson CF940 series fans are equipped with advanced energy-efficient technology, which helps reduce electricity costs while maintaining optimal performance. Many of the models come with multiple speed settings, allowing users to easily adjust the airflow according to their preferences and the weather conditions. Some versions also support remote control operation, providing convenience and ease of use, eliminating the need to get up from a comfortable spot to adjust the fan’s settings.

Another significant characteristic of the Emerson CF940 series is its focus on durability and reliability. Built with high-quality materials and rigorous testing standards, these fans are designed to stand the test of time, ensuring that you receive both style and functionality. With a range of sizes available, it’s easy to find the perfect fit for any room.

In summary, the Emerson CF940 series fans—CF940WB00, CF940AW00, CF940SCK00, CF940AB00, and CF940PW00—combine superior airflow, stylish designs, energy efficiency, and advanced technologies, making them a wise choice for anyone looking to enhance their living environment with a reliable and elegant ceiling fan.