USE

ADJUSTING TEMPERATURE

Electric Shock Hazard

• To prevent electrical shock, disconnect power before removing access cover to adjust or service the thermostat.

Scalding Hazard

• Do not allow water to boil. May result in severe burns.

Fire / Product Hazard

• Do not remove or alter the thermal overload protector. May result in product damage or fire.

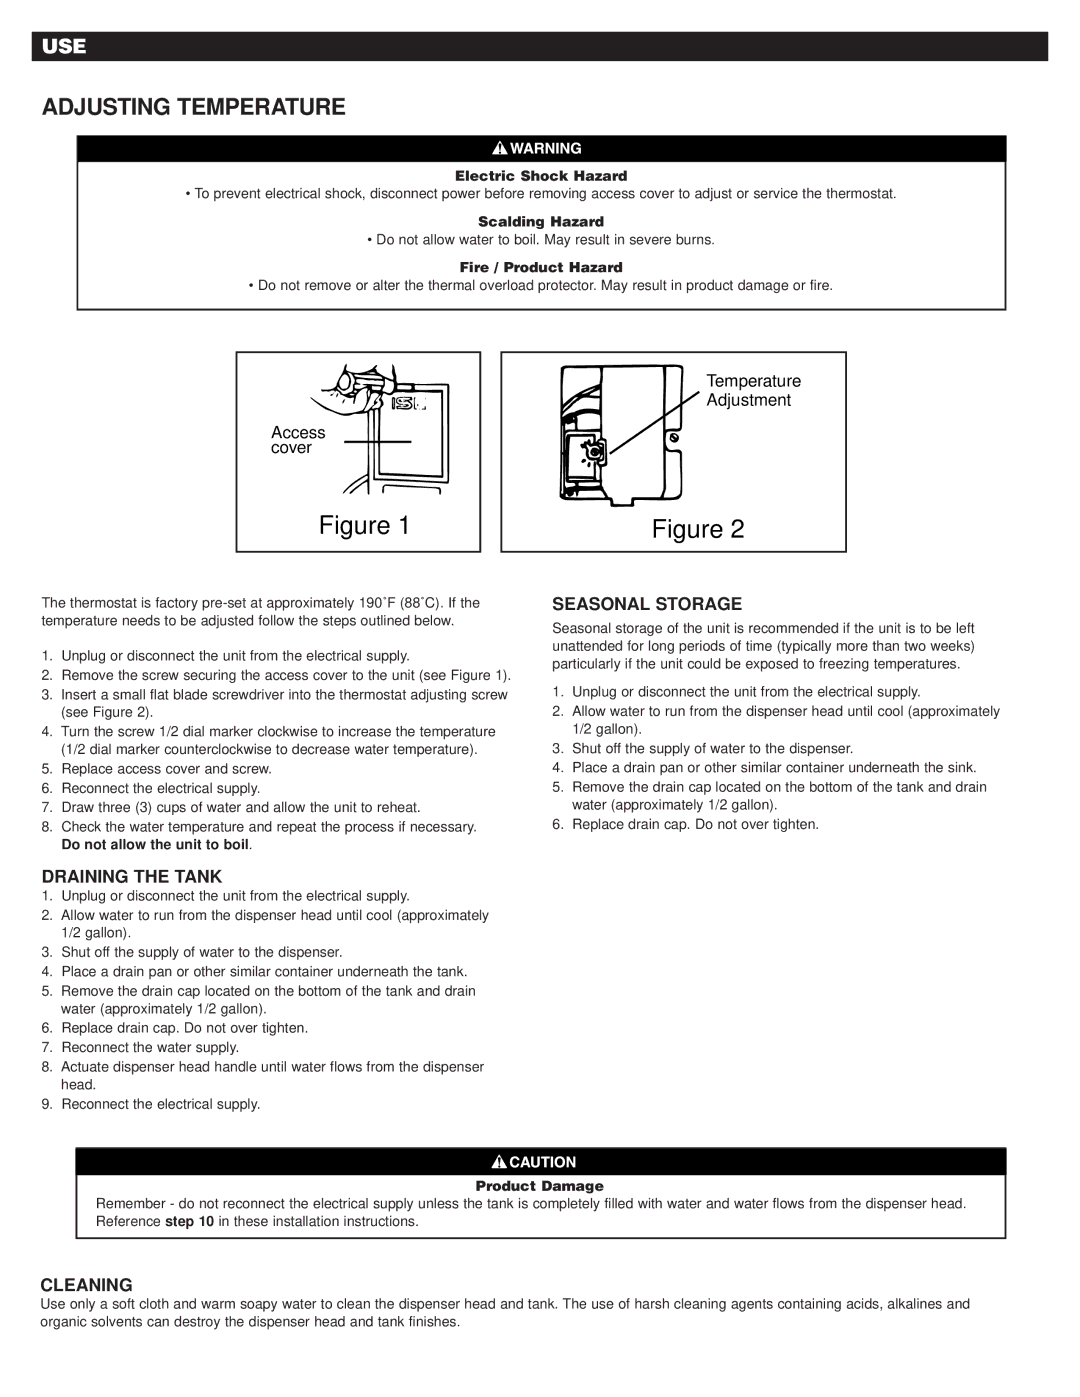
Access cover

Figure 1

Temperature

Adjustment

Figure 2

The thermostat is factory pre-set at approximately 190˚F (88˚C). If the temperature needs to be adjusted follow the steps outlined below.

1.Unplug or disconnect the unit from the electrical supply.

2.Remove the screw securing the access cover to the unit (see Figure 1).

3.Insert a small flat blade screwdriver into the thermostat adjusting screw (see Figure 2).

4.Turn the screw 1/2 dial marker clockwise to increase the temperature (1/2 dial marker counterclockwise to decrease water temperature).

5.Replace access cover and screw.

6.Reconnect the electrical supply.

7.Draw three (3) cups of water and allow the unit to reheat.

8.Check the water temperature and repeat the process if necessary. Do not allow the unit to boil.

SEASONAL STORAGE

Seasonal storage of the unit is recommended if the unit is to be left unattended for long periods of time (typically more than two weeks) particularly if the unit could be exposed to freezing temperatures.

1.Unplug or disconnect the unit from the electrical supply.

2.Allow water to run from the dispenser head until cool (approximately 1/2 gallon).

3.Shut off the supply of water to the dispenser.

4.Place a drain pan or other similar container underneath the sink.

5.Remove the drain cap located on the bottom of the tank and drain water (approximately 1/2 gallon).

6.Replace drain cap. Do not over tighten.

DRAINING THE TANK

1.Unplug or disconnect the unit from the electrical supply.

2.Allow water to run from the dispenser head until cool (approximately 1/2 gallon).

3.Shut off the supply of water to the dispenser.

4.Place a drain pan or other similar container underneath the tank.

5.Remove the drain cap located on the bottom of the tank and drain water (approximately 1/2 gallon).

6.Replace drain cap. Do not over tighten.

7.Reconnect the water supply.

8.Actuate dispenser head handle until water flows from the dispenser head.

9.Reconnect the electrical supply.

Product Damage

Remember - do not reconnect the electrical supply unless the tank is completely filled with water and water flows from the dispenser head. Reference step 10 in these installation instructions.

CLEANING

Use only a soft cloth and warm soapy water to clean the dispenser head and tank. The use of harsh cleaning agents containing acids, alkalines and organic solvents can destroy the dispenser head and tank finishes.

Page 6
Image 6
Emerson Process Management Water Dispenser Adjusting Temperature, Use, Seasonal Storage, Draining the Tank, Cleaning

Water Dispenser specifications

Emerson Process Management has pioneered innovative solutions in the field of process automation, and its water dispenser exemplifies the synergy of technology and user experience. This advanced water dispenser is designed for both residential and commercial use, providing a reliable source of purified drinking water with exceptional efficiency and convenience.

One of the main features of the Emerson water dispenser is its multi-stage filtration system. This system leverages advanced filtration technologies including activated carbon and reverse osmosis to remove contaminants, ensuring that the water not only tastes great but is also safe for consumption. Users can enjoy peace of mind knowing that the water dispensed is free from harmful substances, making it particularly beneficial in areas with less-than-ideal water quality.

The Emerson water dispenser also boasts a sleek and modern design, making it a stylish addition to any environment. Its user-friendly interface enables easy operation, allowing users to select different temperature settings, from refreshing cold water to soothing hot water, at the touch of a button. This feature is particularly useful for varied uses such as making tea, coffee, or instant soups.

In terms of smart technologies, the Emerson water dispenser is equipped with smart sensors that monitor the water levels and filter life, sending alerts when it's time for a refill or filter replacement. This ensures users are always aware of the maintenance needs of their system, preventing unexpected downtime. Additionally, some models include connectivity features allowing users to manage their water consumption and settings via a mobile app, enhancing the overall user experience.

Energy efficiency is another hallmark of Emerson’s water dispenser. With eco-friendly modes and energy-saving features, the device operates optimally while minimizing electricity usage, making it not just a practical choice but also an environmentally conscious one.

In conclusion, the Emerson Process Management water dispenser stands out due to its advanced filtration technology, stylish design, user-friendly interface, smart sensors, and energy efficiency. By embracing these features, Emerson continues to lead in providing solutions that enhance convenience and health, making it an ideal choice for modern lifestyles.