Manuals
/
EPoX Computer
/
Computer Equipment
/
Computer Hardware
EPoX Computer
EP-3VWM
specifications
System Block Diagram
Models:
EP-3VWM
1
10
69
69
Download
69 pages
47.93 Kb
7
8
9
10
11
12
13
14
Install
System Block Diagram
Password
Defaults Menu
Timer & DMA Channels MAP
PNP/PCI Configuration
Award Bios Setup
Shield Connector
Bios EP-3VWM
Handling Procedures
Page 10
Image 10
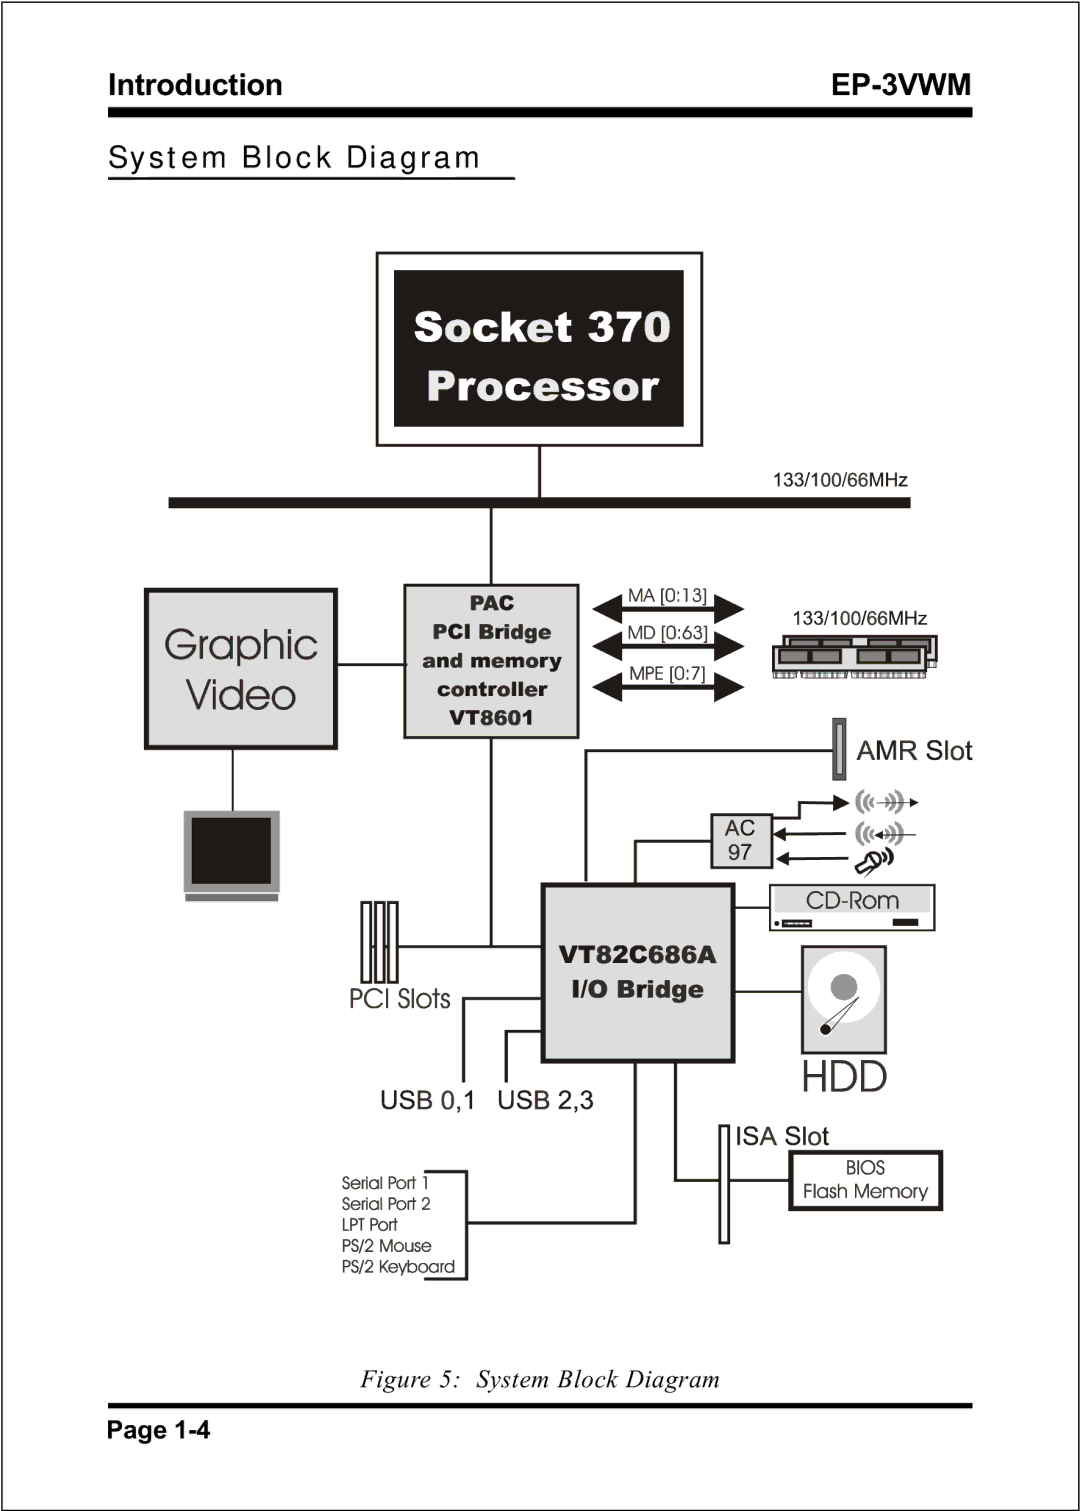
Introduction
EP-3VWM
System Block Diagram
Figure 5: System Block Diagram
Page
1-4
Page 9
Page 11
Page 10
Image 10
Page 9
Page 11
Contents
EP-3VWM
Handling Procedures
User Notice
Technical Support Services
Contacting Technical Support
Table of Contents
Appendix C
Appendix Appendix a
Appendix B
Appendix D
Left Blank
Components Checklist
Introduction
Summary of ATX chassis features
EP-3VWM Form-Factor
Shield Connector
Power-On/Off Remote
System Block Diagram
System Block Diagram
Features
EP-3VWM Features
Features
Installation
Installation
EP-3VWM Detailed Layout
Section CPU Insertion
Installation
Section Jumper Settings
JP3
Section System Memory Configuration Memory Layout
Dimm
Dimm Module Installation
Unbuffered
Section Device Connectors
USB port header pin descriptions
Power On/Off
Award Bios Setup
Main Menu
Bios EP-3VWM
Standard Cmos Setup
Advanced Bios Features
Bios Features Setup
Bios EP-3VWM
EP-3VWM Bios
Characters per second
EP-3VWM Bios
Advanced Chipset Features
EP-3VWM Bios
Bios EP-3VWM
Integrated Peripherals
Bios EP-3VWM
EP-3VWM Bios
Bios EP-3VWM
Power Management Setup
Bios EP-3VWM
EP-3VWM Bios
PNP/PCI Configuration
EP-3VWM Bios
PC Health Status
Frequency/Voltage Control
Defaults Menu
Supervisor/User Password Setting
Enter Password
Exit Without Saving
Exit Selecting Save & Exit Setup
Save to Cmos and Exit Y/N? Y
Quit without saving Y/N? Y
Appendix a
Appendix
Timer & DMA Channels MAP
RTC & Cmos RAM MAP
Appendix
For Bios 6.0 Code
Appendix B
Reset keyboard for Winbond 977 series Super I/O
Checksum fails, use default value instead
Appendix
EP-3VWM
CDROM…
EP-3VWM
Left Blank
Load Optimized Defaults
Appendix C
Left Blank
Appendix D
Ghost 5.1 Quick User’s Guide
Appendix
EP-3VWM
Appendix
EP-3VWM
Appendix
EP-3VWM
Appendix
EP-3VWM
Top
Page
Image
Contents