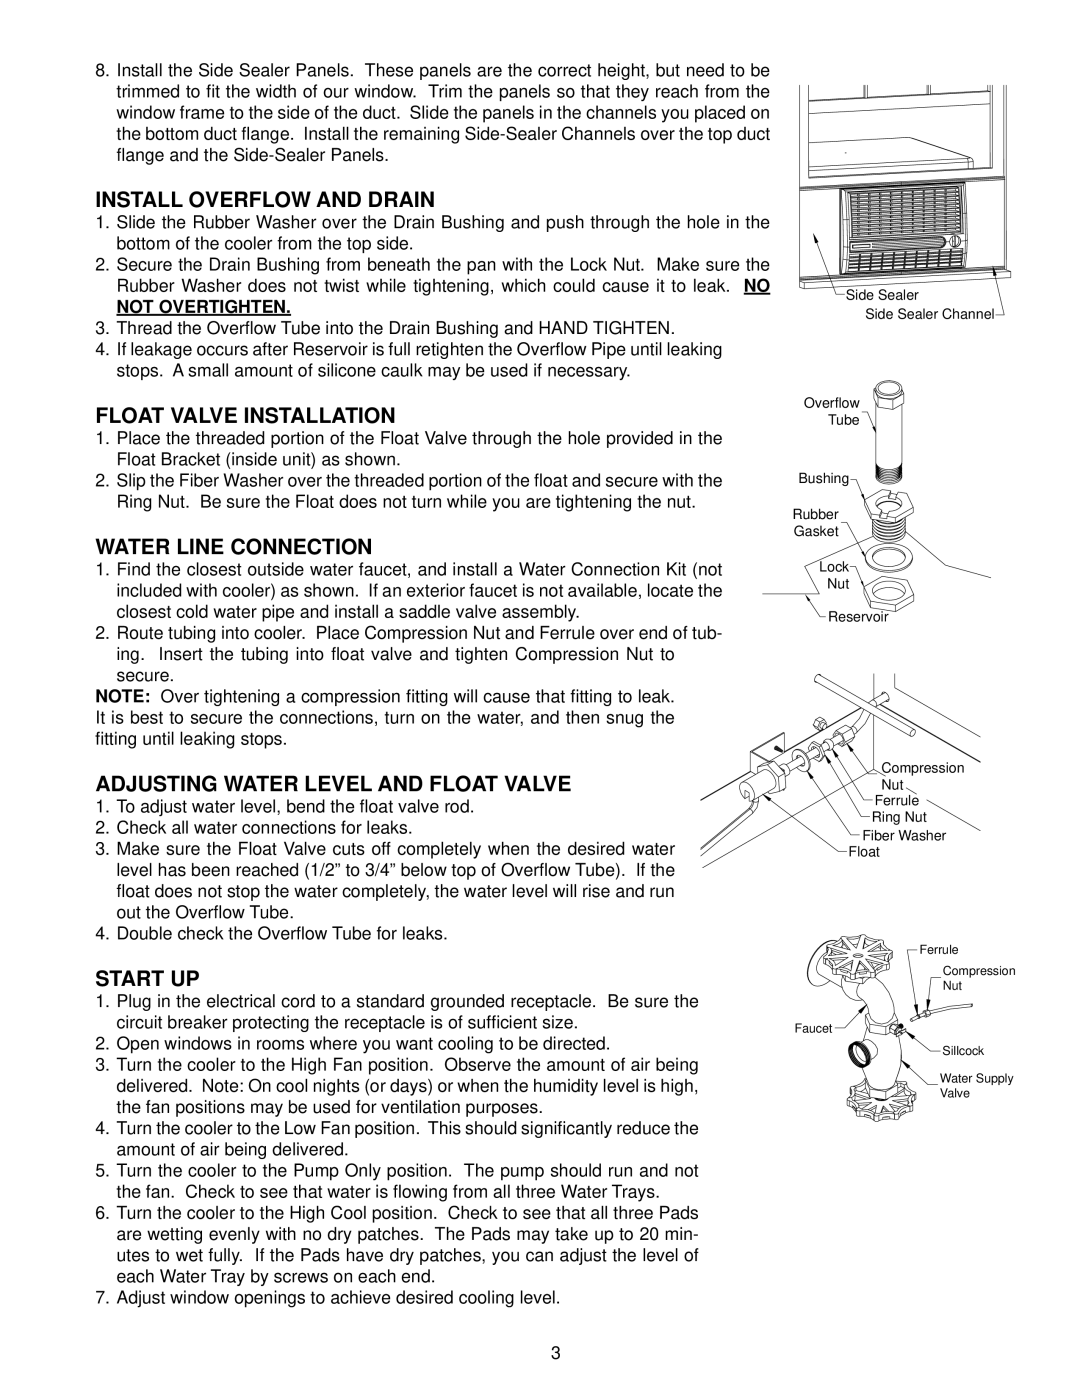
8.Install the Side Sealer Panels. These panels are the correct height, but need to be trimmed to fit the width of our window. Trim the panels so that they reach from the window frame to the side of the duct. Slide the panels in the channels you placed on the bottom duct flange. Install the remaining Side-Sealer Channels over the top duct flange and the Side-Sealer Panels.

INSTALL OVERFLOW AND DRAIN

1.Slide the Rubber Washer over the Drain Bushing and push through the hole in the bottom of the cooler from the top side.

2.Secure the Drain Bushing from beneath the pan with the Lock Nut. Make sure the Rubber Washer does not twist while tightening, which could cause it to leak. NO

NOT OVERTIGHTEN.

3.Thread the Overflow Tube into the Drain Bushing and HAND TIGHTEN.

4.If leakage occurs after Reservoir is full retighten the Overflow Pipe until leaking stops. A small amount of silicone caulk may be used if necessary.

FLOAT VALVE INSTALLATION

1.Place the threaded portion of the Float Valve through the hole provided in the Float Bracket (inside unit) as shown.

2.Slip the Fiber Washer over the threaded portion of the float and secure with the Ring Nut. Be sure the Float does not turn while you are tightening the nut.

WATER LINE CONNECTION

1.Find the closest outside water faucet, and install a Water Connection Kit (not included with cooler) as shown. If an exterior faucet is not available, locate the closest cold water pipe and install a saddle valve assembly.

2.Route tubing into cooler. Place Compression Nut and Ferrule over end of tub- ing. Insert the tubing into float valve and tighten Compression Nut to secure.

NOTE: Over tightening a compression fitting will cause that fitting to leak. It is best to secure the connections, turn on the water, and then snug the fitting until leaking stops.

ADJUSTING WATER LEVEL AND FLOAT VALVE

1. To adjust water level, bend the float valve rod.

2.Check all water connections for leaks.

3.Make sure the Float Valve cuts off completely when the desired water level has been reached (1/2” to 3/4” below top of Overflow Tube). If the float does not stop the water completely, the water level will rise and run out the Overflow Tube.

4.Double check the Overflow Tube for leaks.

START UP

1.Plug in the electrical cord to a standard grounded receptacle. Be sure the circuit breaker protecting the receptacle is of sufficient size.

2.Open windows in rooms where you want cooling to be directed.

3.Turn the cooler to the High Fan position. Observe the amount of air being delivered. Note: On cool nights (or days) or when the humidity level is high, the fan positions may be used for ventilation purposes.

4.Turn the cooler to the Low Fan position. This should significantly reduce the amount of air being delivered.

5.Turn the cooler to the Pump Only position. The pump should run and not the fan. Check to see that water is flowing from all three Water Trays.

6.Turn the cooler to the High Cool position. Check to see that all three Pads are wetting evenly with no dry patches. The Pads may take up to 20 min- utes to wet fully. If the Pads have dry patches, you can adjust the level of each Water Tray by screws on each end.

7.Adjust window openings to achieve desired cooling level.

Side Sealer

Side Sealer Channel

Overflow

Tube

Bushing

Rubber

Gasket

Lock

Nut

Reservoir

Compression

Nut

Ferrule

Ring Nut

Fiber Washer

Float

Ferrule

Compression

Nut

Faucet

Sillcock

Water Supply

Valve

3

Page 3
Image 3
Essick Air N30W instruction manual Install Overflow and Drain, Float Valve Installation, Water Line Connection, Start UP

N30W specifications

The Essick Air N30W is a stylish and efficient evaporative cooler designed to provide superior cooling performance in a variety of environments. It combines modern aesthetics with advanced technology, making it an excellent choice for homes, workshops, and outdoor spaces.

One of the most notable features of the N30W is its low energy consumption. Utilizing the principles of evaporative cooling, this unit requires significantly less electricity compared to traditional air conditioning systems. This makes it an environmentally friendly option that can help reduce energy costs while still providing a refreshing breeze during hot summer months.

The N30W boasts a large water tank capacity which allows for extended periods of continuous operation without the need for frequent refills. This feature is particularly advantageous for those who want to enjoy a cool environment without the hassle of constant maintenance. The tank is designed with easy access for filling and cleaning, ensuring that users can quickly maintain their cooler without issues.

In terms of design, the Essick Air N30W has a sleek and modern look that fits well with various home decors. Its compact size makes it easy to position in different spaces, whether in a living room, garage, or patio. The unit is designed to operate quietly, providing cooling comfort without disturbing daily activities.

Another key characteristic of the N30W is its multiple speed settings. Users can easily adjust the airflow according to their preferences, allowing for personalized comfort. The integrated fan and louver system also enable even cooling distribution throughout the area. This helps eliminate hot spots, ensuring that the entire space is adequately cooled.

The Essick Air N30W also features an indicator light that alerts users when the water level is low, preventing damage to the unit and ensuring continuous operation. The cooler is equipped with a durable exterior that can withstand varying weather conditions, making it suitable for both indoor and outdoor use.

Overall, the Essick Air N30W combines practical features, energy efficiency, and modern design into a single unit. It is ideal for those looking for an effective cooling solution that doesn’t compromise on style or performance. Whether for a home or workspace, the N30W is a reliable choice to beat the heat and enhance comfort during warm weather.