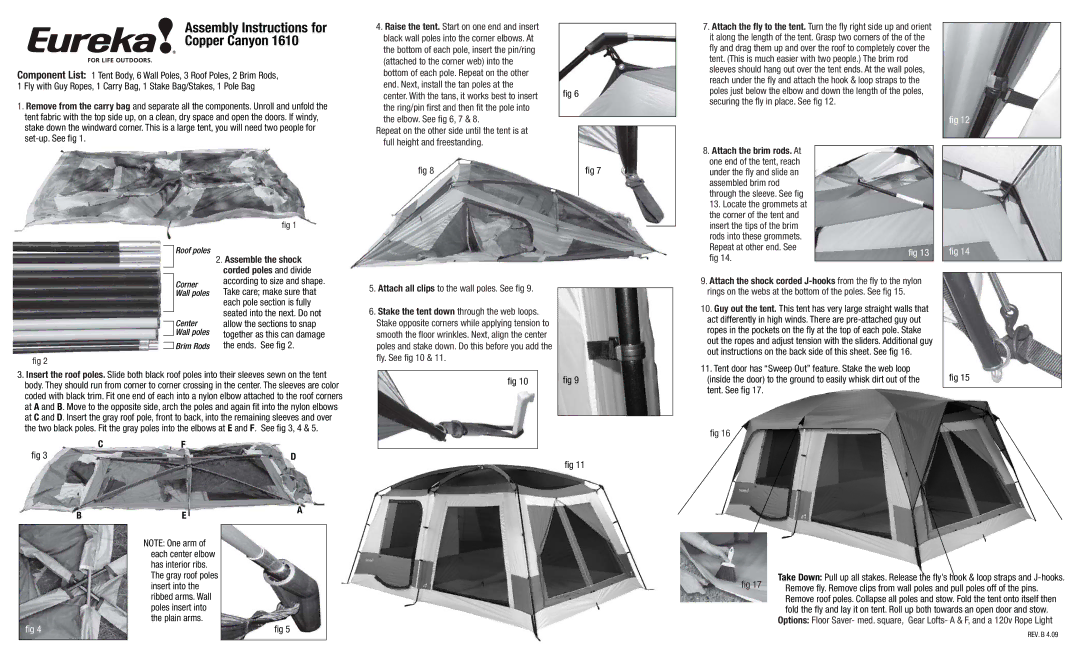
Assembly Instructions for

Copper Canyon 1610

Component List: 1 Tent Body, 6 Wall Poles, 3 Roof Poles, 2 Brim Rods, 1 Fly with Guy Ropes, 1 Carry Bag, 1 Stake Bag/Stakes, 1 Pole Bag

1.Remove from the carry bag and separate all the components. Unroll and unfold the tent fabric with the top side up, on a clean, dry space and open the doors. If windy, stake down the windward corner. This is a large tent, you will need two people for set-up. See fig 1.

4.Raise the tent. Start on one end and insert black wall poles into the corner elbows. At the bottom of each pole, insert the pin/ring (attached to the corner web) into the bottom of each pole. Repeat on the other

end. Next, install the tan poles at the center. With the tans, it works best to insert the ring/pin first and then fit the pole into the elbow. See fig 6, 7 & 8.

Repeat on the other side until the tent is at full height and freestanding.

fig 8

fig 6

fig 7

7.Attach the fly to the tent. Turn the fly right side up and orient it along the length of the tent. Grasp two corners of the of the fly and drag them up and over the roof to completely cover the tent. (This is much easier with two people.) The brim rod sleeves should hang out over the tent ends. At the wall poles, reach under the fly and attach the hook & loop straps to the poles just below the elbow and down the length of the poles, securing the fly in place. See fig 12.

fig 12

8. Attach the brim rods. At

one end of the tent, reach

under the fly and slide an

assembled brim rod

through the sleeve. See fig

13. Locate the grommets at

the corner of the tent and

Roof poles

fig 1

2. Assemble the shock

corded poles and divide

insert the tips of the brim

rods into these grommets.

Repeat at other end. See

fig 14.

fig 13

fig 14

Corner

Wall poles

Center

Wall poles

Brim Rods

fig 2

according to size and shape.

Take care; make sure that

each pole section is fully

seated into the next. Do not

allow the sections to snap

together as this can damage

the ends. See fig 2.

5.Attach all clips to the wall poles. See fig 9.

6.Stake the tent down through the web loops. Stake opposite corners while applying tension to smooth the floor wrinkles. Next, align the center poles and stake down. Do this before you add the fly. See fig 10 & 11.

9. Attach the shock corded J-hooks from the fly to the nylon

rings on the webs at the bottom of the poles. See fig 15.

10. Guy out the tent. This tent has very large straight walls that

act differently in high winds. There are pre-attached guy out

ropes in the pockets on the fly at the top of each pole. Stake

out the ropes and adjust tension with the sliders. Additional guy

out instructions on the back side of this sheet. See fig 16.

11. Tent door has “Sweep Out” feature. Stake the web loop

3.Insert the roof poles. Slide both black roof poles into their sleeves sewn on the tent body. They should run from corner to corner crossing in the center. The sleeves are color coded with black trim. Fit one end of each into a nylon elbow attached to the roof corners at A and B. Move to the opposite side, arch the poles and again fit into the nylon elbows at C and D. Insert the gray roof pole, front to back, into the remaining sleeves and over the two black poles. Fit the gray poles into the elbows at E and F. See fig 3, 4 & 5.

fig 10

fig 9

(inside the door) to the ground to easily whisk dirt out of the

fig 15

tent. See fig 17.


fig 16


C

fig 3

B

fig 4

F

E

NOTE: One arm of each center elbow has interior ribs. The gray roof poles insert into the ribbed arms. Wall poles insert into the plain arms.

D

A

fig 5

fig 11

Take Down: Pull up all stakes. Release the fly’s hook & loop straps and J-hooks.

fig 17 Remove fly. Remove clips from wall poles and pull poles off of the pins. Remove roof poles. Collapse all poles and stow. Fold the tent onto itself then fold the fly and lay it on tent. Roll up both towards an open door and stow.

Options: Floor Saver- med. square, Gear Lofts- A & F, and a 120v Rope Light

REV. B 4.09

Page 1
Image 1
Eureka! Tents Copper Canyon 1610 manual Assembly Instructions for Copper Canyon

Copper Canyon 1610 specifications

When it comes to camping, having the right tent can make all the difference in creating a comfortable and enjoyable outdoor experience. The Eureka! Tents Copper Canyon 1610 is a perfect blend of space, durability, and practicality, tailored for families or groups of campers seeking a cozy shelter while retaining the spirit of adventure.

One of the standout features of the Copper Canyon 1610 is its generous size. With a 10-person capacity, this tent provides ample room for everyone, making it an ideal choice for family outings or camping trips with friends. The tent boasts a spacious footprint, allowing campers to utilize the area efficiently while still having room to move around comfortably. The high peak height further enhances the livability of the space, enabling users to walk comfortably within the tent without the hassle of crouching.

The design of the Copper Canyon is anchored in Eureka!’s commitment to quality and innovation. The tent is constructed using durable materials that can withstand various weather conditions. A robust polyester fabric provides excellent water resistance, while the tent’s floor features a tough polyethylene material to protect against ground moisture. Additionally, the tent includes welded seams to prevent leaks, ensuring that campers stay dry during unexpected rain showers.

The Copper Canyon 1610 also incorporates a unique cabin-style design that provides vertical walls, maximizing internal space. This thoughtful architecture enables campers to set up sleeping arrangements or move around freely without feeling cramped. The tent features multiple windows, allowing for superior ventilation and visibility, ensuring that the interior remains fresh and airy.

One of the notable technologies that Eureka! uses in the Copper Canyon is its Easy Setup System, which streamlines the process of pitching the tent. This feature is especially appreciated by campers who prefer a hassle-free setup after a long day on the trail. The color-coded poles make it simple to assemble, while the tent’s design allows for rapid disassembly when it's time to head home.

For enhanced organization, the tent includes multiple internal pockets for storing smaller items, like phone chargers or headlamps, keeping the interior tidy. Furthermore, the tent's design accommodates optional vestibules for added storage space, allowing campers to keep their gear separate from the main living area.

In summary, the Eureka! Tents Copper Canyon 1610 is an exceptional choice for those seeking a spacious, durable, and user-friendly camping tent. With thoughtful design features, advanced materials, and a convenient setup process, it delivers a comfortable and enjoyable camping experience that will make it a favorite for years to come. Whether you're embarking on a family camping trip or enjoying a weekend with friends, the Copper Canyon 1610 is ready to stand up to the adventure.