ASSEMBLY INSTRUCTIONS

for the DOMINION TENT

Component List:

CB

With the tent secure, drape the fly over the tent body. The fly only fits on the tent one way. Position the fly over the tent with the vestibule wing sections over the doors and with the ! section over the all mesh end of the tent. Reach under the fly and connect the hook and loop tabs to the tent poles. See fig. 7.

Connect the four corner buckles on the fly to their mates on the tent webs. Do not fully tighten down any of the webs just yet.

1

Tent Body,

2 Tent Poles, 1 Carry Bag,

1

Tent Fly,

1 Stake Bag/ Stakes

Unroll and unfold the tent with the floor on the ground. Remove the fly and set it aside. Do not stake the tent down yet. In windy conditions, we recommend that the mesh end should face into the wind and that you stake down one corner of this end.

Join the shockcorded poles. Try to prevent pole sections from snapping together, as this can damage the pole ends. NOTE: Make certain each insert end has seated firmly into each plain end.

D

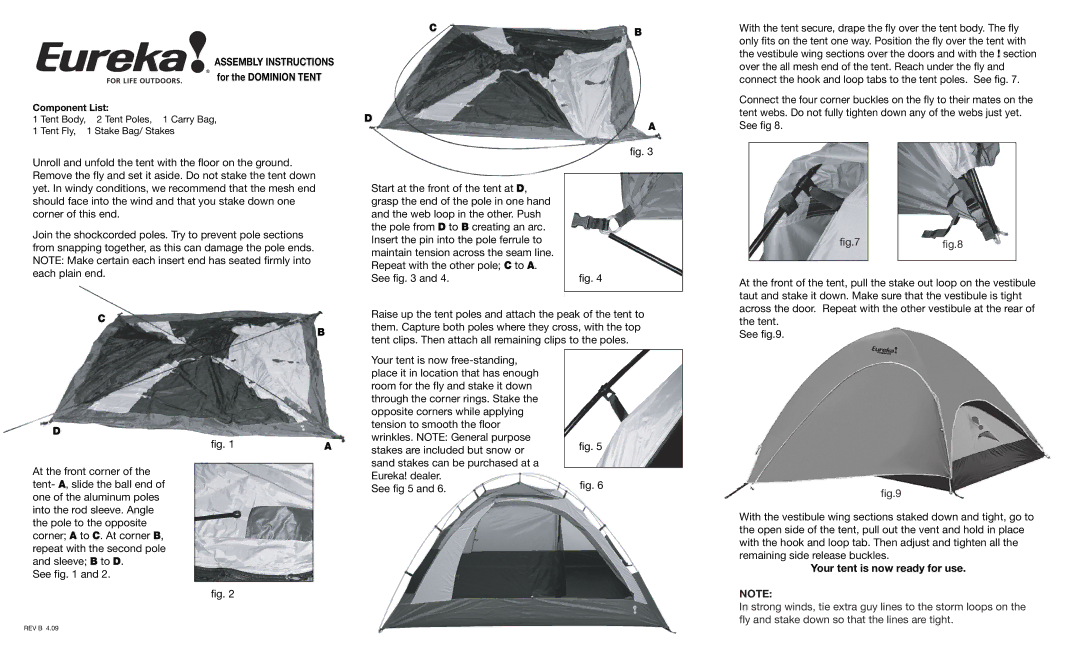
Start at the front of the tent at D, grasp the end of the pole in one hand and the web loop in the other. Push the pole from D to B creating an arc. Insert the pin into the pole ferrule to maintain tension across the seam line. Repeat with the other pole; C to A. See fig. 3 and 4.

A

fig. 3

fig. 4

See fig 8.

fig.7


fig.8


At the front of the tent, pull the stake out loop on the vestibule taut and stake it down. Make sure that the vestibule is tight across the door. Repeat with the other vestibule at the rear of

C

B

D

fig. 1

A

At the front corner of the tent- A, slide the ball end of one of the aluminum poles into the rod sleeve. Angle the pole to the opposite corner; A to C. At corner B, repeat with the second pole and sleeve; B to D.

See fig. 1 and 2.

fig. 2

Raise up the tent poles and attach the peak of the tent to them. Capture both poles where they cross, with the top tent clips. Then attach all remaining clips to the poles.

Your tent is now free-standing,


place it in location that has enough


room for the fly and stake it down


through the corner rings. Stake the


opposite corners while applying


tension to smooth the floor


wrinkles. NOTE: General purpose

fig. 5

stakes are included but snow or


sand stakes can be purchased at a


Eureka! dealer.

fig. 6

See fig 5 and 6.


the tent. See fig.9.

fig.9

With the vestibule wing sections staked down and tight, go to the open side of the tent, pull out the vent and hold in place with the hook and loop tab. Then adjust and tighten all the remaining side release buckles.

Your tent is now ready for use.

NOTE:

In strong winds, tie extra guy lines to the storm loops on the fly and stake down so that the lines are tight.

REV B 4.09

Page 1
Image 1
Eureka! Tents manual For the Dominion Tent, Your tent is now ready for use

Dominion specifications

Eureka! Tents Dominion series represents a perfect blend of innovation, functionality, and durability in the realm of outdoor camping gear. Designed to cater to serious outdoor enthusiasts, the Dominion tents provide an optimal solution for varied camping scenarios, whether you're embarking on a quick weekend getaway or an extended trekking adventure.

One of the standout features of the Dominion series is its robust construction. With a waterproof and highly durable polyester fabric, these tents are engineered to withstand the elements. The materials are treated with water-repellent coatings and feature tailored seams to ensure that you stay dry and comfortable in adverse weather conditions. Additionally, the tent's sturdy poles are made from high-quality aluminum, offering a lightweight yet incredibly strong framework that can endure strong winds and rough terrain.

The spacious interiors of the Dominion tents are another highlight. Designed with ample headroom and generous floor space, these tents allow for ease of movement and comfort for multiple occupants. Whether you are sharing the tent with family or friends, there is enough room to accommodate sleeping arrangements as well as gear storage. Many models also include vestibules, which provide extra storage space for backpacks and shoes, keeping the interior clutter-free.

Technologically, Eureka! Tents employs cutting-edge features to enhance user experience. The use of color-coded pole systems simplifies setup, allowing campers to pitch their tents quickly, even after a long hike. The inclusion of mesh panels promotes ventilation, mitigating condensation and allowing for airflow on warm nights while maintaining insect protection. Several models also feature adjustable ventilation systems that enable campers to customize air circulation according to their preferences.

Another innovative characteristic is the footprint compatibility available with many models in the Dominion series. This adds an extra layer of protection to the tent floor as well as enhancing longevity. Compatibility with various accessories such as gear lofts and integrated lighting systems makes customizing your camping experience easy.

Overall, Eureka! Tents Dominion series stands out for its versatility, durability, and thoughtful design, catering to both novice and seasoned campers alike. With these tents, outdoor enthusiasts can confidently explore the great outdoors while enjoying comfort, convenience, and security in their temporary abodes. Whether you are scaling mountains or relaxing at a lakeside, Eureka! Tents Dominion is equipped to meet your needs and elevate your camping experience.