Assembly Instructions
Forte SQ 2 Tents
Component List: 1 Tent Body, 1 Tent Fly, 4 Part Frame Assembly, 1 Carry Bag, 1 Stake Bag with Stakes, 1 Pole Bag, 1 Pole Repair Splint
NOTE: Do not drop tent bag or pole bag on its end. Do not bounce tent bag on its end to get the tent out. These actions may cut the shock cord and/or damage the pole ends.
1.Unroll and unfold the tent and lay it on the ground. In windy conditions, stake down one front corner into wind. See fig.1.
fig.1
2.Join the frame sections on the ground: Fit each pole to its mate or hub. The sections are shockcorded. Try to keep the poles from snapping together, as
this can damage the ends. It is important to make sure that each section has firmly seated into the hub. Improperly fit poles may cause the hub to break.
Set the “A” frames over the |
| |
tent so that the poles align |
| |
to the tent corner webs. | fig.2 | |
See fig. 2 & 3. | ||
| ||
| fig.3 |
3.Fit the ring/pins into the poles: There are webs sewn to each corner of the tent. Start at either end and insert the pins into the bottom of the poles at that end. Repeat at the opposite end. See fig. 4.
fig.4
4.Raise the frame: Start at either end and insert the ridge pole into the hub. Walk to the opposite end and grasp both the ridge pole and the second hub. Push/curve the poles until the ridge pole fits securely
into the second hub. See fig. 5.
5.Attach the tent body to the frame: There are two types of connectors sewn to the tent body. For the first, hang the two end shockcords onto the
See fig. 6
Then, work your way down and |
| |
across the frame, attaching |
| |
the pole clips as you go. | fig.6 | |
See fig. 7. | ||
|
6.Install the spreader pole: Lay the pole across the top, over and perpendicular to the ridge pole. There are two pockets sewn to the top of the tent body. One of the pockets has a Velcro® closure and the other is plain. It is easier if you slide the pole into the plain pocket first and then capture the other end with the Velcro® See fig.8 & 9.
7.Stake the tent down: The tent is now freestanding. Move it to your
desired location. Stake it down through the web loops.
Stake opposite corners while applying tension to smooth the floor wrinkles and square the tent.
See fig.9.
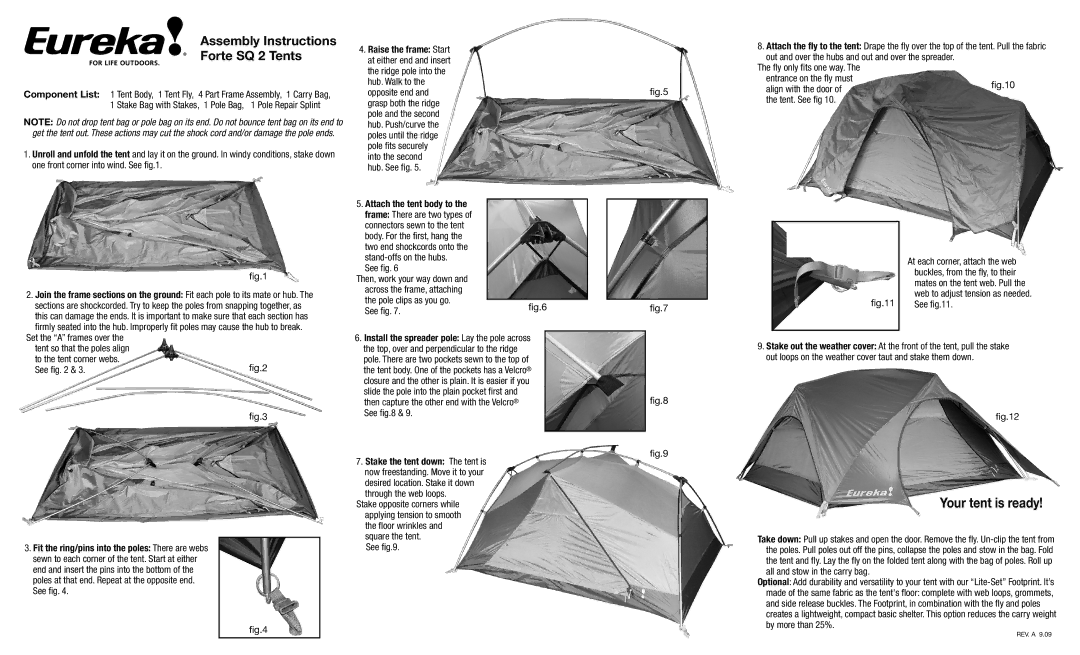
| 8. Attach the fly to the tent: Drape the fly over the top of the tent. Pull the fabric | ||
| out and over the hubs and out and over the spreader. |
| |
| The fly only fits one way. The |
| |
| entrance on the fly must | fig.10 | |
fig.5 | align with the door of | ||
| |||
| the tent. See fig 10. |
| |
|
|
| At each corner, attach the web |
|
|
| |
|
|
| buckles, from the fly, to their |
|
|
| mates on the tent web. Pull the |
|
| fig.11 | web to adjust tension as needed. |
fig.7 |
| See fig.11. | |
|
|
| |
|
|
|
|
| 9. Stake out the weather cover: At the front of the tent, pull the stake | ||
| out loops on the weather cover taut and stake them down. | ||
fig.8 |
|
|
|
|
|
| fig.12 |
fig.9 |
|
|
|
Your tent is ready!
Take down: Pull up stakes and open the door. Remove the fly.
Optional: Add durability and versatility to your tent with our
REV. A 9.09