OPERATING INSTRUCTIONS
GETTING TO KNOW FOOD PROCESSOR
Dough Blade
CAUTION: Make sure that the unit is unplugged from the power source and the operating button is in the “OFF” position before inserting or removing attachments.
1.Make sure that the blade storage cover is closed during use.
2.Fit the processor bowl and spindle as described previously on page 4.
3.Fit the dough blade over the spindle and press firmly into place. (Fig. 8)
4.Place the ingredients into the bowl.
5.Fit the lid and click into place as described in the “Setting Up” section (page 4).
6.Insert food pusher and then plug in the food processor.
7.Turn the food processor on selecting high speed. Maximum capacity for processing dough is based on the mixture of 21 oz. (600 g.) of flour and 14 oz. (400 g.) of water in order to obtain 2.2 Lbs. (1 kg.) of dough.
8.Recommended speed for making dough is high.
9.When it is time to knead the dough, place speed control dial in the "Off" position and pulse until the dough is ready.
10.Remove the blade from the bowl
before removing the dough.
WHEN KNEADING DOUGH, DO NOT OPERATE THE MACHINE LONGER THAN 20 SECONDS. AFTERWARDS WAIT AT LEAST 2 MINUTES BEFORE OPERATING THE MACHINE AGAIN.
FOR SAFETY, ALWAYS LEAVE THE PUSHER IN PLACE WHILE OPERATING THE PROCESSOR.
Slicing & Shredding Blades
CAUTION: Make sure that the unit is unplugged from the power source and the operating button is “OFF” before inserting or removing attachments.
1.Make sure that the blade storage cover is closed during use.
2.Place the blade of your choice on the blade holder. Inserting the longer tab on the side of the blade first. (Fig. 9)
3.Press the other end of the blade until it clicks into place. (Fig. 10)
4.Fit the processor bowl and spindle as detailed on the page 4.
5.Using the finger holes in the blade holder, fit it over the spindle and press firmly into place as indicated. (Fig. 11)
WARNING: USE EXTREME CAUTION WHEN HANDLING BLADES. BLADES ARE SHARP.
6.Fit the lid and click into place as described in the Setting Up section (page 4).
7.Plug in the processor.
8.WARNING: USE THE FOOD
PUSHER TO ADD FOOD INTO THE PROCESSOR BOWL THROUGH THE FEEDER TUBE.
Do not overload the food processor bowl. In one operation, you can process a maximum of 6 cups (1500 ml) of food.
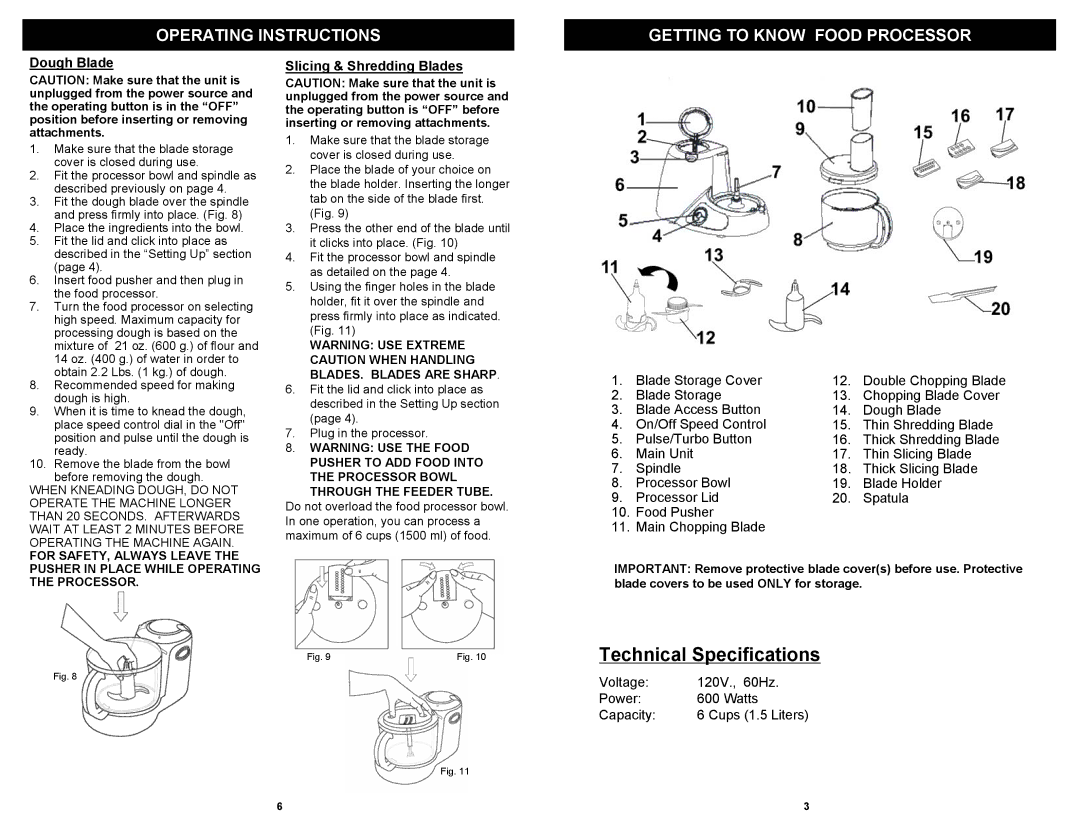
1. | Blade Storage Cover | 12. | Double Chopping Blade |
2. | Blade Storage | 13. | Chopping Blade Cover |
3. | Blade Access Button | 14. | Dough Blade |
4. | On/Off Speed Control | 15. | Thin Shredding Blade |
5. | Pulse/Turbo Button | 16. | Thick Shredding Blade |
6. | Main Unit | 17. | Thin Slicing Blade |
7. | Spindle | 18. | Thick Slicing Blade |
8. | Processor Bowl | 19. | Blade Holder |
9. | Processor Lid | 20. | Spatula |
10.Food Pusher
11.Main Chopping Blade
IMPORTANT: Remove protective blade cover(s) before use. Protective blade covers to be used ONLY for storage.
Fig. 9 | Fig. 10 |
Fig. 8
Fig. 11
6
Technical Specifications
Voltage: | 120V., 60Hz. |
Power: | 600 Watts |
Capacity: | 6 Cups (1.5 Liters) |
3