OPERATING INSTRUCTIONS

OPERATING INSTRUCTIONS

Maintenance & Care

For best cleaning results, the dust bag should be changed often. The use of powder carpet fresheners can decrease the effectiveness of the dust bag filtering system by clogging the bag and not allowing air to flow though properly. We recommend that hard objects, pins, broken glass, paper clips, etc. be picked up from the floor before vacuuming. Although, your vacuum will pick them up, they could do severe damage to the vacuum.

Use genuine Shark Trailblazer dust

bags, belts and filters only to insure top performance from your vacuum.

1.Changing the Dust Bag:

Your vacuum comes with both paper bags and a reusable cloth bag. To change bags:

A)Unplug power cord from wall outlet.

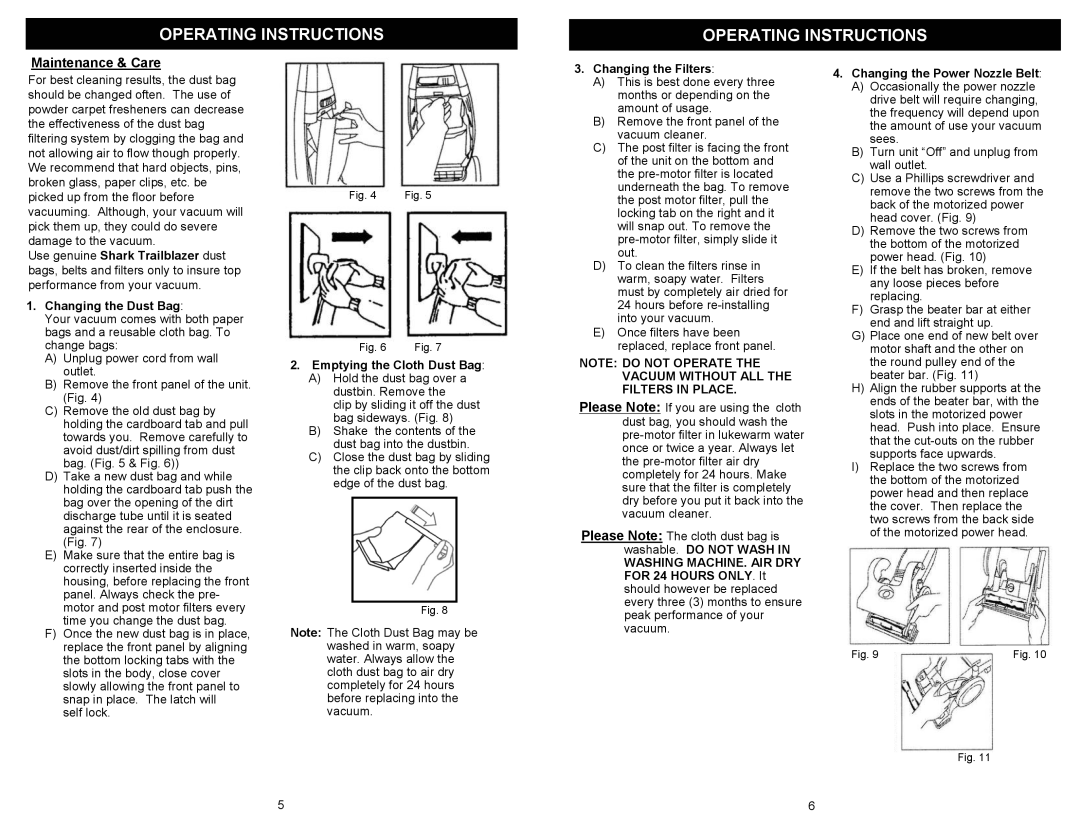
B)Remove the front panel of the unit. (Fig. 4)

C)Remove the old dust bag by holding the cardboard tab and pull towards you. Remove carefully to avoid dust/dirt spilling from dust bag. (Fig. 5 & Fig. 6))

D)Take a new dust bag and while holding the cardboard tab push the bag over the opening of the dirt discharge tube until it is seated against the rear of the enclosure. (Fig. 7)

E)Make sure that the entire bag is correctly inserted inside the housing, before replacing the front panel. Always check the pre- motor and post motor filters every time you change the dust bag.

F)Once the new dust bag is in place, replace the front panel by aligning the bottom locking tabs with the slots in the body, close cover slowly allowing the front panel to snap in place. The latch will

self lock.

Fig. 4

Fig. 5

Fig. 6

Fig. 7

2.Emptying the Cloth Dust Bag:

A)Hold the dust bag over a dustbin. Remove the

clip by sliding it off the dust bag sideways. (Fig. 8)

B)Shake the contents of the dust bag into the dustbin.

C)Close the dust bag by sliding the clip back onto the bottom edge of the dust bag.

Fig. 8

Note: The Cloth Dust Bag may be washed in warm, soapy water. Always allow the cloth dust bag to air dry completely for 24 hours before replacing into the vacuum.

3.Changing the Filters:

A)This is best done every three months or depending on the amount of usage.

B)Remove the front panel of the vacuum cleaner.

C)The post filter is facing the front of the unit on the bottom and the pre-motor filter is located underneath the bag. To remove the post motor filter, pull the locking tab on the right and it will snap out. To remove the pre-motor filter, simply slide it out.

D)To clean the filters rinse in warm, soapy water. Filters must by completely air dried for 24 hours before re-installing into your vacuum.

E)Once filters have been replaced, replace front panel.

NOTE: DO NOT OPERATE THE VACUUM WITHOUT ALL THE FILTERS IN PLACE.

Please Note: If you are using the cloth dust bag, you should wash the pre-motor filter in lukewarm water once or twice a year. Always let the pre-motor filter air dry completely for 24 hours. Make sure that the filter is completely dry before you put it back into the vacuum cleaner.

Please Note: The cloth dust bag is

washable. DO NOT WASH IN

WASHING MACHINE. AIR DRY FOR 24 HOURS ONLY. It should however be replaced every three (3) months to ensure peak performance of your vacuum.

4.Changing the Power Nozzle Belt:

A)Occasionally the power nozzle drive belt will require changing, the frequency will depend upon the amount of use your vacuum sees.

B)Turn unit “Off” and unplug from wall outlet.

C)Use a Phillips screwdriver and remove the two screws from the back of the motorized power head cover. (Fig. 9)

D)Remove the two screws from the bottom of the motorized power head. (Fig. 10)

E)If the belt has broken, remove any loose pieces before replacing.

F)Grasp the beater bar at either end and lift straight up.

G)Place one end of new belt over motor shaft and the other on the round pulley end of the beater bar. (Fig. 11)

H)Align the rubber supports at the ends of the beater bar, with the slots in the motorized power head. Push into place. Ensure that the cut-outs on the rubber supports face upwards.

I)Replace the two screws from the bottom of the motorized power head and then replace the cover. Then replace the two screws from the back side of the motorized power head.

Fig. 9

Fig. 10

Fig. 11

5

6

Page 6
Image 6
Euro-Pro EP825 Maintenance & Care, Use genuine Shark Trailblazer dust, Changing the Dust Bag, Emptying the Cloth Dust Bag

EP825 specifications

The Euro-Pro EP825 is a versatile and powerful vacuum cleaner designed to meet the demands of modern households. This innovative cleaning device stands out with its unique combination of advanced technologies and user-friendly features, making it a popular choice among consumers.

One of the key features of the Euro-Pro EP825 is its multi-surface cleaning capability. With adjustable suction settings, this vacuum is suitable for a wide variety of floor types, including hardwood, carpets, and tiles. Users can easily switch from one surface to another without the need for multiple cleaning devices.

The Euro-Pro EP825 also incorporates a state-of-the-art filtration system. This system includes a HEPA filter designed to capture 99.97% of dust, pollen, and other allergens as small as 0.3 microns. This feature is particularly beneficial for allergy sufferers, as it helps to improve indoor air quality while ensuring that the environment remains clean and free of harmful particles.

Another significant characteristic of the Euro-Pro EP825 is its lightweight design. Weighing in at just under ten pounds, it allows users to carry and maneuver the vacuum effortlessly around their home. The ergonomic handle and compact structure enhance usability, making it convenient for cleaning stairs, tight spots, and hard-to-reach areas.

The vacuum cleaner also features a large-capacity dustbin, which minimizes the frequency of emptying and allows for extended cleaning sessions. This bagless design not only contributes to a more environmentally friendly approach but also provides an easier and more hygienic disposal process.

A notable technology integrated into the Euro-Pro EP825 is its smart sensor technology. This feature allows the vacuum to automatically adjust suction power based on the surface it is cleaning, optimizing performance and ensuring effective dirt removal. This smart capability enhances overall cleaning efficiency and saves energy.

The Euro-Pro EP825 comes equipped with a variety of attachments, including a crevice tool, upholstery brush, and dusting brush. These attachments enable users to tackle different cleaning tasks, from removing pet hair from furniture to reaching into narrow spaces.

In summary, the Euro-Pro EP825 is a powerful and efficient vacuum cleaner that combines innovative technology with user-friendly design. Its versatility, advanced filtration system, lightweight construction, and smart sensor technology make it an exceptional choice for anyone looking to maintain a clean and healthy home environment.