Mode D’Emploi
Operating Instructions
Cuisson des biscuits
Pour la cuisson des biscuits, nous vous suggérons de régler la température de cuisson et d’utiliser une plaque à biscuits sur la grille. (Veuillez prendre note qu’elles ne sont pas comprise avec le four). En outre, l’utilisation d’un papier à cuisson sur la plaque à biscuits pourra s’avérer utile pour certains types de biscuits.
1.Préchauffez le four pendant 15 minutes. Placez la plaque à biscuits sur la grille.
2.Utilisez un papier à cuisson sur la plaque à biscuits afin de les empêcher de coller.
3.Les plaques à biscuits, durées de cuisson et températures peuvent varier de celles nécessaires à d’autres produits de cuisson.
Guide de Cuisson
Suivez les instructions se trouvant sur l’emballage ou dans la recette pour la durée et la température de cuisson.
GRILLE-PAIN
Faites griller le pain, les bagels, les muffins anglais et les autres délices du déjeuner et obtenez toujours un résultat doré. Lorsque vous ne grillez qu’un ou deux articles, placez la nourriture sur la grille, au centre du four, pour des résultats uniformes.
Remarque de Fonctionnement: Il n'est pas possible de régler la température de cette fonction.
1.
2. Placez la nourriture sur la grille.
3.Appuyez sur le bouton
4.Appuyez sur le bouton Augmentation/Diminution pour sélectionner le degré de
|
|
|
|
|
|
|
|
|
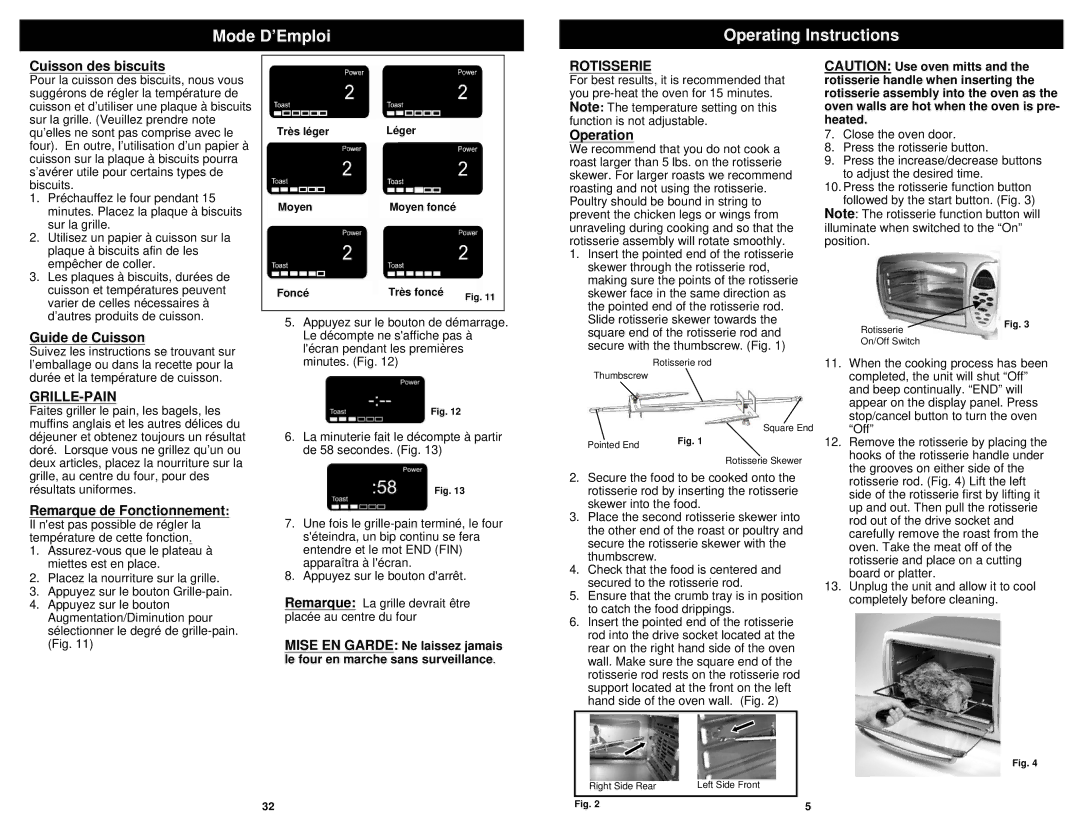
| Très léger |
| Léger |
|
|
| ||
|
|
|
|
|
|
|
|
|
|
|
|
|
|
|
|
| |
| Moyen |
|
| Moyen foncé |
|
| ||
|
|
|
|
|
|
|
| |
|
|
|
| Très foncé |
| |||
| Foncé |
|
| Fig. 11 | ||||
|
|
|
|
|
|
|
|
|
5.Appuyez sur le bouton de démarrage. Le décompte ne s'affiche pas à l'écran pendant les premières minutes. (Fig. 12)
Fig. 12
6.La minuterie fait le décompte à partir de 58 secondes. (Fig. 13)
Fig. 13
7.Une fois le
8.Appuyez sur le bouton d'arrêt.
Remarque: La grille devrait être placée au centre du four
MISE EN GARDE: Ne laissez jamais le four en marche sans surveillance.
ROTISSERIE
For best results, it is recommended that you
Operation
We recommend that you do not cook a roast larger than 5 lbs. on the rotisserie skewer. For larger roasts we recommend roasting and not using the rotisserie. Poultry should be bound in string to prevent the chicken legs or wings from unraveling during cooking and so that the rotisserie assembly will rotate smoothly.
1.Insert the pointed end of the rotisserie skewer through the rotisserie rod, making sure the points of the rotisserie skewer face in the same direction as the pointed end of the rotisserie rod. Slide rotisserie skewer towards the square end of the rotisserie rod and secure with the thumbscrew. (Fig. 1)
Rotisserie rod
Thumbscrew
Square End
Pointed End | Fig. 1 |
|
Rotisserie Skewer
2.Secure the food to be cooked onto the rotisserie rod by inserting the rotisserie skewer into the food.
3.Place the second rotisserie skewer into the other end of the roast or poultry and secure the rotisserie skewer with the thumbscrew.
4.Check that the food is centered and secured to the rotisserie rod.
5.Ensure that the crumb tray is in position to catch the food drippings.
6.Insert the pointed end of the rotisserie rod into the drive socket located at the rear on the right hand side of the oven wall. Make sure the square end of the rotisserie rod rests on the rotisserie rod support located at the front on the left hand side of the oven wall. (Fig. 2)
CAUTION: Use oven mitts and the rotisserie handle when inserting the rotisserie assembly into the oven as the oven walls are hot when the oven is pre- heated.
7.Close the oven door.
8.Press the rotisserie button.
9.Press the increase/decrease buttons to adjust the desired time.
10.Press the rotisserie function button followed by the start button. (Fig. 3)
Note: The rotisserie function button will illuminate when switched to the “On” position.
Rotisserie | Fig. 3 |
| |
On/Off Switch |
|
11.When the cooking process has been completed, the unit will shut “Off” and beep continually. “END” will appear on the display panel. Press stop/cancel button to turn the oven “Off”
12.Remove the rotisserie by placing the hooks of the rotisserie handle under the grooves on either side of the rotisserie rod. (Fig. 4) Lift the left side of the rotisserie first by lifting it up and out. Then pull the rotisserie rod out of the drive socket and carefully remove the roast from the oven. Take the meat off of the rotisserie and place on a cutting board or platter.
13.Unplug the unit and allow it to cool completely before cleaning.
Fig. 4
32
Right Side Rear | Left Side Front | |
|
|
|
Fig. 2 | 5 | |