CLEANING THE DUST TRAY
To achieve the best performance, empty the dust tray after each use.
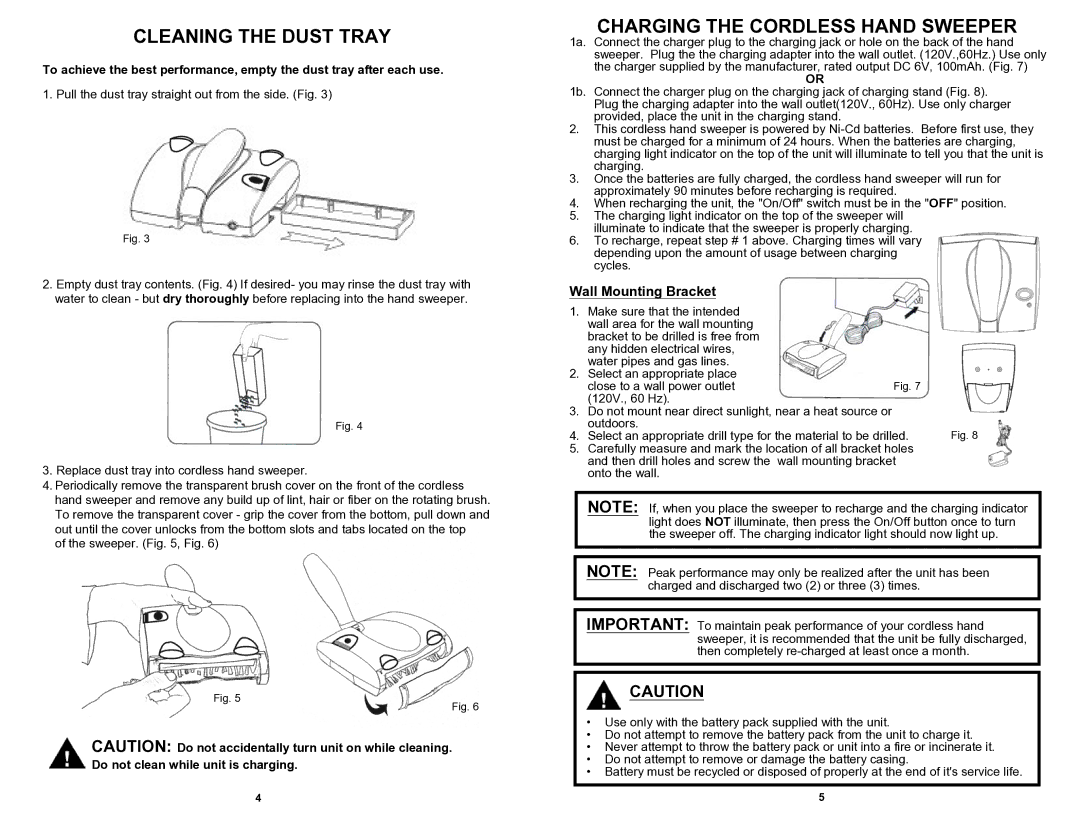
1. Pull the dust tray straight out from the side. (Fig. 3)
Fig. 3
2.Empty dust tray contents. (Fig. 4) If desired- you may rinse the dust tray with water to clean - but dry thoroughly before replacing into the hand sweeper.
Fig. 4
3.Replace dust tray into cordless hand sweeper.
4.Periodically remove the transparent brush cover on the front of the cordless hand sweeper and remove any build up of lint, hair or fiber on the rotating brush. To remove the transparent cover - grip the cover from the bottom, pull down and out until the cover unlocks from the bottom slots and tabs located on the top
of the sweeper. (Fig. 5, Fig. 6)
Fig. 5
Fig. 6
CAUTION: Do not accidentally turn unit on while cleaning. Do not clean while unit is charging.
CHARGING THE CORDLESS HAND SWEEPER
1a. Connect the charger plug to the charging jack or hole on the back of the hand sweeper. Plug the the charging adapter into the wall outlet. (120V.,60Hz.) Use only the charger supplied by the manufacturer, rated output DC 6V, 100mAh. (Fig. 7)
OR
1b. Connect the charger plug on the charging jack of charging stand (Fig. 8). Plug the charging adapter into the wall outlet(120V., 60Hz). Use only charger provided, place the unit in the charging stand.
2.This cordless hand sweeper is powered by
3.Once the batteries are fully charged, the cordless hand sweeper will run for approximately 90 minutes before recharging is required.
4.When recharging the unit, the "On/Off" switch must be in the "OFF" position.
5.The charging light indicator on the top of the sweeper will illuminate to indicate that the sweeper is properly charging.
6.To recharge, repeat step # 1 above. Charging times will vary depending upon the amount of usage between charging cycles.
Wall Mounting Bracket
1.Make sure that the intended wall area for the wall mounting bracket to be drilled is free from any hidden electrical wires, water pipes and gas lines.
2.Select an appropriate place
| close to a wall power outlet | Fig. 7 |
|
3. | (120V., 60 Hz). |
|
|
Do not mount near direct sunlight, near a heat source or |
|
| |
4. | outdoors. |
|
|
Select an appropriate drill type for the material to be drilled. | Fig. 8 | ||
5.Carefully measure and mark the location of all bracket holes and then drill holes and screw the wall mounting bracket onto the wall.
NOTE: If, when you place the sweeper to recharge and the charging indicator light does NOT illuminate, then press the On/Off button once to turn the sweeper off. The charging indicator light should now light up.
NOTE: Peak performance may only be realized after the unit has been charged and discharged two (2) or three (3) times.
IMPORTANT: To maintain peak performance of your cordless hand sweeper, it is recommended that the unit be fully discharged, then completely
![]() CAUTION
CAUTION
•Use only with the battery pack supplied with the unit.
•Do not attempt to remove the battery pack from the unit to charge it.
•Never attempt to throw the battery pack or unit into a fire or incinerate it.
•Do not attempt to remove or damage the battery casing.
•Battery must be recycled or disposed of properly at the end of it's service life.
4 | 5 |
