Maintenance


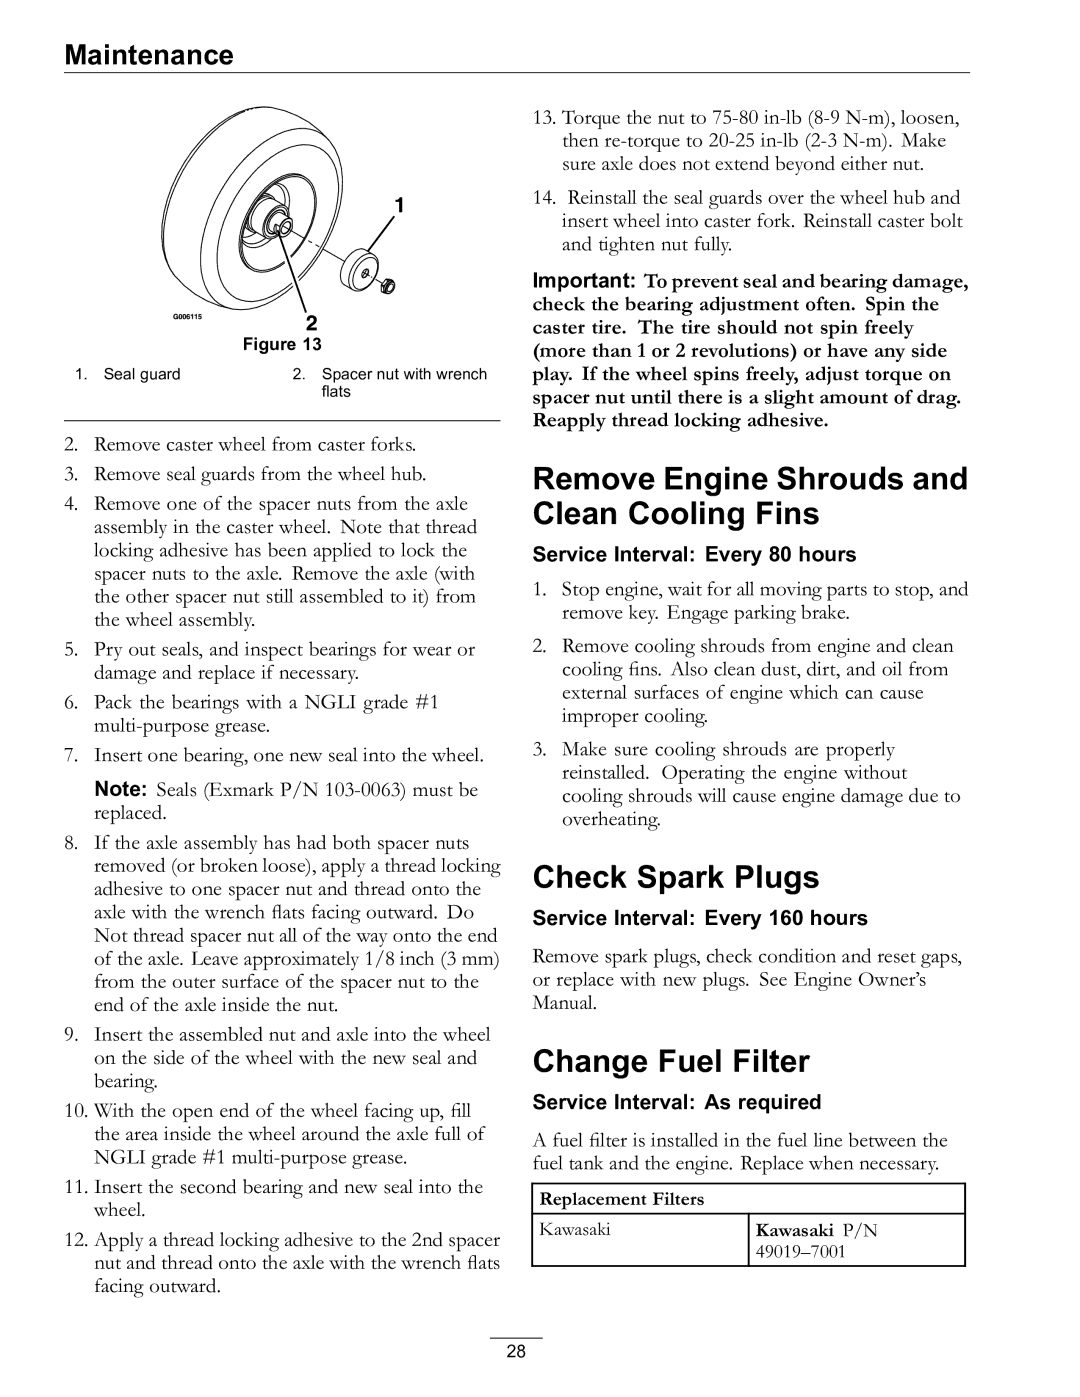
Figure 13

1. Seal guard

2. Spacer nut with wrench


flats

2.Remove caster wheel from caster forks.

3.Remove seal guards from the wheel hub.

4.Remove one of the spacer nuts from the axle assembly in the caster wheel. Note that thread locking adhesive has been applied to lock the spacer nuts to the axle. Remove the axle (with the other spacer nut still assembled to it) from the wheel assembly.

5.Pry out seals, and inspect bearings for wear or damage and replace if necessary.

6.Pack the bearings with a NGLI grade #1 multi-purpose grease.

7.Insert one bearing, one new seal into the wheel.

Note: Seals (Exmark P/N 103-0063) must be replaced.

8.If the axle assembly has had both spacer nuts removed (or broken loose), apply a thread locking adhesive to one spacer nut and thread onto the axle with the wrench flats facing outward. Do Not thread spacer nut all of the way onto the end of the axle. Leave approximately 1/8 inch (3 mm) from the outer surface of the spacer nut to the end of the axle inside the nut.

9.Insert the assembled nut and axle into the wheel on the side of the wheel with the new seal and bearing.

10.With the open end of the wheel facing up, fill the area inside the wheel around the axle full of NGLI grade #1 multi-purpose grease.

11.Insert the second bearing and new seal into the wheel.

12.Apply a thread locking adhesive to the 2nd spacer nut and thread onto the axle with the wrench flats facing outward.

13.Torque the nut to 75-80 in-lb (8-9 N-m), loosen, then re-torque to 20-25 in-lb (2-3 N-m). Make sure axle does not extend beyond either nut.

14.Reinstall the seal guards over the wheel hub and insert wheel into caster fork. Reinstall caster bolt and tighten nut fully.

Important: To prevent seal and bearing damage, check the bearing adjustment often. Spin the caster tire. The tire should not spin freely (more than 1 or 2 revolutions) or have any side play. If the wheel spins freely, adjust torque on spacer nut until there is a slight amount of drag. Reapply thread locking adhesive.

Remove Engine Shrouds and Clean Cooling Fins

Service Interval: Every 80 hours

1.Stop engine, wait for all moving parts to stop, and remove key. Engage parking brake.

2.Remove cooling shrouds from engine and clean cooling fins. Also clean dust, dirt, and oil from external surfaces of engine which can cause improper cooling.

3.Make sure cooling shrouds are properly reinstalled. Operating the engine without cooling shrouds will cause engine damage due to overheating.

Check Spark Plugs

Service Interval: Every 160 hours

Remove spark plugs, check condition and reset gaps, or replace with new plugs. See Engine Owner’s Manual.

Change Fuel Filter

Service Interval: As required

A fuel filter is installed in the fuel line between the fuel tank and the engine. Replace when necessary.

Replacement Filters

Kawasaki

Kawasaki P/N


49019–7001

28

Page 28
Image 28
Exmark 4500-528 manual Remove Engine Shrouds and Clean Cooling Fins, Check Spark Plugs, Change Fuel Filter

4500-528 specifications

The Exmark 4500-528 is a formidable piece of equipment in the realm of professional landscaping and lawn maintenance. Renowned for its robust build and high-performance capabilities, this zero-turn mower is engineered for efficiency, agility, and maneuverability, making it an ideal choice for both commercial landscapers and passionate homeowners.

One of the standout features of the Exmark 4500-528 is its powerful engine. It is equipped with a reliable engine option that delivers impressive horsepower, allowing for faster mowing speeds and better handling of various terrains. The mowers are designed to tackle even the toughest grass conditions, making them suitable for large lawns and challenging landscapes.

The 4500-528 incorporates Exmark’s patented UltraCut deck design, which is specifically designed to optimize mowing efficiency. The deck's advanced cutting technology ensures a clean, even cut, promoting healthier grass growth while minimizing clumping and discharge issues. Furthermore, the mower is available in different cutting deck sizes, allowing users to choose based on their specific requirements and preferences.

Operator comfort is another hallmark of the Exmark 4500-528. The mower features a comfortable, adjustable seat, allowing users to maintain optimal posture during extended mowing sessions. With intuitive controls and a user-friendly interface, operators can easily manage the mower's numerous functions, including speed adjustments and deck height settings.

In terms of durability, the Exmark 4500-528 is built to last. Its heavy-duty frame and high-quality components ensure that it can withstand the rigors of professional use. The mower's tires are designed for traction and stability on various surfaces, enhancing its performance in different weather conditions.

Another impressive characteristic of the Exmark 4500-528 is its fuel efficiency. It is designed to maximize fuel economy while maintaining powerful performance, reducing operational costs for users. Additionally, the ease of maintenance associated with the mower ensures that it remains in top working condition with minimal effort.

Lastly, the Exmark 4500-528 is equipped with cutting-edge technologies, including improved steering control and enhanced safety features. These advancements not only make operations smoother but also enhance the safety of the operator and bystanders.

In summary, the Exmark 4500-528 is a premier zero-turn mower that combines power, precision, comfort, and durability, making it an essential asset for anyone serious about lawn care. Whether for commercial purposes or personal use, this mower delivers exceptional performance and extensive versatility.