PS 1230 External Power Supply •
Installation Guide
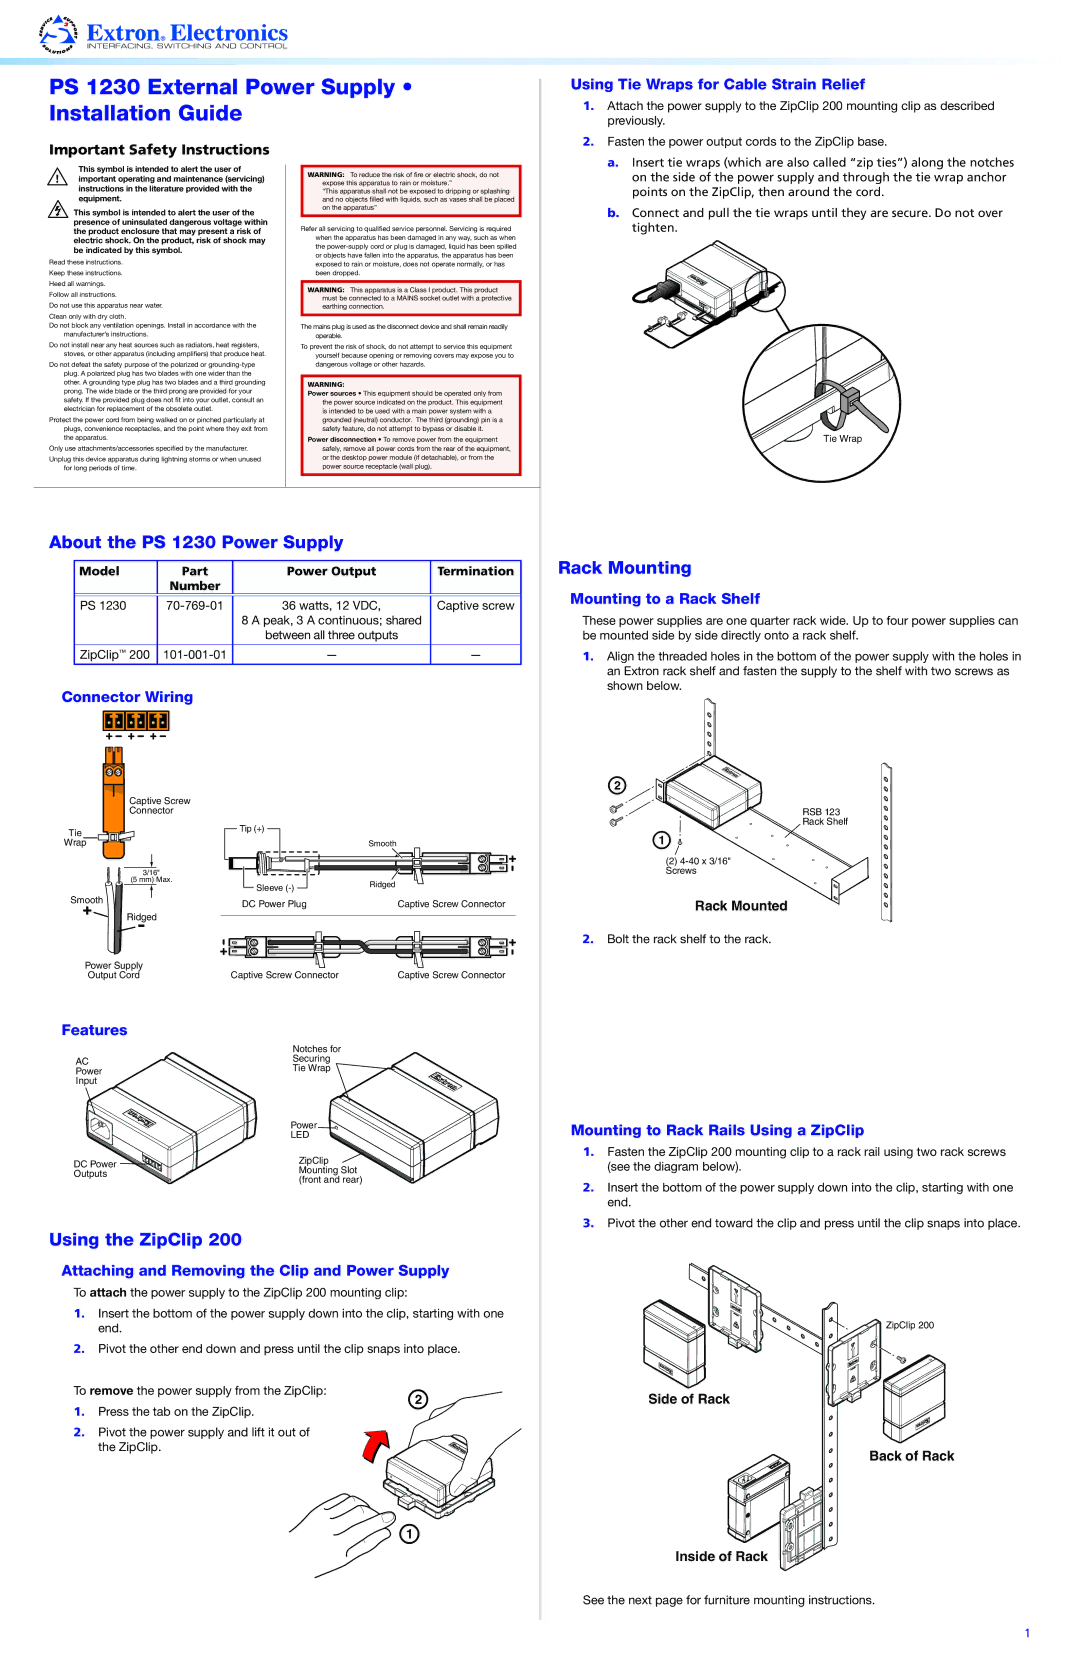
Using Tie Wraps for Cable Strain Relief
1. | Attach the power supply to the ZipClip 200 mounting clip as described |
| previously. |
2. | Fasten the power output cords to the ZipClip base. |
Important Safety Instructions
This symbol is intended to alert the user of important operating and maintenance (servicing) instructions in the literature provided with the equipment.
This symbol is intended to alert the user of the presence of uninsulated dangerous voltage within the product enclosure that may present a risk of electric shock. On the product, risk of shock may be indicated by this symbol.
Read these instructions. Keep these instructions. Heed all warnings.
Follow all instructions.
Do not use this apparatus near water.
Clean only with dry cloth.
Do not block any ventilation openings. Install in accordance with the manufacturer’s instructions.
Do not install near any heat sources such as radiators, heat registers, stoves, or other apparatus (including amplifiers) that produce heat.
Do not defeat the safety purpose of the polarized or
Protect the power cord from being walked on or pinched particularly at plugs, convenience receptacles, and the point where they exit from the apparatus.
Only use attachments/accessories specified by the manufacturer.
Unplug this device apparatus during lightning storms or when unused for long periods of time.
WARNING: To reduce the risk of fire or electric shock, do not expose this apparatus to rain or moisture.”
“This apparatus shall not be exposed to dripping or splashing and no objects filled with liquids, such as vases shall be placed on the apparatus”
Refer all servicing to qualified service personnel. Servicing is required when the apparatus has been damaged in any way, such as when the
WARNING: This apparatus is a Class I product. This product must be connected to a MAINS socket outlet with a protective earthing connection.
The mains plug is used as the disconnect device and shall remain readily operable.
To prevent the risk of shock, do not attempt to service this equipment yourself because opening or removing covers may expose you to dangerous voltage or other hazards.
WARNING:
Power sources • This equipment should be operated only from
the power source indicated on the product. This equipment is intended to be used with a main power system with a grounded (neutral) conductor. The third (grounding) pin is a safety feature, do not attempt to bypass or disable it.
Power disconnection • To remove power from the equipment
safely, remove all power cords from the rear of the equipment, or the desktop power module (if detachable), or from the power source receptacle (wall plug).
a. | Insert tie wraps (which are also called “zip ties”) along the notches |
| on the side of the power supply and through the tie wrap anchor |
| points on the ZipClip, then around the cord. |
b. | Connect and pull the tie wraps until they are secure. Do not over |
| tighten. |
Tie Wrap
About the PS 1230 Power Supply
Model | Part | Power Output | Termination |
| Number |
|
|
|
|
|
|
PS 1230 | 36 watts, 12 VDC, | Captive screw | |
|
| 8 A peak, 3 A continuous; shared |
|
|
| between all three outputs |
|
|
|
|
|
ZipClip™ 200 | — | — | |
|
|
|
|
Rack Mounting
Mounting to a Rack Shelf
These power supplies are one quarter rack wide. Up to four power supplies can be mounted side by side directly onto a rack shelf.
1. Align the threaded holes in the bottom of the power supply with the holes in |
an Extron rack shelf and fasten the supply to the shelf with two screws as |
shown below. |
Connector Wiring
Captive Screw
Connector
Tie | Tip (+) |
| |
Wrap |
|
| 3/16" |
| (5 mm) Max. |
| Sleeve |
Smooth | DC Power Plug |
| |
| Ridged |
Smooth
Ridged
Captive Screw Connector
b
RSB 123
Rack Shelf
a ![]()
(2)
Rack Mounted
2.Bolt the rack shelf to the rack.
Power Supply |
|
|
Output Cord | Captive Screw Connector | Captive Screw Connector |
Features
| Notches for | |
AC | Securing | |
Tie Wrap | ||
Power | ||
Input |
| |
| Power | |
| LED | |
DC Power | ZipClip | |
Mounting Slot | ||
Outputs | ||
(front and rear) | ||
|
Using the ZipClip 200
Attaching and Removing the Clip and Power Supply
To attach the power supply to the ZipClip 200 mounting clip:
1.Insert the bottom of the power supply down into the clip, starting with one end.
2.Pivot the other end down and press until the clip snaps into place.
To remove the power supply from the ZipClip: | b | |
1. | Press the tab on the ZipClip. | |
2. | Pivot the power supply and lift it out of |
|
| the ZipClip. |
|
 a
a
Mounting to Rack Rails Using a ZipClip
1.Fasten the ZipClip 200 mounting clip to a rack rail using two rack screws (see the diagram below).
2.Insert the bottom of the power supply down into the clip, starting with one end.
3.Pivot the other end toward the clip and press until the clip snaps into place.
ZipClip 200
Side of Rack
Back of Rack
Inside of Rack
See the next page for furniture mounting instructions.
1