Making Connections • Chapter 2

Installation in a Rack, on a Wall or Under a Table

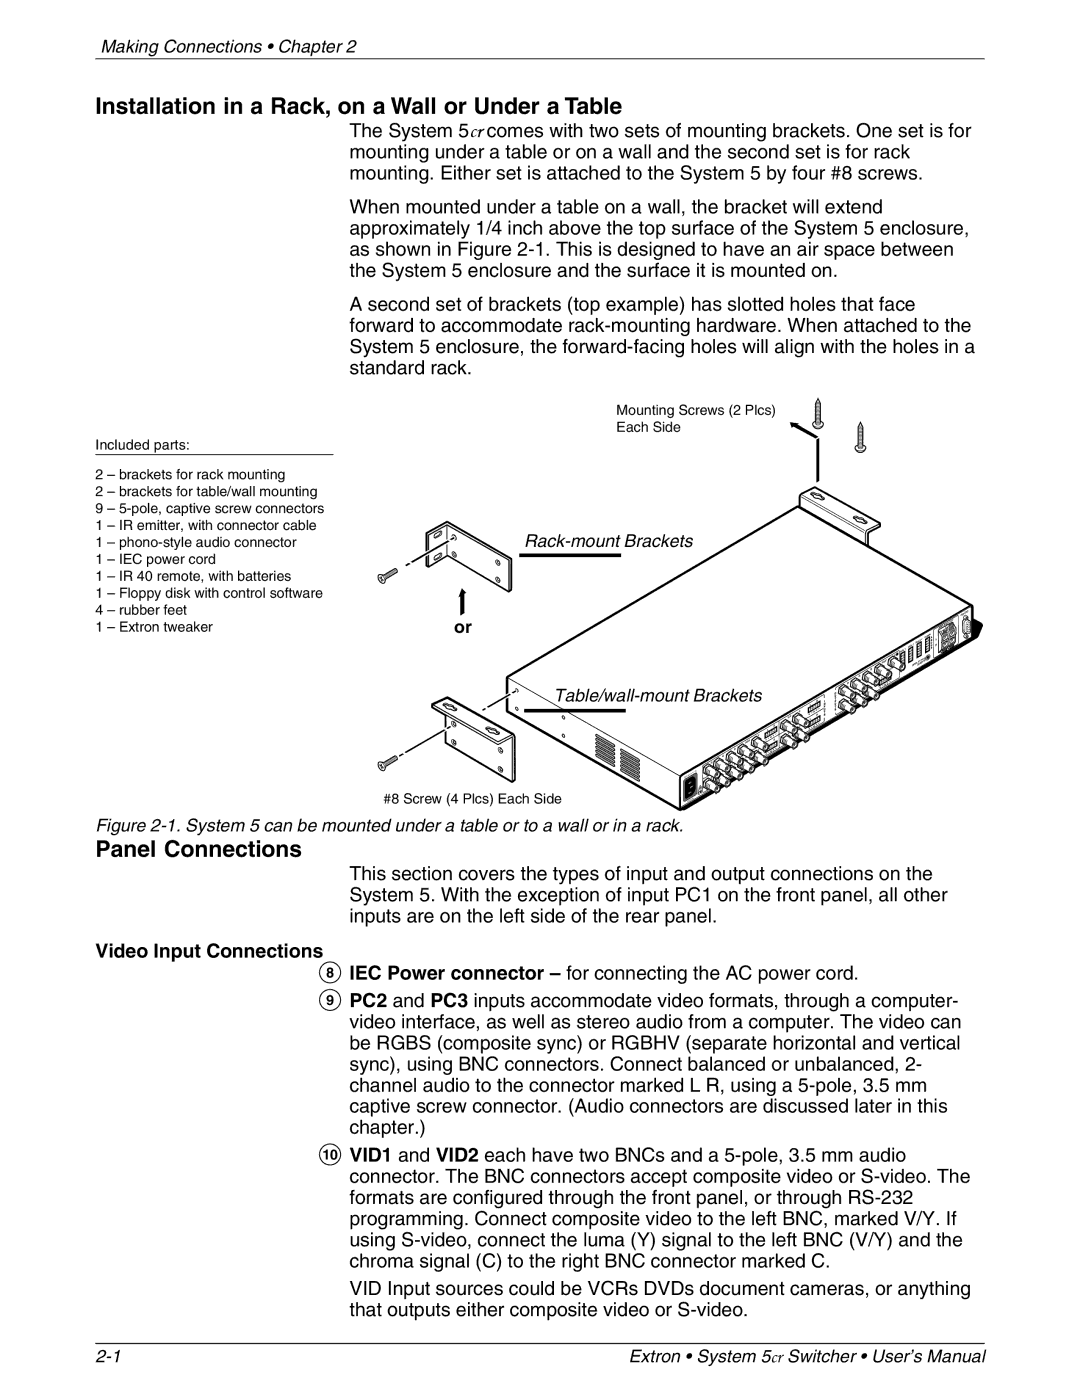
The System 5cr comes with two sets of mounting brackets. One set is for mounting under a table or on a wall and the second set is for rack mounting. Either set is attached to the System 5 by four #8 screws.

When mounted under a table on a wall, the bracket will extend approximately 1/4 inch above the top surface of the System 5 enclosure, as shown in Figure 2-1. This is designed to have an air space between the System 5 enclosure and the surface it is mounted on.

A second set of brackets (top example) has slotted holes that face forward to accommodate rack-mounting hardware. When attached to the System 5 enclosure, the forward-facing holes will align with the holes in a standard rack.

Included parts:

2 – brackets for rack mounting

2 – brackets for table/wall mounting

9 – 5-pole, captive screw connectors

1 – IR emitter, with connector cable

1 – phono-style audio connector

1 – IEC power cord

1 – IR 40 remote, with batteries

1 – Floppy disk with control software

4 – rubber feet

1 – Extron tweaker

or

Mounting Screws (2 Plcs)

Each Side

Rack-mount Brackets


2

RS

-23


D OU

T


IFIE


AMPL


L


M.


R


AY

COM

L


REL


2


AUX


R


AUX

1


V


H/HV


PW

R


DIS

PLAYNSOR


SE


B


T


MP

OU


EA

R


G

PR L


R

VID


Table/wall-mount Brackets


L

R


C


Y


C


V

/Y


L

R


R

VID

1

C


2


L

VID


V

V/Y


H

/HV

R


L


B


V


G


H/H

V


2


R

P

C

3

B


PC


1.3A


G


-240

V


100


R


#8 Screw (4 Plcs) Each Side

50/6

0 Hz


Figure 2-1. System 5 can be mounted under a table or to a wall or in a rack.

Panel Connections

This section covers the types of input and output connections on the System 5. With the exception of input PC1 on the front panel, all other inputs are on the left side of the rear panel.

Video Input Connections

8IEC Power connector – for connecting the AC power cord.

9PC2 and PC3 inputs accommodate video formats, through a computer- video interface, as well as stereo audio from a computer. The video can be RGBS (composite sync) or RGBHV (separate horizontal and vertical sync), using BNC connectors. Connect balanced or unbalanced, 2- channel audio to the connector marked L R, using a 5-pole, 3.5 mm captive screw connector. (Audio connectors are discussed later in this chapter.)

10VID1 and VID2 each have two BNCs and a 5-pole, 3.5 mm audio connector. The BNC connectors accept composite video or S-video. The formats are configured through the front panel, or through RS-232 programming. Connect composite video to the left BNC, marked V/Y. If using S-video, connect the luma (Y) signal to the left BNC (V/Y) and the chroma signal (C) to the right BNC connector marked C.

VID Input sources could be VCRs DVDs document cameras, or anything that outputs either composite video or S-video.

2-1

Extron • System 5cr Switcher • User’s Manual

Page 12
Image 12
Extron electronic 68-388-01 Installation in a Rack, on a Wall or Under a Table, Panel Connections, Video Input Connections

68-388-01 specifications

Extron Electronics has long been a prominent name in the AV integration industry, known for its innovation and quality products. One of the standout models in their product line is the Extron 68-388-01, a versatile and user-friendly solution designed to enhance various audiovisual experiences. This device exemplifies Extron's commitment to excellence, delivering robust performance and seamless integration for a variety of applications.

The Extron 68-388-01 is primarily an HDMI to RGB scaler designed for converting HDMI signals into high-quality RGB analog video outputs. This feature is particularly beneficial for environments where legacy analog display equipment is still in use, allowing for compatibility with modern HDMI sources without sacrificing signal quality. The device supports a wide range of resolutions up to 1920x1200, ensuring it meets the demands of high-definition content while maintaining clarity and detail.

A key feature of the 68-388-01 is its advanced scaling technology. Utilizing precise scaling algorithms, this device effectively adjusts the input signal to match the native resolution of the output display, minimizing artifacts and enhancing image quality. This technology is particularly useful in settings such as classrooms and conference rooms, where visual clarity is essential for effective communication.

Another notable characteristic of the Extron 68-388-01 is its user-friendly interface. Equipped with a straightforward front-panel control system, users can easily manage settings and configurations, making it suitable for both tech-savvy users and those less familiar with AV technology. Additionally, the device comes with Extron's proprietary software, allowing for remote management and configuration via a connected PC or network.

The build quality of the 68-388-01 is typical of Extron's reputation for durability and reliability. Designed for rack mounting, it fits seamlessly into existing AV installations while offering excellent thermal management and low power consumption. Its compact form factor enhances versatility, making it an ideal choice for a range of environments, from education to corporate and broadcast applications.

In conclusion, the Extron 68-388-01 stands out as an exceptional HDMI to RGB scaler, combining advanced features, robust performance, and ease of use. Its ability to bridge the gap between modern digital sources and legacy analog displays makes it an invaluable tool for any AV professional looking to create a flexible and future-proof installation.