Installation

Installation Overview

Install and set up the HSA surface access enclosure as follows:

1If you have an unprepared mounting template, prepare the template. See “Preparing the Routing Template” on the next page.

2If desired, install the optional RJ-45 to RJ-11 conversion kit(s) to replace one or more RJ-45 connectors with RJ-11 connectors. Refer to the RJ-45 to RJ-11 Conversion Kit manual.

3If desired, install the optional flexible conduit kit to replace the removable AC power cord. Refer to the Flexible Conduit Kit manual.

4Cut a hole in the surface where the enclosure will be installed and install the enclosure. The clamshell clamps the enclosure to the table. See “Preparing the Table and Mounting the Enclosure” in this chapter.

5Run all cables necessary to support the AC and RJ-45 connectors and all planned AAP connectors. Leave enough slack in the cables to connect them to the underside of the enclosure or to the rear of the AAPs before the AAPs are installed in the enclosure.

6Turn off all of the equipment to be connected. Ensure that the equipment connected to the RJ-45 connectors and the connections for any AAPs are all turned off and disconnected from the power source.

7If applicable, connect cables to the rear connectors on the AAPs to be installed in the HSA. Install the desired AAPs on the front panel of the enclosure. See “Cabling and Installing the AAPs” in this chapter.

8Connect the power and RJ-45 cables to the underside of the enclosure. See “Cabling the Enclosure” in this chapter.

9Route and secure the AAP cables inside the clamshell. See “Routing the AAP Cables” in this chapter.

10Peel the protective coating from the top surface.

11Connect the power cords and turn on the devices that connect to the surface access enclosure.

Preparing the Routing Template

Extron offers a metal template for each HSA model. Appendix A lists the HSA 400/402 template part numbers. Extron recommends using this template as a guide to cut the hole in the table where the HSA will be installed.


The metal routing template is reusable. Do not discard


this template when the installation is complete. Save it


for installing future HSA enclosures of the same size.

1.

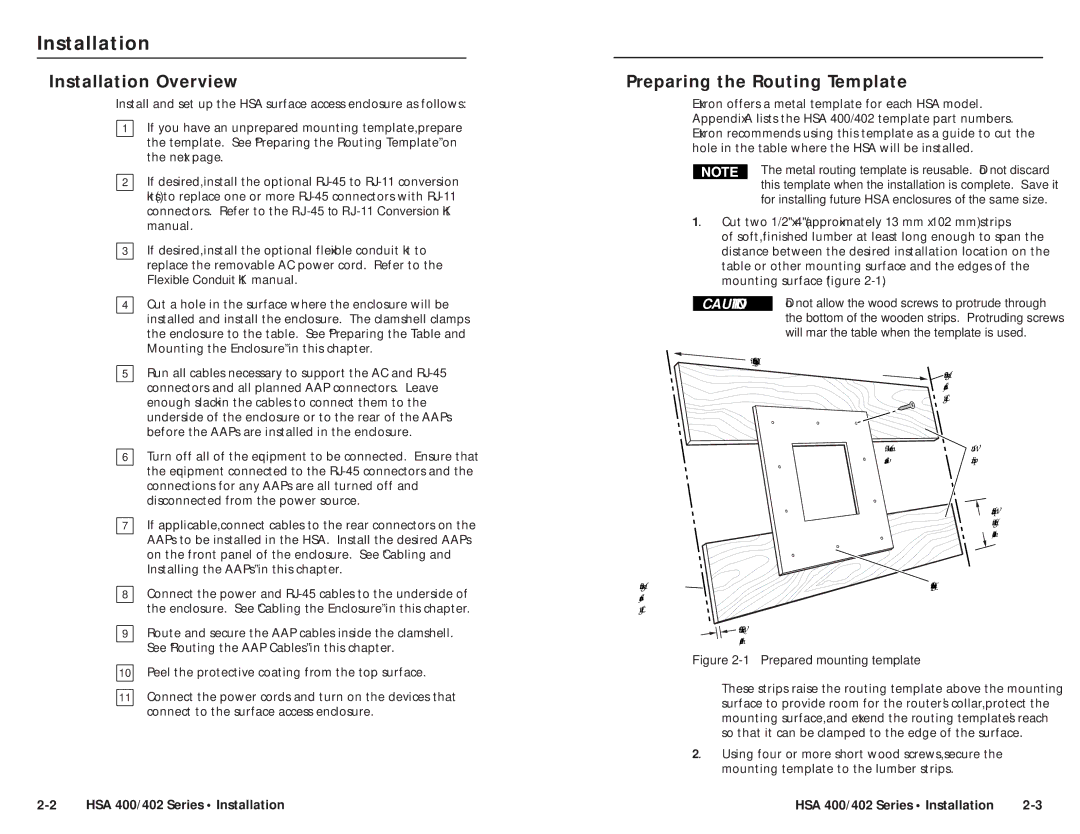
Cut two 1/2" x 4" (approximately 13 mm x 102 mm) strips


of soft, finished lumber at least long enough to span the


distance between the desired installation location on the


table or other mounting surface and the edges of the


mounting surface (figure 2-1).


CAUTION

Do not allow the wood screws to protrude through


the bottom of the wooden strips. Protruding screws


will mar the table when the template is used.


Mounting


Surface


Edge


Minimum

Wood


4 Screws

Strips


Wood Strip


Height


4" / 10.2 cm

Mounting


Routing Template

Surface


Edge


Wood Thickness 0.5" / 1.3 cm

Figure 2-1 — Prepared mounting template

These strips raise the routing template above the mounting surface to provide room for the router’s collar, protect the mounting surface, and extend the routing template’s reach so that it can be clamped to the edge of the surface.

2. Using four or more short wood screws, secure the mounting template to the lumber strips.

2-2

HSA 400/402 Series • Installation

HSA 400/402 Series • Installation

2-3

Page 8
Image 8
Extron electronic HSA 402, HSA 400 INTERNATIONAL user manual Installation Overview, Preparing the Routing Template

HSA 400 INTERNATIONAL, HSA 402 INTERNATIONAL, HSA 402, HSA 400 specifications

Extron is a well-known company specializing in the design and manufacturing of high-quality AV signal routing, distribution, and control solutions. Among its impressive lineup, the Extron HSA 400 and HSA 402 models, as well as the RGB 580xi AAP, stand out for their exceptional performance and versatility in audio and video integration.

Starting with the HSA 400 and HSA 402, these are high-performance audio switches designed for efficient audio management in professional AV environments. The HSA 400 supports up to four stereo audio input channels, while the HSA 402 expands this capability to two outputs. Both units feature advanced audio processing, allowing users to mix and switch audio sources seamlessly. They come equipped with Extron's patented audio algorithms, which help maintain high audio fidelity by eliminating noise and distortion during the switching process.

The HSA series also ensures user-friendly operation through their intuitive interface, which includes front panel controls and LED indicators for easy status monitoring. Additionally, they can be integrated into larger systems using various control options, including serial and Ethernet for automation versatility.

On the other hand, the RGB 580xi AAP is a state-of-the-art presentation switcher that provides comprehensive input options for a variety of signal sources, such as RGB, HDMI, and composite video. It is particularly notable for its ability to support high-resolution signals up to 1920x1200, catering to the needs of modern displays and projectors. The RGB 580xi AAP is designed with advanced scaling technology, ensuring that output images maintain quality and clarity, regardless of the source resolution.

This model also accommodates multiple output formats, enabling simultaneous connections to different display types. The integration of Extron's standout technologies like frame synchronizers ensures smooth transitions and real-time video switching without lag, making it an ideal choice for dynamic presentations.

Overall, Extron's HSA 400, HSA 402, and RGB 580xi AAP are exemplars of audio and video technology designed for professional environments. Their robust feature sets, including seamless switching, high-quality processing, versatile input/output options, and user-friendly interfaces, make them essential components for modern AV installations.