JMP 9600 • Setup Guide
lDual Redundant AC Power Input connectors — Connect standard IEC power cords between one rear panel AC Power Input connector and a 100 to 240VAC,
![]() WARNING: Physically disconnect both power cables from the player before opening the case for servicing.
WARNING: Physically disconnect both power cables from the player before opening the case for servicing.
NOTE: • | Although the unit performs reliably while running on a single AC power supply, doing so defeats the dual- |
| redundant power supply feature. |
• | Connect the dual power cords to either uninterruptible power sources or to power sources that are completely |
| independent of each other. |
mDual Redundant AC Power Input switches — Toggle both AC Power Input switches to the on ( ) position.
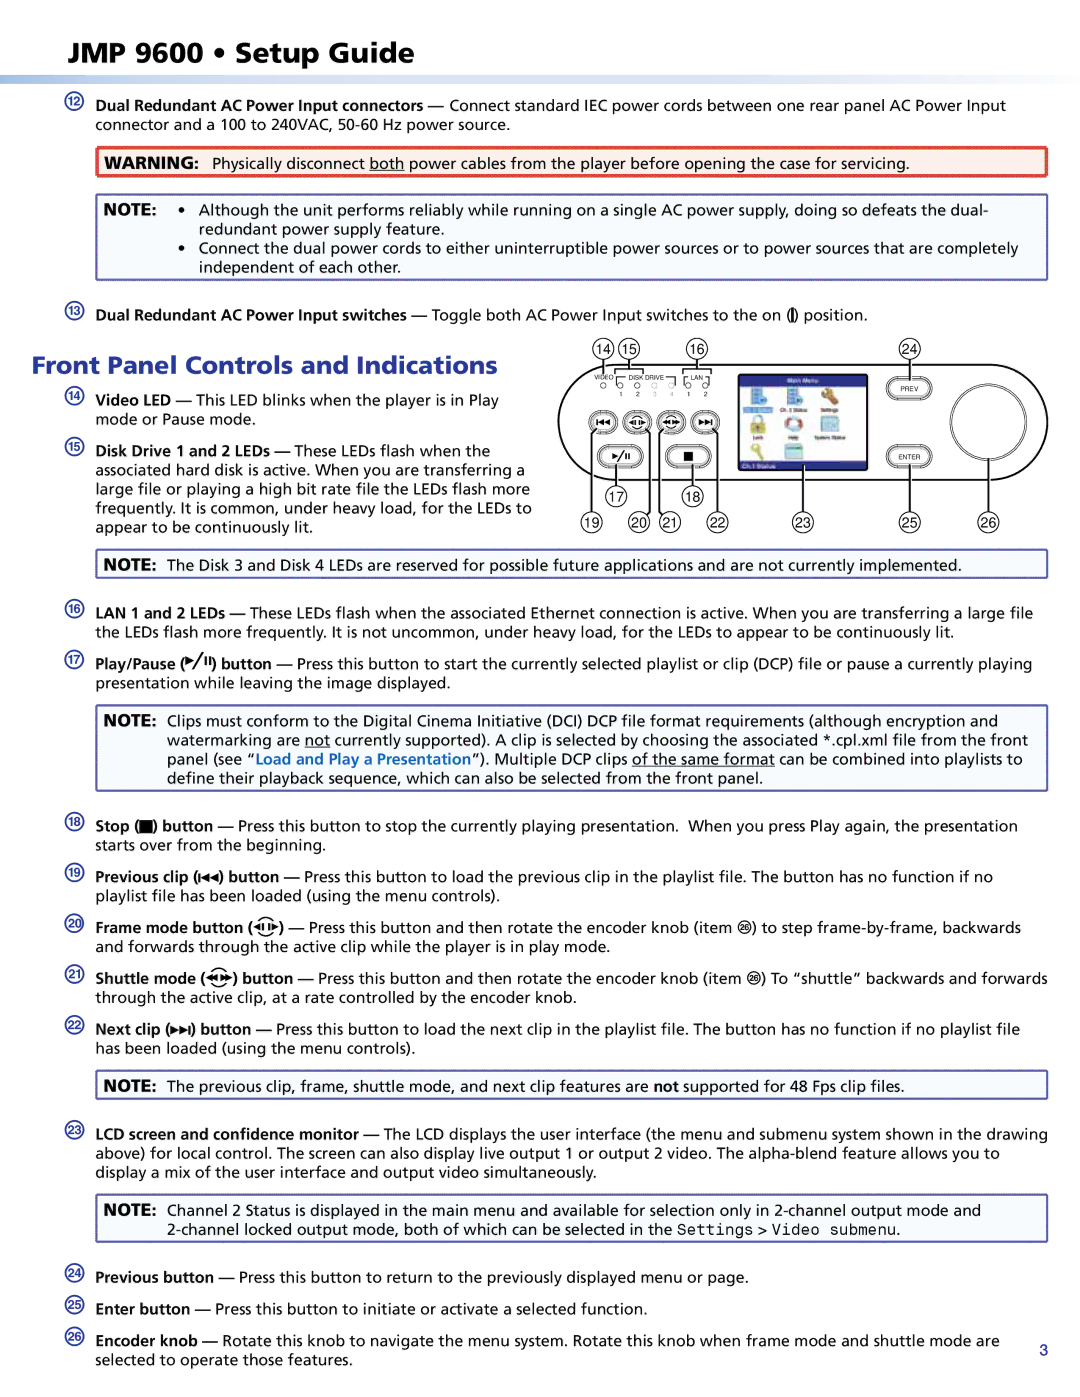
Front Panel Controls and Indications
nVideo LED — This LED blinks when the player is in Play mode or Pause mode.
14 | 15 |
|
| 16 | ||
VIDEO |
| DISK DRIVE |
|
| LAN | |
| 1 | 2 | 3 | 4 | 1 | 2 |
24
PREV
o Disk Drive 1 and 2 LEDs — These LEDs flash when the |
|
|
|
|
| ENTER |
| |
associated hard disk is active. When you are transferring a |
|
|
|
|
|
|
| |
large file or playing a high bit rate file the LEDs flash more |
| 17 |
| 18 |
|
|
| |
frequently. It is common, under heavy load, for the LEDs to |
|
|
|
|
| |||
19 | 20 | 21 | 22 | 23 | 25 | 26 | ||
appear to be continuously lit. |
![]() NOTE: The Disk 3 and Disk 4 LEDs are reserved for possible future applications and are not currently implemented.
NOTE: The Disk 3 and Disk 4 LEDs are reserved for possible future applications and are not currently implemented.
pLAN 1 and 2 LEDs — These LEDs flash when the associated Ethernet connection is active. When you are transferring a large file the LEDs flash more frequently. It is not uncommon, under heavy load, for the LEDs to appear to be continuously lit.
qPlay/Pause (![]()
![]()
![]() ) button — Press this button to start the currently selected playlist or clip (DCP) file or pause a currently playing presentation while leaving the image displayed.
) button — Press this button to start the currently selected playlist or clip (DCP) file or pause a currently playing presentation while leaving the image displayed.
![]() NOTE: Clips must conform to the Digital Cinema Initiative (DCI) DCP file format requirements (although encryption and
NOTE: Clips must conform to the Digital Cinema Initiative (DCI) DCP file format requirements (although encryption and ![]() watermarking are not currently supported). A clip is selected by choosing the associated *.cpl.xml file from the front
watermarking are not currently supported). A clip is selected by choosing the associated *.cpl.xml file from the front
panel (see “Load and Play a Presentation”). Multiple DCP clips of the same format can be combined into playlists to
define their playback sequence, which can also be selected from the front panel.
rStop (![]() ) button — Press this button to stop the currently playing presentation. When you press Play again, the presentation starts over from the beginning.
) button — Press this button to stop the currently playing presentation. When you press Play again, the presentation starts over from the beginning.
sPrevious clip (![]()
![]()
![]() ) button — Press this button to load the previous clip in the playlist file. The button has no function if no playlist file has been loaded (using the menu controls).
) button — Press this button to load the previous clip in the playlist file. The button has no function if no playlist file has been loaded (using the menu controls).
tFrame mode button (![]()
![]()
![]()
![]() ) — Press this button and then rotate the encoder knob (item z) to step
) — Press this button and then rotate the encoder knob (item z) to step
uShuttle mode (![]()
![]() ) button — Press this button and then rotate the encoder knob (item z) To “shuttle” backwards and forwards through the active clip, at a rate controlled by the encoder knob.
) button — Press this button and then rotate the encoder knob (item z) To “shuttle” backwards and forwards through the active clip, at a rate controlled by the encoder knob.
vNext clip (![]()
![]()
![]() ) button — Press this button to load the next clip in the playlist file. The button has no function if no playlist file has been loaded (using the menu controls).
) button — Press this button to load the next clip in the playlist file. The button has no function if no playlist file has been loaded (using the menu controls).
![]() NOTE: The previous clip, frame, shuttle mode, and next clip features are not supported for 48 Fps clip files.
NOTE: The previous clip, frame, shuttle mode, and next clip features are not supported for 48 Fps clip files.
wLCD screen and confidence monitor — The LCD displays the user interface (the menu and submenu system shown in the drawing above) for local control. The screen can also display live output 1 or output 2 video. The
![]() NOTE: Channel 2 Status is displayed in the main menu and available for selection only in
NOTE: Channel 2 Status is displayed in the main menu and available for selection only in ![]()
x Previous button — Press this button to return to the previously displayed menu or page. |
| |
y Enter button — Press this button to initiate or activate a selected function. |
| |
z Encoder knob — Rotate this knob to navigate the menu system. Rotate this knob when frame mode and shuttle mode are | 3 | |
selected to operate those features. | ||
|