Installation, cont’d

Outputs

E

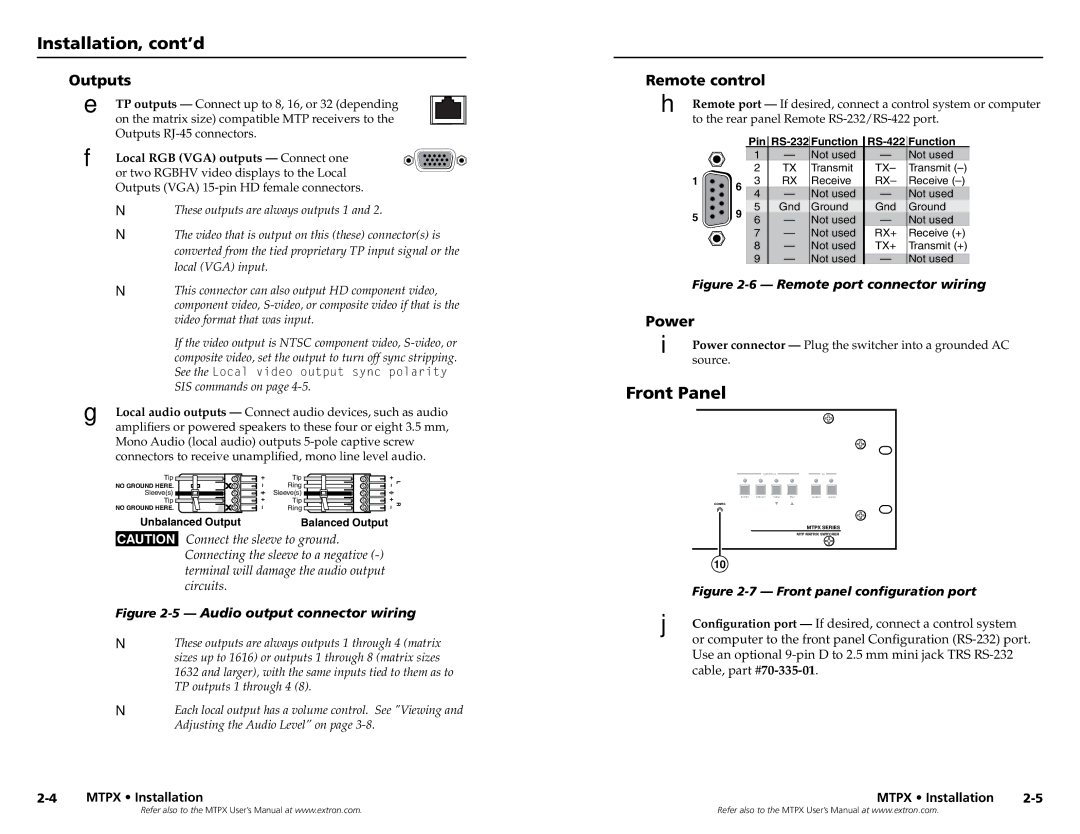
TP outputs — Connect up to 8, 16, or 32 (depending


on the matrix size) compatible MTP receivers to the


Outputs RJ-45 connectors.

F

Local RGB (VGA) outputs — Connect one


or two RGBHV video displays to the Local


Outputs (VGA) 15-pin HD female connectors.

NThese outputs are always outputs 1 and 2.

NThe video that is output on this (these) connector(s) is converted from the tied proprietary TP input signal or the local (VGA) input.

NThis connector can also output HD component video, component video, S-video, or composite video if that is the video format that was input.

If the video output is NTSC component video, S-video, or composite video, set the output to turn off sync stripping. See the Local video output sync polarity SIS commands on page 4-5.

G

Local audio outputs — Connect audio devices, such as audio


amplifiers or powered speakers to these four or eight 3.5 mm,


Mono Audio (local audio) outputs 5-pole captive screw


connectors to receive unamplified, mono line level audio.

Tip

Tip

L

NO GROUND HERE.

Ring


Sleeve(s)

Sleeve(s)


Tip

Tip

R

NO GROUND HERE.

Ring


Unbalanced Output

Balanced Output

CAUTION Connect the sleeve to ground. Connecting the sleeve to a negative (-) terminal will damage the audio output circuits.

Figure 2-5Audio output connector wiring

NThese outputs are always outputs 1 through 4 (matrix sizes up to 1616) or outputs 1 through 8 (matrix sizes 1632 and larger), with the same inputs tied to them as to TP outputs 1 through 4 (8).

NEach local output has a volume control. See "Viewing and Adjusting the Audio Level” on page 3-8.

2-4 MTPX • Installation

Remote control

H

Remote port — If desired, connect a control system or computer


to the rear panel Remote RS-232/RS-422 port.


Pin


RS-232


Function


RS-422


Function


1


Not used


Not used


2


TX


Transmit


TX–


Transmit (–)


1

6


3


RX


Receive


RX–


Receive (–)


4


Not used


Not used


5

9


5


Gnd


Ground


Gnd


Ground


6


Not used


Not used


7


Not used


RX+


Receive (+)


8


Not used


TX+


Transmit (+)


9


Not used


Not used


Figure 2-6Remote port connector wiring

Power


I

Power connector — Plug the switcher into a grounded AC


source.


Front Panel

CONTROL


IO

ENTER PRESET VIEW

ESC

RGBHV AUDIO

CONFIG


MTPX SERIES


MTP MATRIX SWITCHER


10


Figure 2-7 — Front panel configuration port

J

Configuration port — If desired, connect a control system


or computer to the front panel Configuration (RS-232) port.


Use an optional 9-pin D to 2.5 mm mini jack TRS RS-232


cable, part #70-335-01.

MTPX • Installation

2-5

Refer also to the MTPX User’s Manual at www.extron.com.

Refer also to the MTPX User’s Manual at www.extron.com.

Page 10
Image 10
Extron electronic MTPX 3232, MTPX Series, MTPX 1616 Installation, cont’d, Front Panel, Outputs, Remote control, Power

MTPX 1616, MTPX 816, MTPX 3216, MTPX 1632, MTPX 168 specifications

Extron Electronics is renowned for its commitment to high-quality audio-visual distribution solutions, and the MTPX Series is no exception. The MTPX Series features a range of versatile matrix switchers designed to accommodate various AV signal formats, including composite video, S-Video, and RGBHV. Among the models in this series, the MTPX 3232, MTPX 168, MTPX 1632, and MTPX 3216 stand out for their advanced technology and user-friendly features, making them ideal for many applications.

The MTPX 3232 offers robust capabilities with 32 inputs and 32 outputs, providing high flexibility for large installations where multiple source devices need to be routed to multiple displays. Each output can be individually controlled, allowing seamless switching between different sources with minimal delay. This model supports a range of video formats, ensuring compatibility with various equipment.

For smaller installations, the MTPX 168 and MTPX 1632 models present excellent alternatives. The MTPX 168 is designed with 16 inputs and 8 outputs, providing efficient routing for systems that require fewer connections. Meanwhile, the MTPX 1632 has 16 input and 32 output configurations, ensuring versatile signal routing for enhanced scalability. These models employ Extron's robust technology, such as the proprietary Extron XTP technology, which delivers high-performance signal distribution over long distances.

The MTPX 3216 model adds another dimension with its 32 input and 16 output setup, offering a balanced solution for various AV needs while maintaining excellent signal integrity. All models feature advanced video processing technologies that help eliminate flickering and ensure high-quality video performance even in demanding environments.

A significant feature across the MTPX Series is the built-in web interface, which simplifies the configuration, monitoring, and control of the matrix switchers. This user-friendly platform allows technicians to manage inputs and outputs remotely, ensuring seamless transitions during events and presentations. Furthermore, Extron's advanced EDID Management ensures optimal performance by allowing the switchers to communicate effectively with connected devices.

With exceptional build quality and user-centric features, the Extron MTPX Series stands out as a reliable choice for professional AV installation, enhancing the way audio and video signals are managed in various settings. Whether for a classroom, boardroom, or large venue, these models provide the versatility and performance needed to create impactful AV experiences.