Installation, cont’d

Installation Instructions

The MK box is not included with the interface; the installer is responsible for obtaining and installing the box.

The MK box must have a minimum depth of 47 mm.

Preparing the site and installing the MK box

Choose a location that allows cable runs without interference. Allow enough depth for both the MK box and the cables. You may need to install the cables into the wall, furniture, or conduits before installing the interface.

The installation must conform to national and local electrical codes and to the interface’s size requirements. Dimensional drawings and actual-size cut-out templates are provided at the end of this guide.

1.Cut out the center portion of the cut-out template.

2.Place the template (or the MK box) against the installation surface, and mark the guidelines for the opening on the wall or furniture.

3.Cut out the material from the marked area.

4.Check the opening size by inserting the MK box. The box and interface should fit easily into the opening. Enlarge or smooth the edges of the opening if needed.

5.Feed cables through the wall box punch-out holes, and secure them with cable clamps to provide strain relief.

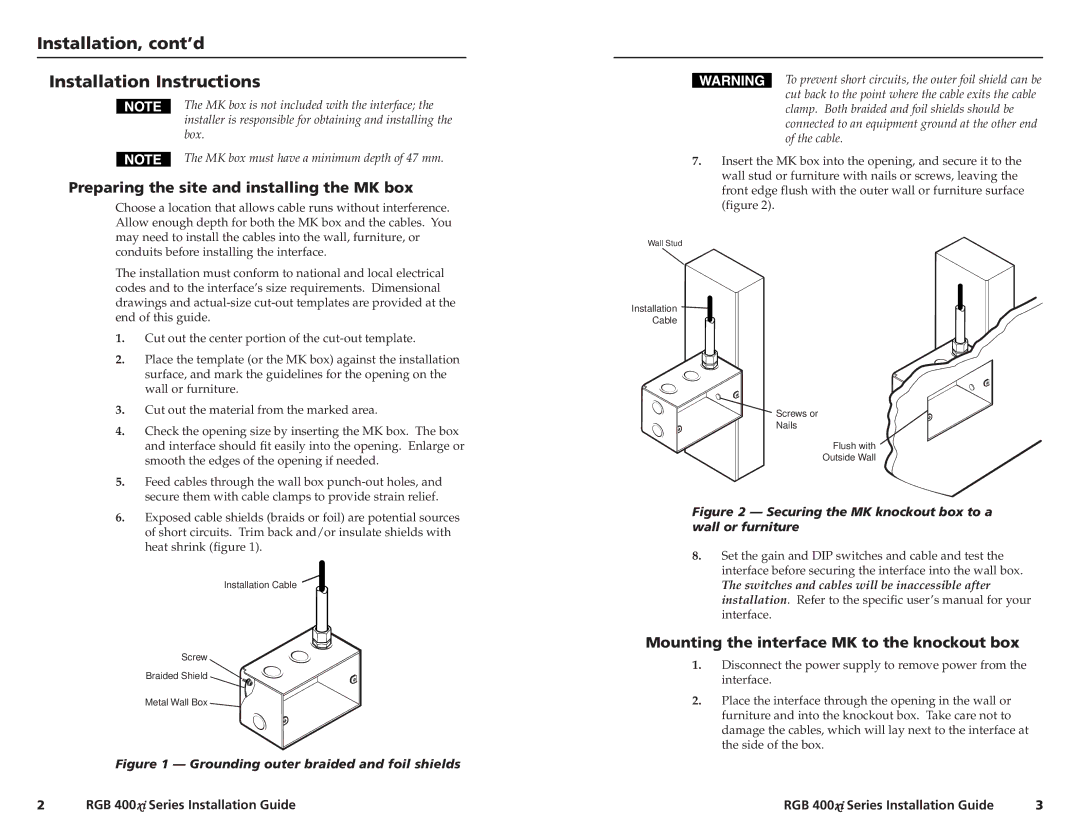
6.Exposed cable shields (braids or foil) are potential sources of short circuits. Trim back and/or insulate shields with heat shrink (figure 1).

Installation Cable

Screw

Braided Shield

Metal Wall Box

Figure 1 — Grounding outer braided and foil shields

To prevent short circuits, the outer foil shield can be cut back to the point where the cable exits the cable clamp. Both braided and foil shields should be connected to an equipment ground at the other end of the cable.

7.Insert the MK box into the opening, and secure it to the wall stud or furniture with nails or screws, leaving the front edge flush with the outer wall or furniture surface (figure 2).

Wall Stud

Installation

Cable

Screws or

Nails

Flush with

Outside Wall

Figure 2 — Securing the MK knockout box to a wall or furniture

8.Set the gain and DIP switches and cable and test the interface before securing the interface into the wall box.

The switches and cables will be inaccessible after installation. Refer to the specific user’s manual for your interface.

Mounting the interface MK to the knockout box

1.Disconnect the power supply to remove power from the interface.

2.Place the interface through the opening in the wall or furniture and into the knockout box. Take care not to damage the cables, which will lay next to the interface at the side of the box.

2

RGB 400xi Series Installation Guide

RGB 400xi Series Installation Guide

3

Page 5
Image 5
Extron electronic RGB 400xi Series manual Installation, cont’d Installation Instructions

RGB 400xi Series specifications

The Extron RGB 400xi Series is a cutting-edge solution designed for high-quality video signal processing and distribution. This series is part of Extron's extensive lineup of professional AV products, tailored for users requiring robust performance in various applications, including conference rooms, classrooms, and control centers.

One of the main features of the RGB 400xi Series is its advanced signal processing capabilities. It supports a wide range of input and output resolutions, ensuring compatibility with various devices. The series can handle RGBHV, RGBS, RGsB, and component video signals, making it versatile for different video formats. It efficiently processes signals up to 400 MHz, allowing for high-resolution displays and minimizing latency, which is critical for live presentations or video conferences.

In terms of technology, the RGB 400xi Series integrates Extron’s exclusive features such as Color Transcoding and the patented Extron PowerCage technology. Color Transcoding allows users to adjust the brightness, contrast, and color balance of video signals, ensuring optimal image quality tailored to specific display requirements. The PowerCage technology enhances signal integrity by isolating power supplies and reducing interference, which is essential for maintaining high-quality video output, especially in complex installations.

The series also boasts advanced EDID management capabilities, which ensure that the source devices correctly identify and communicate with display devices. This feature is particularly beneficial when multiple inputs and outputs are used, as it simplifies connection management and enhances overall system reliability.

Another noteworthy characteristic of the RGB 400xi Series is its user-friendly interface. The intuitive front panel, along with the ability to control settings via a web-based management system, allows users to adjust parameters easily and efficiently. Additionally, the series supports Ethernet control, making it suitable for integration into existing network systems.

The RGB 400xi Series is not only designed for performance but also for durability and reliability. It includes features such as built-in thermal protection and a robust metal enclosure, ensuring it can withstand the demands of professional environments.

In summary, Extron's RGB 400xi Series stands out for its comprehensive feature set, advanced signal processing technologies, and user-centric design, making it an ideal choice for a wide range of professional AV applications.