Wall installations

1.Choose a location on an outside wall where no wall studs, wires, pipes, etc. run through the opening area. A minimum distance of 24" (61 cm) from remote blower to ground may be required depending on local code. Make sure to leave room for anticipated snowfall in your region.

2.Drill the guide hole in the center of the 11" (27.9 cm) diameter opening area.

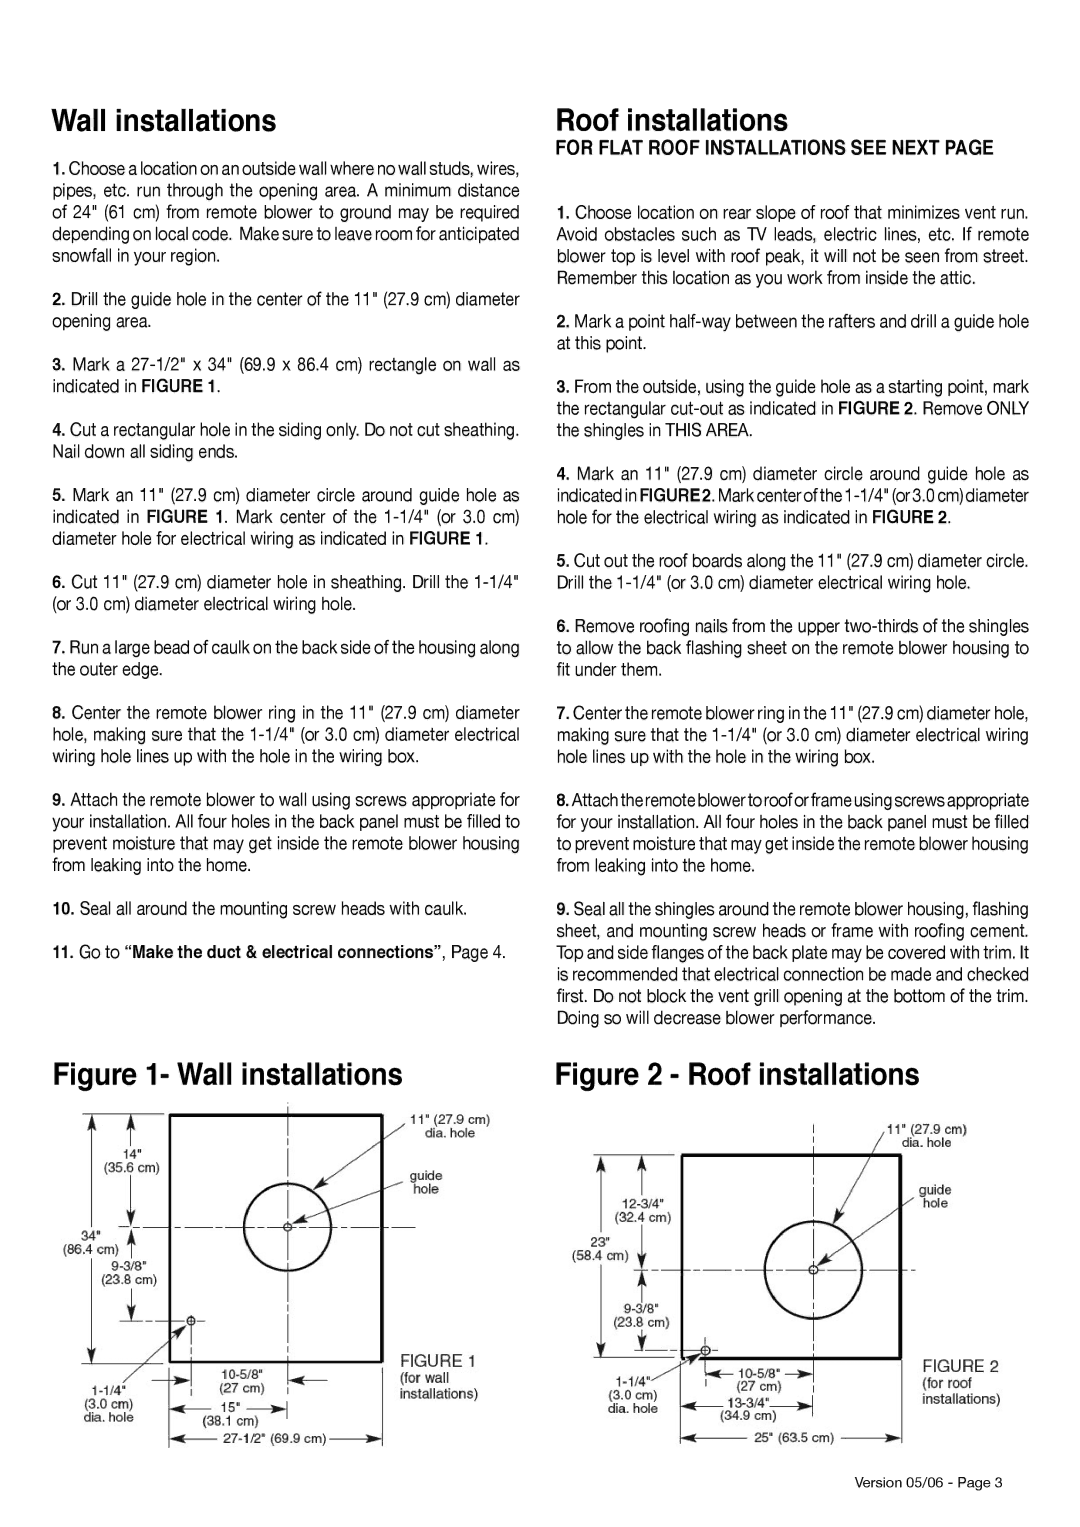
3.Mark a 27-1/2" x 34" (69.9 x 86.4 cm) rectangle on wall as indicated in FIGURE 1.

4.Cut a rectangular hole in the siding only. Do not cut sheathing. Nail down all siding ends.

5.Mark an 11" (27.9 cm) diameter circle around guide hole as indicated in FIGURE 1. Mark center of the 1-1/4" (or 3.0 cm) diameter hole for electrical wiring as indicated in FIGURE 1.

6.Cut 11" (27.9 cm) diameter hole in sheathing. Drill the 1-1/4" (or 3.0 cm) diameter electrical wiring hole.

7.Run a large bead of caulk on the back side of the housing along the outer edge.

8.Center the remote blower ring in the 11" (27.9 cm) diameter hole, making sure that the 1-1/4" (or 3.0 cm) diameter electrical wiring hole lines up with the hole in the wiring box.

9.Attach the remote blower to wall using screws appropriate for your installation. All four holes in the back panel must be filled to prevent moisture that may get inside the remote blower housing from leaking into the home.

10.Seal all around the mounting screw heads with caulk.

11.Go to “Make the duct & electrical connections”, Page 4.

Figure 1- Wall installations

Roof installations

FOR FLAT ROOF INSTALLATIONS SEE NEXT PAGE

1.Choose location on rear slope of roof that minimizes vent run. Avoid obstacles such as TV leads, electric lines, etc. If remote blower top is level with roof peak, it will not be seen from street. Remember this location as you work from inside the attic.

2.Mark a point half-way between the rafters and drill a guide hole at this point.

3.From the outside, using the guide hole as a starting point, mark the rectangular cut-out as indicated in FIGURE 2. Remove ONLY the shingles in THIS AREA.

4.Mark an 11" (27.9 cm) diameter circle around guide hole as indicated in FIGURE2. Mark center of the 1-1/4" (or 3.0 cm) diameter hole for the electrical wiring as indicated in FIGURE 2.

5.Cut out the roof boards along the 11" (27.9 cm) diameter circle. Drill the 1-1/4" (or 3.0 cm) diameter electrical wiring hole.

6.Remove roofing nails from the upper two-thirds of the shingles to allow the back flashing sheet on the remote blower housing to fit under them.

7.Center the remote blower ring in the 11" (27.9 cm) diameter hole, making sure that the 1-1/4" (or 3.0 cm) diameter electrical wiring hole lines up with the hole in the wiring box.

8.Attach the remote blower to roof or frame using screws appropriate for your installation. All four holes in the back panel must be filled to prevent moisture that may get inside the remote blower housing from leaking into the home.

9.Seal all the shingles around the remote blower housing, flashing sheet, and mounting screw heads or frame with roofing cement. Top and side flanges of the back plate may be covered with trim. It is recommended that electrical connection be made and checked first. Do not block the vent grill opening at the bottom of the trim. Doing so will decrease blower performance.

Figure 2 - Roof installations

Version 05/06 - Page 3

Page 3
Image 3
Faber 1200 CFM installation instructions Wall installations, For Flat Roof Installations see Next

1200 CFM specifications

The Faber 1200 CFM range hood is a powerful appliance designed to enhance your kitchen experience by efficiently removing smoke, steam, and odors generated during cooking. With its impressive airflow capacity of 1200 cubic feet per minute, it is ideal for larger kitchen spaces and high-heat cooking methods.

One of the standout features of the Faber 1200 CFM range hood is its advanced ventilation technology. This hood employs a multi-layered filtration system that captures grease and other particulates, ensuring a cleaner kitchen environment. The filters are typically constructed of stainless steel, making them durable and easy to maintain. Many models also come with dishwasher-safe filters, allowing for effortless cleaning and consistent performance.

In terms of design, the Faber 1200 CFM range hood embodies a modern aesthetic that suits a variety of kitchen styles. Available in different finishes such as stainless steel, chrome, and black, it can seamlessly integrate into your kitchen decor. Many models boast a sleek, low-profile design that maximizes both form and function without overwhelming the space.

Another significant characteristic of the Faber 1200 CFM is its noise performance. Designed with sound insulation technology, this range hood operates quietly, allowing you to enjoy a peaceful cooking experience. It offers multiple speed settings, enabling you to adjust the ventilation power based on your cooking needs while reducing noise levels.

Faber also focuses on user convenience with features such as LED lighting, which illuminates your cooking area without generating excessive heat. These lights are not just energy-efficient but also enhance visibility during food preparation. Additionally, some models come equipped with intuitive electronic controls, including touch-sensitive buttons, making it easy to operate the hood.

Safety is paramount, and the Faber 1200 CFM range hood often includes features like a delay shut-off timer, which allows the unit to run for a predetermined time before turning off automatically, ensuring all cooking byproducts are adequately vented.

In summary, the Faber 1200 CFM range hood combines efficiency, style, and advanced technology, making it an excellent choice for anyone looking to upgrade their kitchen ventilation system. With its powerful airflow, easy maintenance, and user-friendly features, it stands out as a reliable partner in any culinary endeavor.