TOOLS NEEDED FOR INSTALLATION

• Saber Saw or Jig Saw

• Drill

• 1 1/4" Wood Drill Bit

• Pliers

• Phillips Screwdriver

• Wire Stripper or Utility Knife

• Metal Snips

• Measuring Tape or Ruler

• Level

• Pencil

• Caulking Gun

• Duct Tape

PLAN THE DUCTWORK

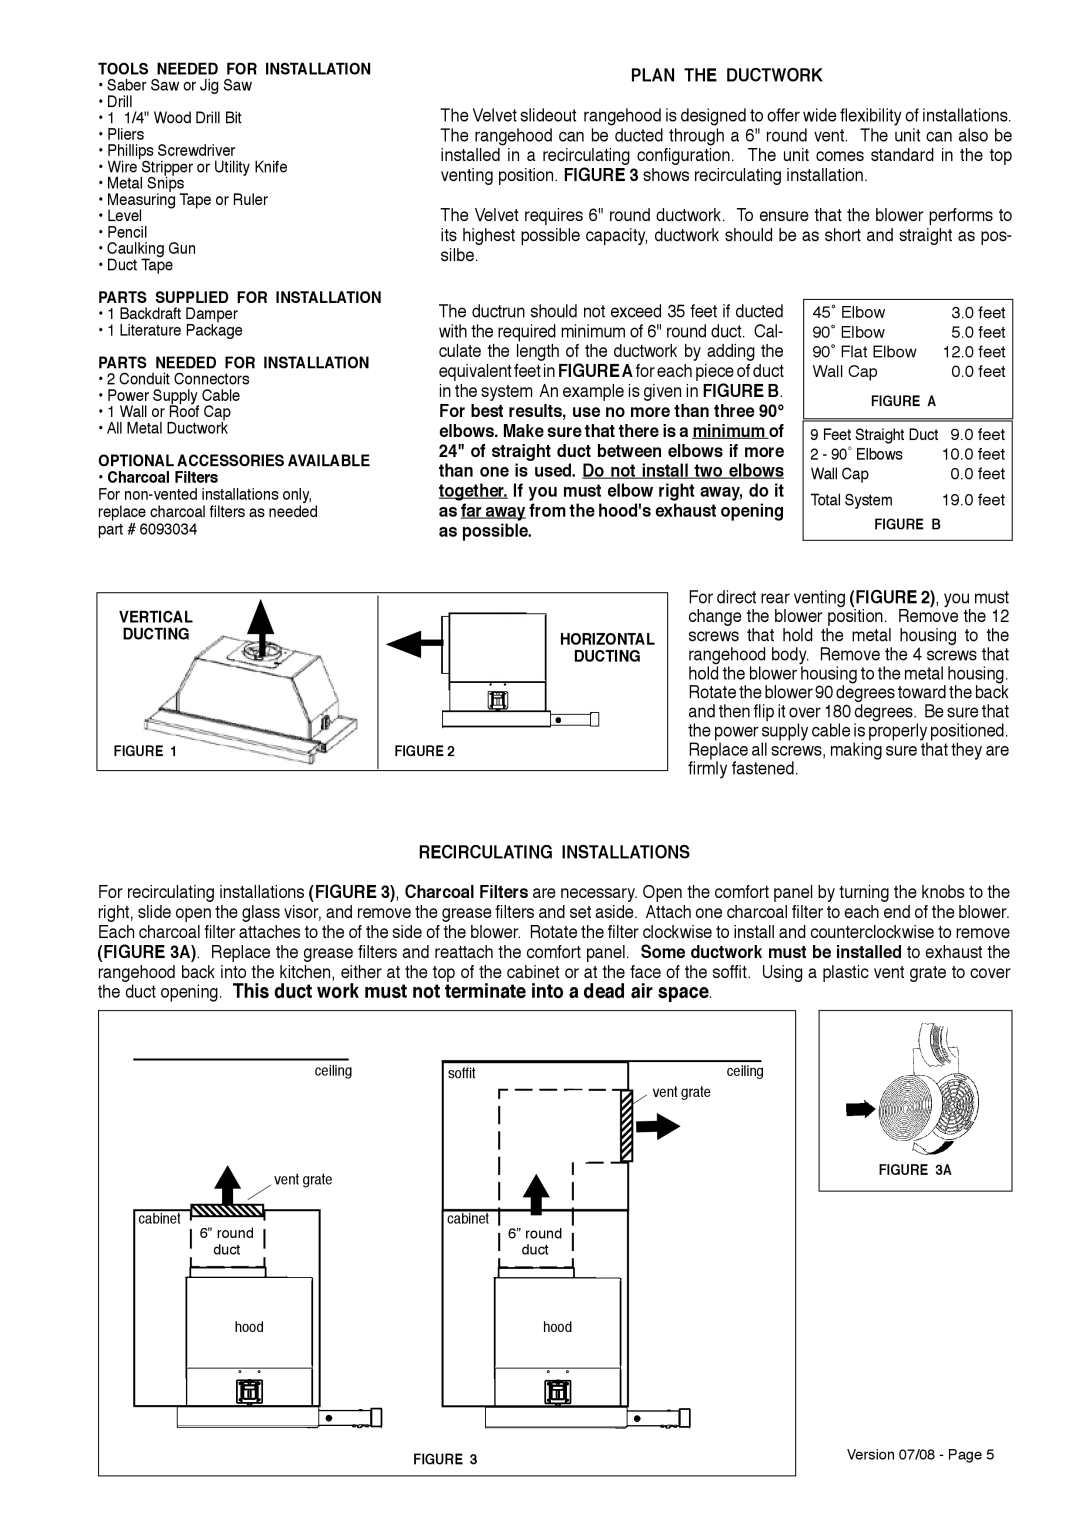
The Velvet slideout rangehood is designed to offer wide flexibility of installations. The rangehood can be ducted through a 6" round vent. The unit can also be installed in a recirculating configuration. The unit comes standard in the top venting position. FIGURE 3 shows recirculating installation.

The Velvet requires 6" round ductwork. To ensure that the blower performs to its highest possible capacity, ductwork should be as short and straight as pos- silbe.

PARTS SUPPLIED FOR INSTALLATION

• 1 Backdraft Damper

• 1 Literature Package

PARTS NEEDED FOR INSTALLATION

• 2 Conduit Connectors

• Power Supply Cable

• 1 Wall or Roof Cap

• All Metal Ductwork

OPTIONAL ACCESSORIES AVAILABLE

• Charcoal Filters

For non-vented installations only, replace charcoal filters as needed part # 6093034

The ductrun should not exceed 35 feet if ducted with the required minimum of 6" round duct. Cal- culate the length of the ductwork by adding the equivalent feet in FIGUREA for each piece of duct in the system An example is given in FIGURE B.

For best results, use no more than three 90° elbows. Make sure that there is a minimum of 24" of straight duct between elbows if more than one is used. Do not install two elbows together. If you must elbow right away, do it as far away from the hood's exhaust opening as possible.

45˚ Elbow

3.0 feet

90˚ Elbow

5.0 feet

90˚ Flat Elbow

12.0 feet

Wall Cap

0.0 feet

FIGURE A


9 Feet Straight Duct

9.0 feet

2 - 90˚ Elbows

10.0 feet

Wall Cap

0.0 feet

Total System

19.0 feet

FIGURE B


VERTICAL DUCTING

FIGURE 1

HORIZONTAL

DUCTING

FIGURE 2

For direct rear venting (FIGURE 2), you must change the blower position. Remove the 12 screws that hold the metal housing to the rangehood body. Remove the 4 screws that hold the blower housing to the metal housing. Rotate the blower 90 degrees toward the back and then flip it over 180 degrees. Be sure that the power supply cable is properly positioned. Replace all screws, making sure that they are firmly fastened.

RECIRCULATING INSTALLATIONS

For recirculating installations (FIGURE 3), Charcoal Filters are necessary. Open the comfort panel by turning the knobs to the right, slide open the glass visor, and remove the grease filters and set aside. Attach one charcoal filter to each end of the blower. Each charcoal filter attaches to the of the side of the blower. Rotate the filter clockwise to install and counterclockwise to remove (FIGURE 3A). Replace the grease filters and reattach the comfort panel. Some ductwork must be installed to exhaust the rangehood back into the kitchen, either at the top of the cabinet or at the face of the soffit. Using a plastic vent grate to cover the duct opening. This duct work must not terminate into a dead air space.


ceiling

soffit

ceiling


vent grate


vent grate


cabinet

6” round

cabinet

6” round


duct


duct


hood


hood


FIGURE 3


FIGURE 3A

Version 07/08 - Page 5

Page 5
Image 5
Faber 630006509 installation instructions Plan the Ductwork, Recirculating Installations

630006509 specifications

The Faber 630006509 is a cutting-edge kitchen appliance that epitomizes modern design and functionality. Engineered to elevate your culinary experience, this model integrates a blend of superior technology with user-friendly features.

One of the main characteristics of the Faber 630006509 is its sleek, stainless-steel finish that not only enhances the aesthetics of any kitchen but also ensures easy maintenance and durability. The appliance is designed with a powerful motor that delivers efficient performance, making it suitable for both professional chefs and home cooks alike.

With a maximum extraction rate, the Faber 630006509 effectively eliminates unwanted smoke and odors from your cooking space, enhancing air quality. This model showcases a diverse range of speed settings that allow users to adjust the extraction power according to their cooking needs, providing flexibility and control during food preparation.

Incorporating advanced technology, the Faber 630006509 features an intuitive touch control panel. This interface offers a seamless user experience with straightforward navigation, making it easy to operate even for those less experienced in the kitchen. Additionally, the appliance's inclusive LED lighting not only illuminates your cooking area but also adds a modern touch to your kitchen décor.

Energy efficiency is another hallmark of the Faber 630006509. Designed with sustainability in mind, it employs eco-friendly technologies that help in reducing energy consumption without compromising on performance. This feature not only provides significant cost savings on energy bills but also aligns with environmentally conscious living.

The Faber 630006509 is equipped with a highly efficient filtration system that captures grease and particulate matter, ensuring clearer air and a cleaner kitchen environment. The filters are designed for easy access and maintenance, allowing users to clean or replace them with minimal hassle.

Overall, the Faber 630006509 stands out as an impressive combination of style, efficiency, and technology. It reflects the brand's commitment to quality and innovation, making it an ideal addition to any modern kitchen. Whether you are aspiring to elevate your culinary skills or simply looking to enhance your kitchen's functionality, the Faber 630006509 is a reliable choice that delivers on all fronts.