INSTALL THE RANGEHOOD CONTINUED

8.The field wiring box is located on the inside the rangehood, insertyour power supplycablethrutheknock holes located on the top or back of the rangehood body.

Remove the cover from the field wiring compartment with a phillips screwdriver. Feed the Power Supply Cable through the electrical knockout before the ground cable. Connect the Power Supply Cable to the rangehood cable. Attach the White lead of the power supply to the White lead of the rangehood with a twist-on type wire connector. Attach the Black lead of the power supply to the Black lead of the rangehood with a twist-on type wire connector. AttachthePowerSupplyCablegroundinglead to the green screw provided. Using the 4 holes provided, screw the field wiring compartment to the wall or cabinet as dictated by your Power Supply Cable location (screws not provided). Replace the cover.

9.Replace the grease filters (FIGURE 10)and reconnectthecomfortpaneltotherangehoodandtwistthe comfort panel knobs into place (FIGURE 8). Connect the ductwork to the damper and seal all connections.

10.Turn the power supply on. Turn on the blower and light. If the rangehood does not operate, check that curcuit breaker is not tripped or the house fuse blown. If the unit still does not operate, disconnect the power supply and check that the wiring connections have been made properly.

USE AND CARE INFORMATION

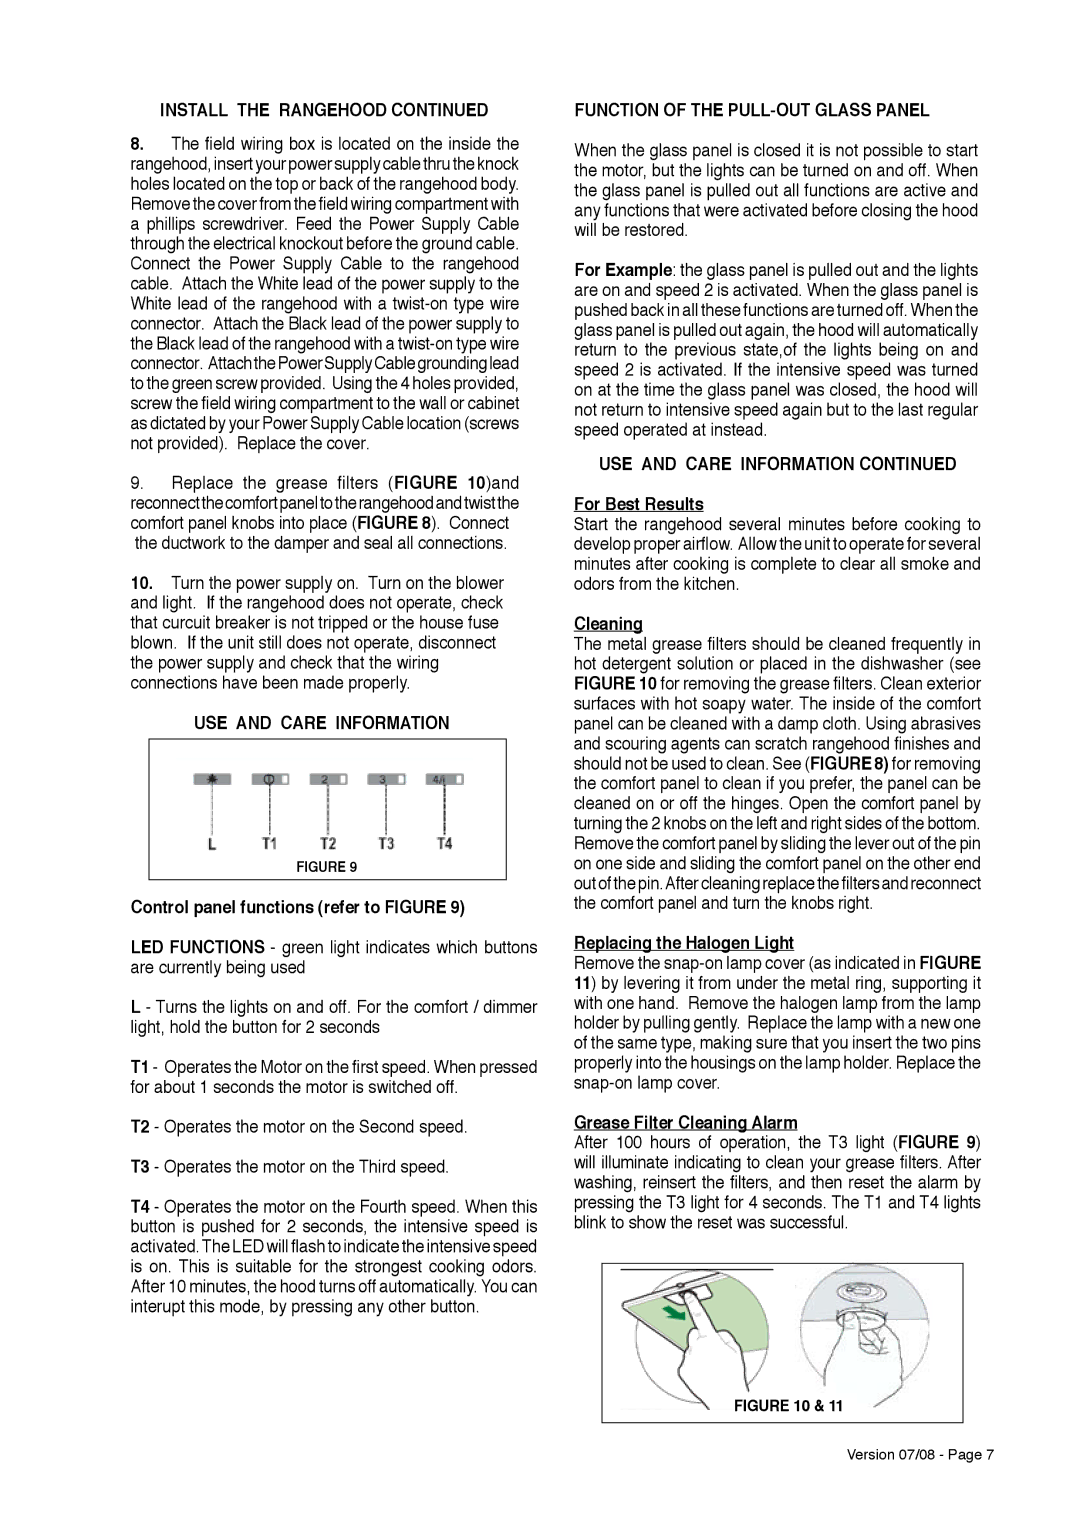
FIGURE 9

Control panel functions (refer to FIGURE 9)

LED FUNCTIONS - green light indicates which buttons are currently being used

L - Turns the lights on and off. For the comfort / dimmer light, hold the button for 2 seconds

T1 - Operates the Motor on the first speed. When pressed for about 1 seconds the motor is switched off.

T2 - Operates the motor on the Second speed.

T3 - Operates the motor on the Third speed.

T4 - Operates the motor on the Fourth speed. When this button is pushed for 2 seconds, the intensive speed is activated. The LED will flash to indicate the intensive speed is on. This is suitable for the strongest cooking odors. After 10 minutes, the hood turns off automatically. You can interupt this mode, by pressing any other button.

FUNCTION OF THE PULL-OUT GLASS PANEL

When the glass panel is closed it is not possible to start the motor, but the lights can be turned on and off. When the glass panel is pulled out all functions are active and any functions that were activated before closing the hood will be restored.

For Example: the glass panel is pulled out and the lights are on and speed 2 is activated. When the glass panel is pushed back in all these functions are turned off. When the glass panel is pulled out again, the hood will automatically return to the previous state,of the lights being on and speed 2 is activated. If the intensive speed was turned on at the time the glass panel was closed, the hood will not return to intensive speed again but to the last regular speed operated at instead.

USE AND CARE INFORMATION CONTINUED

For Best Results

Start the rangehood several minutes before cooking to develop proper airflow. Allow the unit to operate for several minutes after cooking is complete to clear all smoke and odors from the kitchen.

Cleaning

The metal grease filters should be cleaned frequently in hot detergent solution or placed in the dishwasher (see FIGURE 10 for removing the grease filters. Clean exterior surfaces with hot soapy water. The inside of the comfort panel can be cleaned with a damp cloth. Using abrasives and scouring agents can scratch rangehood finishes and should not be used to clean. See (FIGURE 8) for removing the comfort panel to clean if you prefer, the panel can be cleaned on or off the hinges. Open the comfort panel by turning the 2 knobs on the left and right sides of the bottom. Remove the comfort panel by sliding the lever out of the pin on one side and sliding the comfort panel on the other end out of the pin.After cleaning replace the filters and reconnect the comfort panel and turn the knobs right.

Replacing the Halogen Light

Remove the snap-on lamp cover (as indicated in FIGURE 11) by levering it from under the metal ring, supporting it with one hand. Remove the halogen lamp from the lamp holder by pulling gently. Replace the lamp with a new one of the same type, making sure that you insert the two pins properly into the housings on the lamp holder. Replace the snap-on lamp cover.

Grease Filter Cleaning Alarm

After 100 hours of operation, the T3 light (FIGURE 9) will illuminate indicating to clean your grease filters. After washing, reinsert the filters, and then reset the alarm by pressing the T3 light for 4 seconds. The T1 and T4 lights blink to show the reset was successful.

FIGURE 10 & 11

Version 07/08 - Page 7

Page 7
Image 7
Faber 630006509 installation instructions USE and Care Information, Function of the PULL-OUT Glass Panel

630006509 specifications

The Faber 630006509 is a cutting-edge kitchen appliance that epitomizes modern design and functionality. Engineered to elevate your culinary experience, this model integrates a blend of superior technology with user-friendly features.

One of the main characteristics of the Faber 630006509 is its sleek, stainless-steel finish that not only enhances the aesthetics of any kitchen but also ensures easy maintenance and durability. The appliance is designed with a powerful motor that delivers efficient performance, making it suitable for both professional chefs and home cooks alike.

With a maximum extraction rate, the Faber 630006509 effectively eliminates unwanted smoke and odors from your cooking space, enhancing air quality. This model showcases a diverse range of speed settings that allow users to adjust the extraction power according to their cooking needs, providing flexibility and control during food preparation.

Incorporating advanced technology, the Faber 630006509 features an intuitive touch control panel. This interface offers a seamless user experience with straightforward navigation, making it easy to operate even for those less experienced in the kitchen. Additionally, the appliance's inclusive LED lighting not only illuminates your cooking area but also adds a modern touch to your kitchen décor.

Energy efficiency is another hallmark of the Faber 630006509. Designed with sustainability in mind, it employs eco-friendly technologies that help in reducing energy consumption without compromising on performance. This feature not only provides significant cost savings on energy bills but also aligns with environmentally conscious living.

The Faber 630006509 is equipped with a highly efficient filtration system that captures grease and particulate matter, ensuring clearer air and a cleaner kitchen environment. The filters are designed for easy access and maintenance, allowing users to clean or replace them with minimal hassle.

Overall, the Faber 630006509 stands out as an impressive combination of style, efficiency, and technology. It reflects the brand's commitment to quality and innovation, making it an ideal addition to any modern kitchen. Whether you are aspiring to elevate your culinary skills or simply looking to enhance your kitchen's functionality, the Faber 630006509 is a reliable choice that delivers on all fronts.