PREPARE THE CABINET

1.Disconnect and move freestanding range from cabinet opening to provide easier access to upper cabinet and rear wall. Put a thick, protective covering over cooktops, set-in ranges or countertops to protect from damage or dirt.

2.Determine and clearly mark with a pencil the center line of the cabinet on the wall and on the underside of the cabinet where the rangehood will be installed.

3.If the cabinet bottom is recessed, wood blocks need to be installed to insure proper alignment with the cabinet bottom.

Wood blocks should be flush or recessed 1/16" to 1/8" within the cabinet bottom as indicated in FIGURE 4.

FIGURE 4

4.Determine the proper cutouts for the ductwork. Make all necessary cuts in the walls or cabinets for the ductwork. Install the ductwork before mounting the rangehood.

5.Determine and make the proper cutout for the Power Supply Cable. Use a 1 1/4" Drill Bit to make this hole. Run the Power Supply Cable through the wall or cabinet. DO NOT turn on the power until installation is complete. Use caulking to seal around the wire opening.

MAKE THE CUT-OUT OPENING (FIGURE 5)

WHERE THE RANGEHOOD WILL BE INSTALLED.


CUT-OUT

24 - 30

91/2”


FIGURE 5


INSTALL THE RANGEHOOD

1.Remove the rangehood from the carton and place on a flat surface. Cover the surface to prevent accidental damage.

Remove all parts including the backdraft damper and literature package before discarding the carton. Remove the grease filters and set aside.

2.Place the round damper into the exhaust opening of the rangehood and press down.

FIGURE 6

3.Open the comfort panel as shown in FIGURE 8 by turning the 2 knobs on the left and right sides of the panel. Remove the comfort panel by sliding the lever out of the pin on one side and sliding the comfort panel on the other end out of the pin.Removethegreasefiltersbypushingthetabsbackwards.

Slide the glass visor forward.

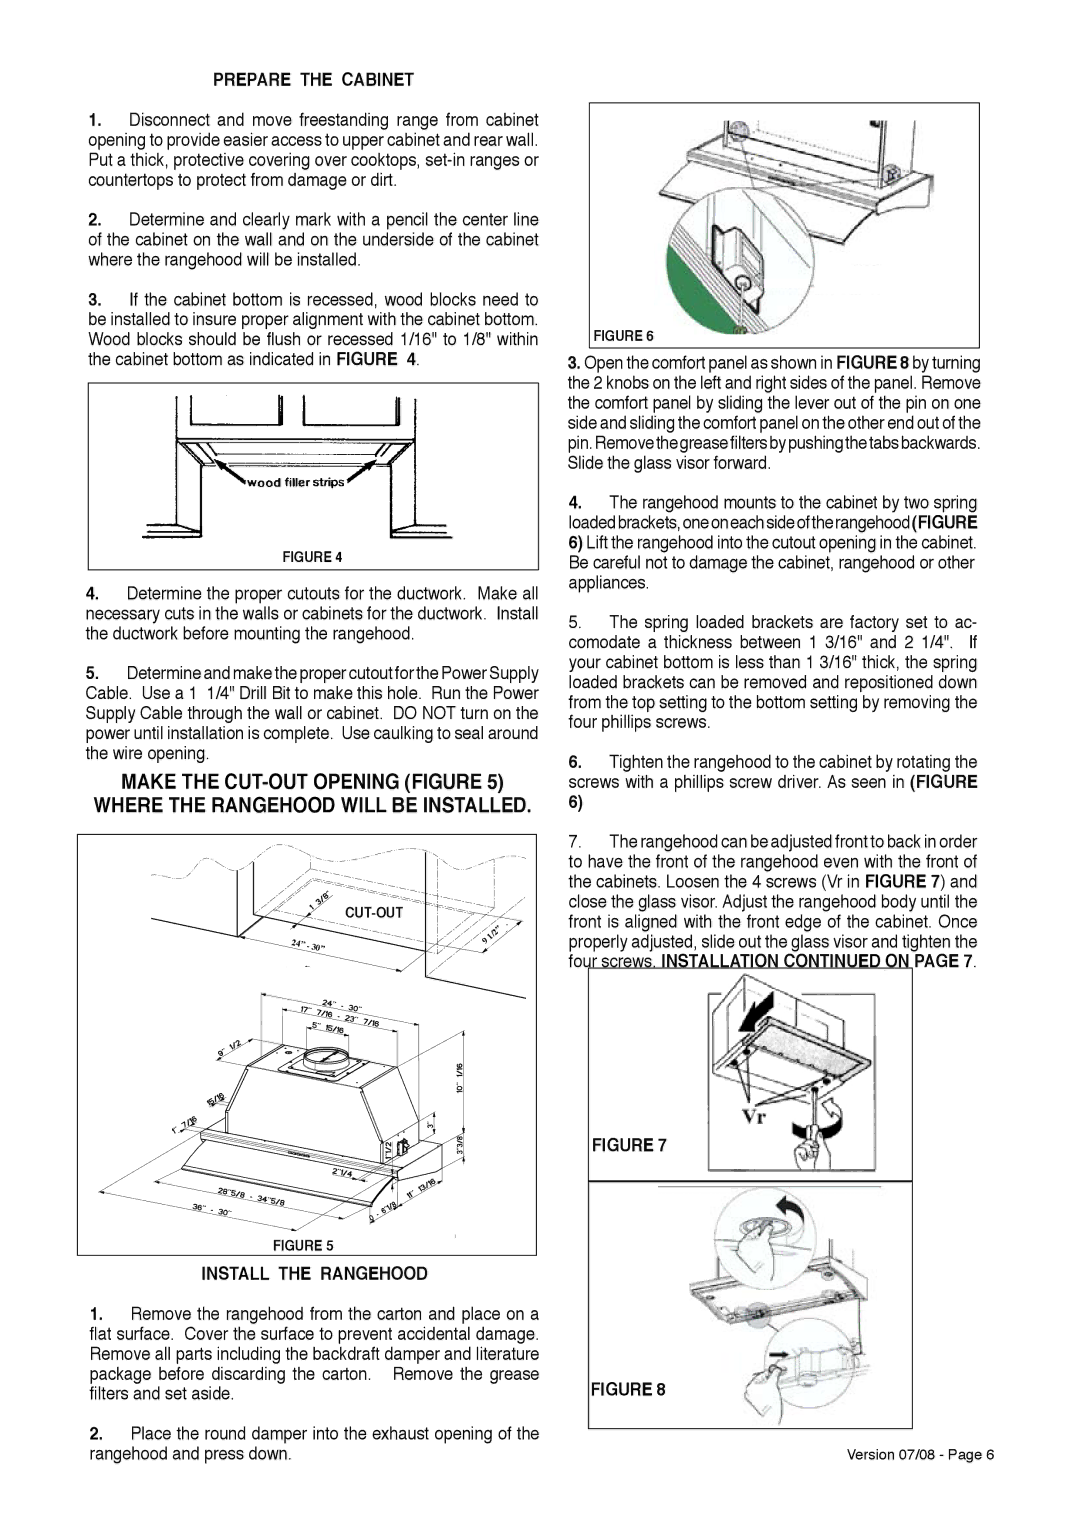
4.The rangehood mounts to the cabinet by two spring loadedbrackets,oneoneachsideoftherangehood(FIGURE 6) Lift the rangehood into the cutout opening in the cabinet. Be careful not to damage the cabinet, rangehood or other appliances.

5.The spring loaded brackets are factory set to ac- comodate a thickness between 1 3/16" and 2 1/4". If your cabinet bottom is less than 1 3/16" thick, the spring loaded brackets can be removed and repositioned down from the top setting to the bottom setting by removing the four phillips screws.

6.Tighten the rangehood to the cabinet by rotating the screws with a phillips screw driver. As seen in (FIGURE

6)

7.The rangehood can be adjusted front to back in order to have the front of the rangehood even with the front of the cabinets. Loosen the 4 screws (Vr in FIGURE 7) and close the glass visor. Adjust the rangehood body until the front is aligned with the front edge of the cabinet. Once properly adjusted, slide out the glass visor and tighten the four screws. INSTALLATION CONTINUED ON PAGE 7.

FIGURE 7

FIGURE 8

Version 07/08 - Page 6

Page 6
Image 6
Faber 630006509 installation instructions Prepare the Cabinet, Install the Rangehood

630006509 specifications

The Faber 630006509 is a cutting-edge kitchen appliance that epitomizes modern design and functionality. Engineered to elevate your culinary experience, this model integrates a blend of superior technology with user-friendly features.

One of the main characteristics of the Faber 630006509 is its sleek, stainless-steel finish that not only enhances the aesthetics of any kitchen but also ensures easy maintenance and durability. The appliance is designed with a powerful motor that delivers efficient performance, making it suitable for both professional chefs and home cooks alike.

With a maximum extraction rate, the Faber 630006509 effectively eliminates unwanted smoke and odors from your cooking space, enhancing air quality. This model showcases a diverse range of speed settings that allow users to adjust the extraction power according to their cooking needs, providing flexibility and control during food preparation.

Incorporating advanced technology, the Faber 630006509 features an intuitive touch control panel. This interface offers a seamless user experience with straightforward navigation, making it easy to operate even for those less experienced in the kitchen. Additionally, the appliance's inclusive LED lighting not only illuminates your cooking area but also adds a modern touch to your kitchen décor.

Energy efficiency is another hallmark of the Faber 630006509. Designed with sustainability in mind, it employs eco-friendly technologies that help in reducing energy consumption without compromising on performance. This feature not only provides significant cost savings on energy bills but also aligns with environmentally conscious living.

The Faber 630006509 is equipped with a highly efficient filtration system that captures grease and particulate matter, ensuring clearer air and a cleaner kitchen environment. The filters are designed for easy access and maintenance, allowing users to clean or replace them with minimal hassle.

Overall, the Faber 630006509 stands out as an impressive combination of style, efficiency, and technology. It reflects the brand's commitment to quality and innovation, making it an ideal addition to any modern kitchen. Whether you are aspiring to elevate your culinary skills or simply looking to enhance your kitchen's functionality, the Faber 630006509 is a reliable choice that delivers on all fronts.