RECIRCULATING INSTALLATIONS

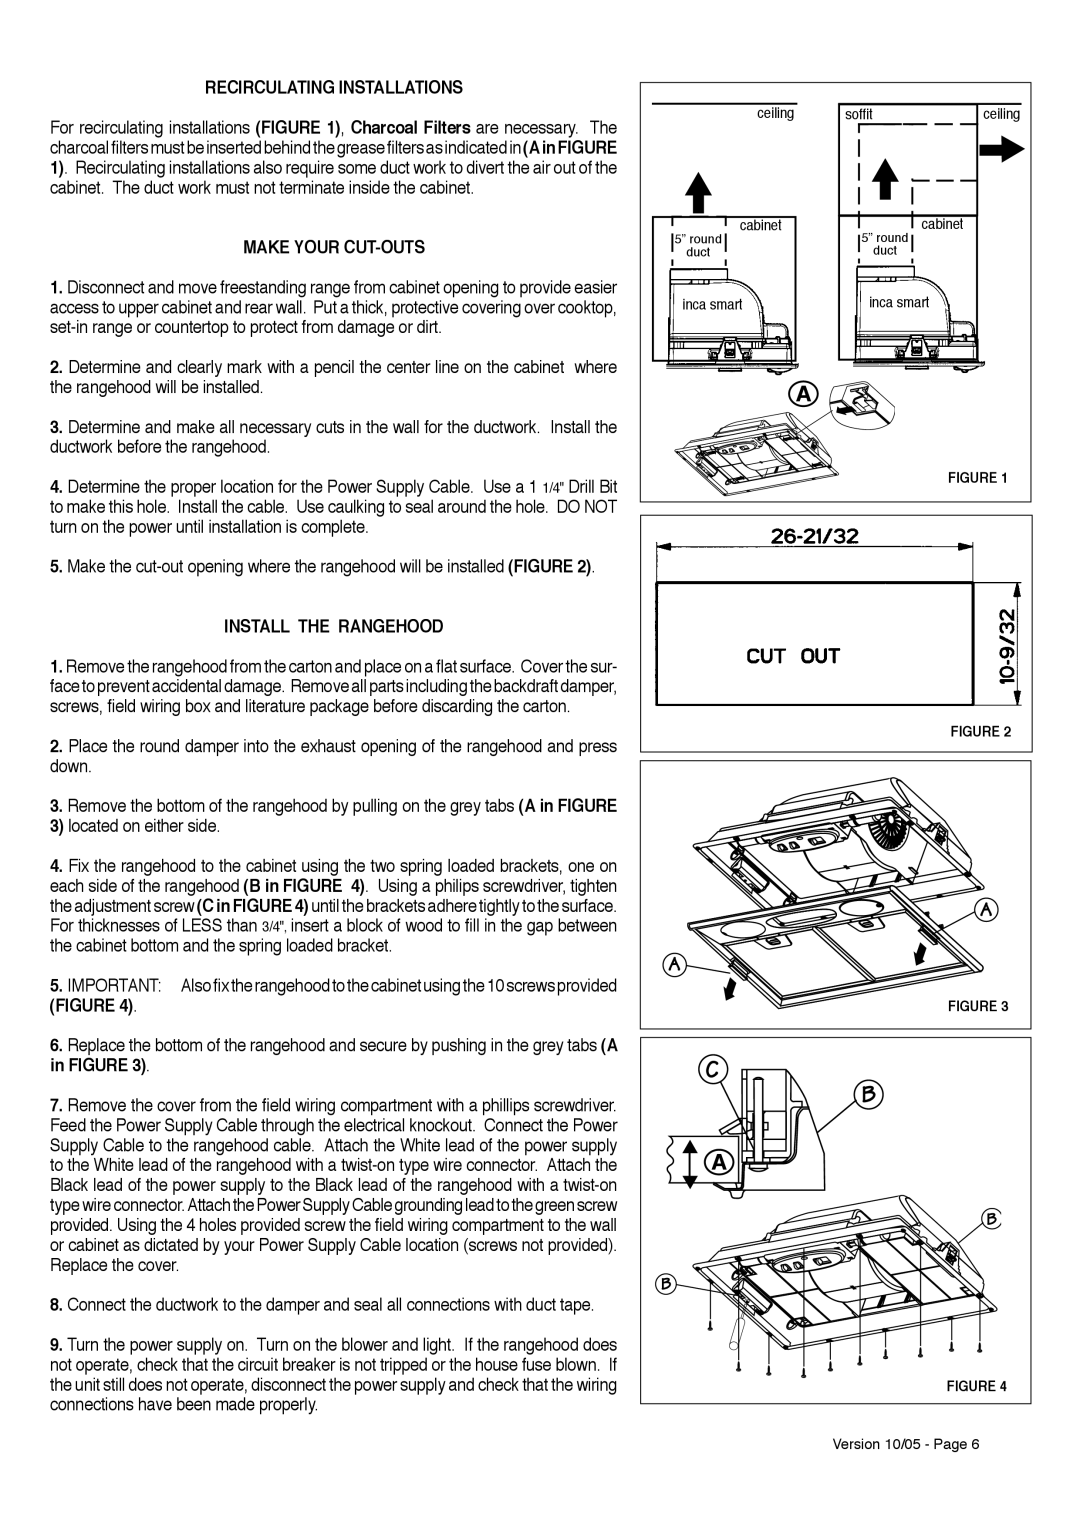
For recirculating installations (FIGURE 1), Charcoal Filters are necessary. The charcoalfiltersmustbeinsertedbehindthegreasefiltersasindicatedin(AinFIGURE 1). Recirculating installations also require some duct work to divert the air out of the cabinet. The duct work must not terminate inside the cabinet.

MAKE YOUR CUT-OUTS

1.Disconnect and move freestanding range from cabinet opening to provide easier access to upper cabinet and rear wall. Put a thick, protective covering over cooktop, set-in range or countertop to protect from damage or dirt.

2.Determine and clearly mark with a pencil the center line on the cabinet where the rangehood will be installed.

3.Determine and make all necessary cuts in the wall for the ductwork. Install the ductwork before the rangehood.

4.Determine the proper location for the Power Supply Cable. Use a 1 1/4" Drill Bit to make this hole. Install the cable. Use caulking to seal around the hole. DO NOT turn on the power until installation is complete.

5.Make the cut-out opening where the rangehood will be installed (FIGURE 2).

INSTALL THE RANGEHOOD

1.Remove the rangehood from the carton and place on a flat surface. Cover the sur- face to prevent accidental damage. Remove all parts including the backdraft damper, screws, field wiring box and literature package before discarding the carton.

2.Place the round damper into the exhaust opening of the rangehood and press down.

3.Remove the bottom of the rangehood by pulling on the grey tabs (A in FIGURE

3) located on either side.

4.Fix the rangehood to the cabinet using the two spring loaded brackets, one on each side of the rangehood (B in FIGURE 4). Using a philips screwdriver, tighten the adjustment screw (C in FIGURE 4) until the brackets adhere tightly to the surface. For thicknesses of LESS than 3/4", insert a block of wood to fill in the gap between the cabinet bottom and the spring loaded bracket.

5.IMPORTANT: Alsofixtherangehoodtothecabinetusingthe10screwsprovided (FIGURE 4).

6.Replace the bottom of the rangehood and secure by pushing in the grey tabs (A in FIGURE 3).

7.Remove the cover from the field wiring compartment with a phillips screwdriver. Feed the Power Supply Cable through the electrical knockout. Connect the Power Supply Cable to the rangehood cable. Attach the White lead of the power supply to the White lead of the rangehood with a twist-on type wire connector. Attach the Black lead of the power supply to the Black lead of the rangehood with a twist-on type wire connector.AttachthePowerSupplyCablegroundingleadtothegreenscrew provided. Using the 4 holes provided screw the field wiring compartment to the wall or cabinet as dictated by your Power Supply Cable location (screws not provided). Replace the cover.

8.Connect the ductwork to the damper and seal all connections with duct tape.

9.Turn the power supply on. Turn on the blower and light. If the rangehood does not operate, check that the circuit breaker is not tripped or the house fuse blown. If the unit still does not operate, disconnect the power supply and check that the wiring connections have been made properly.

ceiling

soffit

ceiling

cabinet

5” round

cabinet

5” round


duct

duct


inca smart

inca smart


A


FIGURE 1

FIGURE 2

FIGURE 3

A

FIGURE 4

Version 10/05 - Page 6

Page 6
Image 6
Faber INCA SMART installation instructions Recirculating Installations, Make Your CUT-OUTS, Install the Rangehood

INCA SMART specifications

The Faber INCA SMART is an innovative kitchen hood that combines advanced technology with stylish design to elevate the cooking experience. This appliance is not only functional but also serves as an aesthetic addition to modern kitchens. Its sleek, minimalist design ensures that it seamlessly blends into various kitchen decors while providing powerful performance.

One of the key features of the Faber INCA SMART is its powerful extraction capability. The hood is equipped with a high-efficiency motor that effectively removes smoke, odors, and steam from the kitchen, allowing for a pleasant cooking environment. With multiple speed settings, users can easily adjust the extraction power based on their culinary needs, ensuring optimal air quality at all times.

The INCA SMART also boasts advanced air filtration technology. The filters are designed to capture grease and particulates, ensuring the air in the kitchen remains clean and fresh. The grease filters are washable, making maintenance effortless and prolonging the lifespan of the appliance. Additionally, the option for charcoal filters allows for recirculation mode, making it suitable for spaces lacking external ventilation.

A standout feature of the Faber INCA SMART is its smart control system. This technology allows users to operate the hood effortlessly through a simple touch control panel. It features intuitive icons that make it easy to navigate settings, while the sleek lighting enhances visibility in the cooking area. The integrated LED lights not only illuminate the workspace but also consume less energy compared to traditional bulbs, making it an environmentally friendly choice.

Another significant characteristic of the INCA SMART is its low noise level. Faber has designed this kitchen hood to operate quietly, ensuring a peaceful cooking experience. This is particularly beneficial for open-plan living spaces where noise can easily carry between rooms.

Stylish and efficient, the Faber INCA SMART is available in various sizes to accommodate different kitchen layouts. Its versatile design options and advanced features make it a premium choice for homeowners seeking both functionality and aesthetics in their kitchen hoods. This appliance is perfect for anyone looking to enhance their culinary space while ensuring a clean and comfortable environment.