The Odor Sensor
If the air purifier senses odors in the air, the indicator bar will increase to a maximum of four (4) bars. Adjust the fan speed to a desired level. The air purifier will automatically adjust the fan speed when it is in “AUTO” mode. (Fig. 3)
Odor Sensor
Indicator Bar
Dust Sensor | Fig. 3 |
|
Indicator Bar | |
The Dust Sensor
When more dust is detected in the air the indicator bar will increase to a maximum of four (4) bars. Adjust the fan speed to desired level. The air purifier will automatically adjust the fan speed when it is in “AUTO” mode. (Fig. 3)
Ionizer
NOTE: The neutralize and the ionizer functions are silent features, the only way to know if they are “On” is with the indicator lights.
1.To turn the ionizer “On”, press the ionizer button on the control panel or the remote control. The ionizer “On/Off” indicator will illuminate when “On.
2.To turn this feature “Off”, depress the ionizer control button or remote button again. The ionizer “On/Off” indicator will no longer be illuminated. (Fig. 4)
| | | Ionizer |
| | | Indicator Light |
| | | |
| Ionizer | Fig. 4 |
| Button |
| |
Neutralize
The neutralize button turns the UV light “On” and begins the photo-catalysis process.
1.To turn the neutralize feature “On”, press the neutralize button on the control panel or the remote control. The neutralize indicator light will illuminate when the feature is “On”. (Fig. 5)
2.To turn this feature “Off” depress the neutralize button again on control panel or remote. The neutralize indicator light will no longer be illuminated.
Neutralize | Fig. 5 |
Indicator Light | Neutralize Button |
|
Using the Timer
The timer button has 5 different cycles for automatic shut off. To use the timer button:
1.Depress the timer control button to preset when the unit will turn “Off”.
2.With this feature, you have a choice of 1hr, 2 hrs, 4 hrs or 8 hrs. (Fig. 6)
Fig. 6
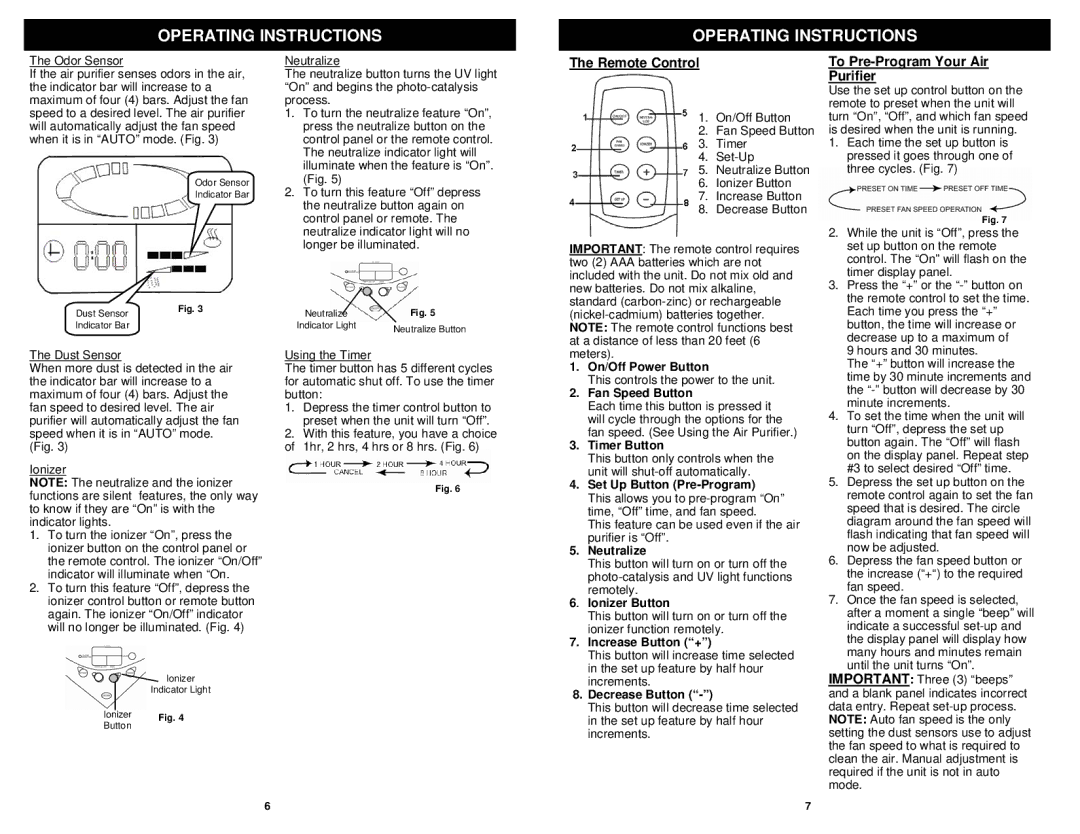
The Remote Control
1. On/Off Button
2. Fan Speed Button
3. Timer
4. Set-Up
5. Neutralize Button
6. Ionizer Button
7. Increase Button
8. Decrease Button
IMPORTANT: The remote control requires two (2) AAA batteries which are not included with the unit. Do not mix old and new batteries. Do not mix alkaline, standard (carbon-zinc) or rechargeable (nickel-cadmium) batteries together. NOTE: The remote control functions best at a distance of less than 20 feet (6 meters).
1.On/Off Power Button
This controls the power to the unit.
2.Fan Speed Button
Each time this button is pressed it will cycle through the options for the fan speed. (See Using the Air Purifier.)
3.Timer Button
This button only controls when the unit will shut-off automatically.
4.Set Up Button (Pre-Program) This allows you to pre-program “On” time, “Off” time, and fan speed.
This feature can be used even if the air purifier is “Off”.
5.Neutralize
This button will turn on or turn off the photo-catalysis and UV light functions
remotely.
6. Ionizer Button
This button will turn on or turn off the ionizer function remotely.
7.Increase Button (“+”)
This button will increase time selected in the set up feature by half hour increments.
8.Decrease Button (“-”)
This button will decrease time selected in the set up feature by half hour increments.
To Pre-Program Your Air Purifier
Use the set up control button on the remote to preset when the unit will turn “On”, “Off”, and which fan speed is desired when the unit is running.
1.Each time the set up button is pressed it goes through one of three cycles. (Fig. 7)
Fig. 7
2.While the unit is “Off”, press the set up button on the remote control. The “On” will flash on the timer display panel.
3.Press the “+” or the “-” button on the remote control to set the time. Each time you press the “+” button, the time will increase or decrease up to a maximum of
9 hours and 30 minutes.
The “+” button will increase the time by 30 minute increments and the “-” button will decrease by 30 minute increments.
4.To set the time when the unit will turn “Off”, depress the set up button again. The “Off” will flash on the display panel. Repeat step #3 to select desired “Off” time.
5.Depress the set up button on the remote control again to set the fan speed that is desired. The circle diagram around the fan speed will flash indicating that fan speed will now be adjusted.
6.Depress the fan speed button or the increase (“+“) to the required fan speed.
7.Once the fan speed is selected, after a moment a single “beep” will indicate a successful set-up and the display panel will display how many hours and minutes remain until the unit turns “On”.
IMPORTANT: Three (3) “beeps” and a blank panel indicates incorrect data entry. Repeat set-up process. NOTE: Auto fan speed is the only setting the dust sensors use to adjust the fan speed to what is required to clean the air. Manual adjustment is required if the unit is not in auto mode.