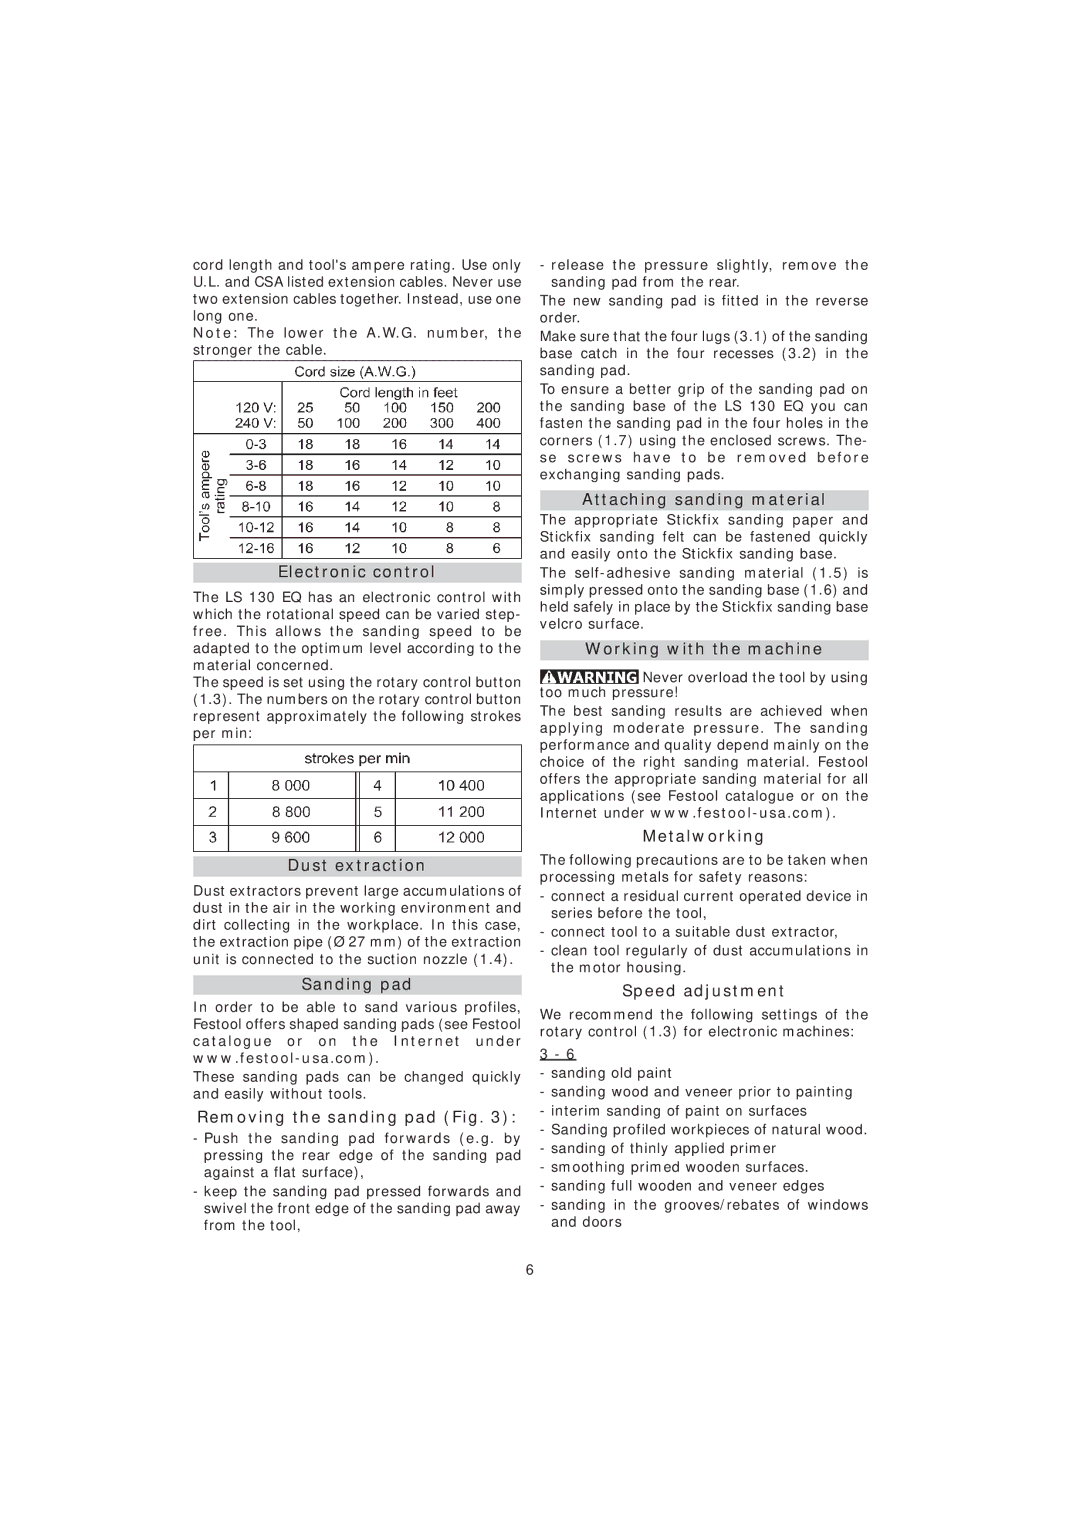
cord length and tool's ampere rating. Use only U.L. and CSA listed extension cables. Never use two extension cables together. Instead, use one long one.
Note: The lower the A.W.G. number, the stronger the cable.
Electronic control
The LS 130 EQ has an electronic control with which the rotational speed can be varied step- free. This allows the sanding speed to be adapted to the optimum level according to the material concerned.
The speed is set using the rotary control button (1.3). The numbers on the rotary control button represent approximately the following strokes per min:
Dust extraction
Dust extractors prevent large accumulations of dust in the air in the working environment and dirt collecting in the workplace. In this case, the extraction pipe (Ø 27 mm) of the extraction unit is connected to the suction nozzle (1.4).
Sanding pad
In order to be able to sand various profiles, Festool offers shaped sanding pads (see Festool catalogue or on the Internet under
These sanding pads can be changed quickly and easily without tools.
Removing the sanding pad (Fig. 3):
-Push the sanding pad forwards (e.g. by pressing the rear edge of the sanding pad against a flat surface),
-keep the sanding pad pressed forwards and swivel the front edge of the sanding pad away from the tool,
-release the pressure slightly, remove the sanding pad from the rear.
The new sanding pad is fitted in the reverse order.
Make sure that the four lugs (3.1) of the sanding base catch in the four recesses (3.2) in the sanding pad.
To ensure a better grip of the sanding pad on the sanding base of the LS 130 EQ you can fasten the sanding pad in the four holes in the corners (1.7) using the enclosed screws. The- se screws have to be removed before exchanging sanding pads.
Attaching sanding material
The appropriate Stickfix sanding paper and Stickfix sanding felt can be fastened quickly and easily onto the Stickfix sanding base.
The
Working with the machine
![]() Never overload the tool by using too much pressure!
Never overload the tool by using too much pressure!
The best sanding results are achieved when applying moderate pressure. The sanding performance and quality depend mainly on the choice of the right sanding material. Festool offers the appropriate sanding material for all applications (see Festool catalogue or on the Internet under
Metalworking
The following precautions are to be taken when processing metals for safety reasons:
-connect a residual current operated device in series before the tool,
-connect tool to a suitable dust extractor,
-clean tool regularly of dust accumulations in the motor housing.
Speed adjustment
We recommend the following settings of the rotary control (1.3) for electronic machines:
3 - 6
-sanding old paint
-sanding wood and veneer prior to painting
-interim sanding of paint on surfaces
-Sanding profiled workpieces of natural wood.
-sanding of thinly applied primer
-smoothing primed wooden surfaces.
-sanding full wooden and veneer edges
-sanding in the grooves/rebates of windows and doors
6
