Irmount R
Table of Contents
Introduction
Advantages of Firestone Airstroke Actuators
Advantages of Firestone Airmount Isolators
AIR Spring
Bellows Construction
Convoluted AIR Springs
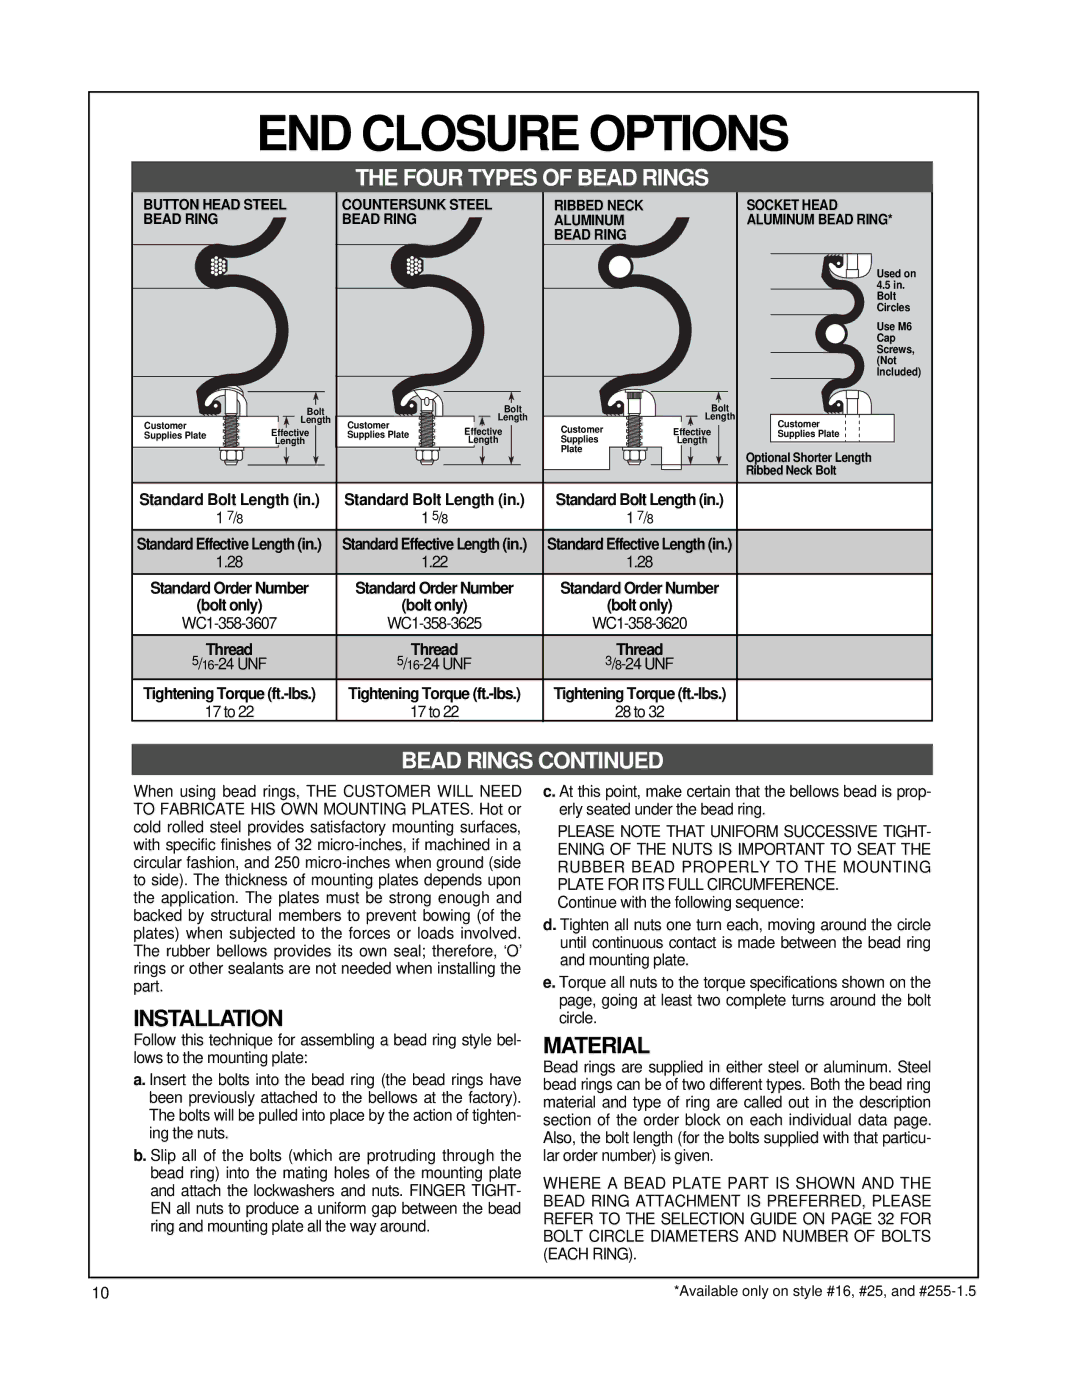
END Closure Options
Reversible Sleeve AIR Springs
UNC Thread Firestone
16 UNC To Air Supply Blind Nut Deep
Tightening Torque On the blind nut 15 to 20 ft.-lbs
Attach the air spring, a Stud Adapter is available from
Steel Bead Rings
Nuts and Lockwashers are included with
Large Parts with Aluminum Bead Rings
Standard Bolt Length
Installation
Material
16-24 UNF
Large Convoluted AIR Springs
9mm
752 180
HOW to USE Static Data Chart
Airstroke Actuation
349
Airmount Isolation
Internal Rubber Bumpers
Pressure
Temperature
Media
Contaminates
Down and UP Stops
Airstroke Actuation
Selection
Return
Stacking
Horizontal Misalignment
Design Envelope
Fail Safe Devices
Style
TE Style
Airstroke Actuator Problem Solvers
Forming Press
Vertical Actuated Drive Table Scissor Lift
Airmount Vibration Isolation
Selection and Isolation Formula
Dynamic Spring Rate Formula
Natural Frequency Formula
Lateral Rates and Stability
Center of Gravity
Height Lateral Rate Vertical Rate
Isolating AN Unbalanced Mass
Safety Stops
Initial Installation
LOW Pressure Operation
Plumbing Systems
Damping
Description Order No
Resonance
Isolation Chart Hertz CPM
Percent
Airmount Isolation Problem Solvers
Airmount Isolation Problem Solvers
Miscellaneous Applications
Miscellaneous Problem Solvers
Miscellaneous Problem Solvers
470 410 360
450 400
600 500
10.8
Type 3 bead plate
Type 1 bead plate
Type 2 bead plate
Type 4 bead ring Type 5 rolled plate
Shaded area without
Dynamic Characteristics at 2.5 in. Design Height
1M1A
Consulting Firestone
Description
1M1A-1
Static Data
Ply Brass studs WO2-358-3004
2M1A
Style NPT, each end 2M1A Plastic studs WO2-358-3002
Throughout the stroke
Style Blind nut,1/8 NPT 2M2A Plastic studs WO2-358-3008
2M2A
Psig
Blind nuts lower plate
Style Blind nuts, 1/4 NPT Blind nuts, 3/4 NPT
NPT only upper plate
Rubber bellows only
Shaded area
25 lbs
Style Blind nuts, 1/4 NPT 131 Blind nuts, 3/4 NPT
131
32 lbs
WO1-358-0112
110
Rubber bellows only WO1-358-0100
Strength
116
WO1-358-7606
Area without Consulting Firestone
Dynamic Characteristics at 5.5 in. Design Height
116-1
37 lbs
Volume
115
WO1-358-7023
Dynamic Characteristics at 5.0 in. Design Height
Rubber bellows only WO1-358-0134
Style Blind nuts, 1/4 NPT WO1-358-7040 19-.75
19-.75
10.0 lbs
113
14.5 lbs
Style Blind nuts, 3/4 NPT WO1-358-8160 128-1 High Strength
113-1
15.2 lbs
17.1 lbs
Dynamic Characteristics at 6.0 in. Design Height
Frequency
Do not use Airstroke
119
13.2 lbs
Static Data Description
Able with rolled plates. See page 11 for explanation
126
Rolled Plate Assembly Ply
Bellows Blind nuts, 3/4 NPT WO1-358-7726
WO1-358-0147
Rubber bellows only High Strength
24.5 lbs
148-1
This bead ring
No blind nuts
Ply NPT both ends
No girdle hoop
255-1.5
50 lbs
Able with bead rings. See pages 8-10 for explanation
Dynamic Characteristics at 6.5 in. Design Height
224
14 lbs
Rubber bellows only WO1-358-0142
Style Blind nuts, 1/4 NPT WO1-358-7325
Blind nuts, 3/4 NPT WO1-358-7327
Shaded area without Consulting Firestone
Dynamic Characteristics at 8.5 in. Design Height
X100
20-2
Use
Dynamic Characteristics at 9.5 in. Design Height
Style Blind nuts, 1/4 NPT WO1-358-7444 22-1.5
Dynamic Characteristics at 10.5 in. Design Height
22-1.5
12.9 lbs
100x
21-2
Minimum height
Style Blind nuts, 1/4 NPT
Dynamic Characteristics at 11.25 in. Design Height
233-2
233-2 Blind nuts, 1/4 NPT Two Rubber bumper
Style Two Ply Bellows
19.0 lbs
8 bolts, nuts, washers WO1-358-7227
203
Style Ribbed neck aluminum bead 203 Rings equal spacing
Ribbed neck aluminum bead Ply
Rubber bellows only WO1-139-0207
WO1-358-7239
28.8 lbs
200 Rings equal spacing
200
Style
WO1-358-7775
215 Rings equal spacing
215
Style Ribbed neck aluminum bead
WO1-358-7301 Ribbed neck aluminum bead Bellows
72.5 lbs
Bead ring Dynamic Characteristics at 11.0 in. Design Height
248-2
Force to collapse to minimum height @ 0 PSIG.... lbs
352
Dynamic Characteristics at 13.5 in. Design Height
20.3 lbs
Style Blind nuts, 1/4 NPT 313
Dynamic Characteristics at 13.0 in. Design Height
313
46 lbs
Dynamic Characteristics at 14.70 in. Design Height
333
WO1-358-7760
312
WO1-358-8004
Rubber bellows only WO1-358-7921
323
Do not
Rubber bellows only WO1-358-0987
Dynamic Characteristics at 14.0 in. Design Height
320
Without
WO1-358-7306
Dynamic Characteristics at 15.0 in. Design Height
321
Rubber bellows only WO1-358-7919
348-3
1X84D
Style Thin wall assembly 1X84D-1 Without cap WO1-358-9188
Dynamic Characteristics at 8.0 in. Design Height
With cap dotted line WO1-358-9190
4001
Style Blind nut, 1/8 NPT WO2-358-4001
7002
Style Blind nut, 1/8 NPT WO2-358-7002
7010
Style Blind nut, 1/8 NPT WO2-358-7010
7012
Style Blind nut, 1/8 NPT WO2-358-7012
Ring bolts, nuts, washers not
1T12E-3
Ply Included, use cap screws WO1-358-8118
1T14C-1
Style Blind nuts, 1/4 NPT WO1-358-5405 1T14C-3
1T14C-3
Than 10 Psig internal pressure
1T14C-7
Style Blind nuts, 1/4 NPT WO1-358-5743 1T28C-7 High Strength
Dynamic Characteristics at 7.0 in. Design Height
10.4 lbs
1T15S
13.7 lbs
Style Blind nuts, 1/4 NPT WO1-358-9414 1T15L-4
15.5 lbs
Available with a bead ring. Bolts are not included
Dynamic Characteristics at 7.5 in. Design Height
Static Data
140
WO1-358-9053 Two Blind nuts, 3/4 NPT WO1-358-9054
1T15M-2
WO1-358-9099
1T15M
Dynamic Characteristics at 12.5 in. Design Height
14.3 lbs
Assembly weight bead plate version, no bumper .... .7 lbs
Blind nuts, 3/4 NPT piston Not included WO1-358-0730
18.0 lbs
Blind nuts, 3/4 NPT WO1-358-9172
Style Blind nuts, 1/4 NPT WO1-358-9148
1T19L-7 Blind nuts, 1/4 NPT, bumper WO1-358-9149
Ply Blind nuts, 3/4 NPT, bumper WO1-358-9160
1T19L
22.6 lbs
Index
Airstroke Actuator Design Parameter Worksheet
Airmount Isolator Design Parameter Worksheet
For Vibration Isolation
Airstroke

